This commented project is an introduction to the different elements provided by Blynk in a real application.
The project includes a LaunchPad CC3200, a Grove BoosterPack, and the following Grove modules: a BMP180 barometer and thermometer, a DHT hygrometer and thermometer, a PIR sensor and a relay.
Seeed Studio has posted a warning about the compatibility of the Grove BoosterPack with the CC3200 LaunchPad. This warning is new and didn't exist when I created this project.
The analog inputs of the CC3200 are limited to 1.5 V, making it incompatible with the Grove BoosterPack, which analog sensors operate at 3.3 V.
Now, this project only uses digital pins at 3.3 V. However, if you don't feel comfortable with this, consider another LaunchPad with the CC3100 BoosterPack instead.
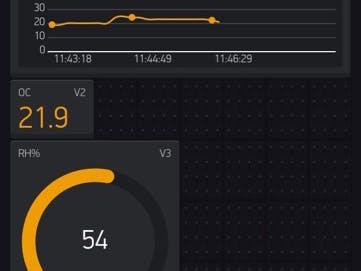
On the Blynk application, I've defined 6 virtual pins and one digital output pin, listed below:
- V0 temperature from BMP180, read
- V1 pressure from BMP180, read
- V2 temperature from DHT, read
- V3 humidity from DHT, read
- V4 alarm LED, read
- V5 reset from remote, write
- D23 A/C relay
The hardware includes a LaunchPad CC3200 and a Grove BoosterPack with 4 elements: a PIR detector (input pin 27), a DHT22 temperature and humidity sensor (input pin 24), a BMP180 pressure sensor (I²C port) and a relay (output pin 23).
Create a new project, select the board as Generic Board and name it.
E-mail the authorization string and copy-paste it on the project.
For each element, select it from the list. A new pane appears. Name the element (here oC).
Associate the element to a pin (here V0 for virtual 0). Set the frequency (here every 10 seconds). Set the minimum and maximum (here 40), and choose the option (here Line). Finally, press OK to add it to the project.
Do the same for the pressure with virtual pin V1.
On the sketch, the code uses the BLYNK_READ() function.
The function is called by the application on the iPhone, reads the data from the BMP180 sensor, and sends the two values, temperature to virtual 0 and pressure to virtual 1.d>
Same definitions of the elements on the interface for the data from the DHT sensor, with temperature to virtual 2 and pressure to virtual 3.
Similar BLYNK_READ() function on the sketch applies for the DHT sensor, with temperature to virtual 2 and relative humidity to virtual 3.
The LED turns red and stays on when the alarm is detected by the PIR sensor.
Select the LED element and associate it to the V4 virtual pin.
The PIR sensor is checked every second. If an intrusion is detected, the red LED on the board is turned on and the alarm flag raised accordingly.
The value of the alarm flag is sent to virtual pin 4.
The RESET button is a push button and sends a message to virtual pin 5.
On the sketch, the code uses the BLYNK_WRITE() function.
The function is called by the application on the iPhone and reads the state of the button from virtual 5, then clears the alarm flag if true.
The A/C button is a switch button associated with digital pin 23. The signal on pin 23 drives the relay. Select blue as colour of the button.
This application can also run on a local server, for example a BeagleBone. Check out the Private IoT with Blynk on Local Server
Links- Blynk for LaunchPad CC3200 library now included in the mainstream Blynk distribution
- BMP180, DHT and PIR are standard libraries
- Main sketch blynkweather.ino


Comments
Please log in or sign up to comment.