


Hardware components | ||||||
| × | 1 | ||||
 |
| × | 1 | |||
| × | 1 | ||||
 |
| × | 1 | |||
 |
| × | 1 | |||
 |
| × | 1 | |||
 |
| × | 1 | |||
| × | 1 | ||||
Software apps and online services | ||||||
 |
| |||||
 |
| |||||
.png?auto=compress%2Cformat&w=48&h=48&fit=fill&bg=ffffff) |
| |||||
 |
| |||||
1.) Hardware Components Description
A.) Setting up the Soil Moisture Sensor
· Soil Moisture Sensor or Hygrometer is usually used to detect the humidity of the soil.
· It is used to sense the current moisture level in the soil and if it's below the threshold I will receive a message to water my plants
· Sensor consists of 2 pieces:
Ø Electronic Board
Ø Probe with 2 pads
· Sensor has built-in a potentiometer for sensitivity adjustment.
· Voltage of the sensor output changes to the content of water in the soil.
WET: Output Voltage decreases.DRY: Output Voltage increases.
B.) Single-channel relay 5V:
The relay is used to turn on and off the pump automatically as the required water level is reached. The relay is what makes the system to automatic. A single channel relay consists of 3 input pins and 3 output terminals. The 3 input pins are:
· "IN": The signal pin to turn off or on the relay. This will be connected to GPIO pins(0, 1, 2, 3, 4) of the Bolt IoT Wi-Fi module. In this system when the water tank is full and a signal will be sent to the relay to turn it on, this action will turn off the water pump. When the tank is empty, a signal will be sent to the relay to turn it off, this action will turn on the water pump.
· "GND": For ground connections
· "VCC": For supply power to the relay. Recommended power is 5V
The 3 outputs terminals are:
· "COM": Common terminal, which will be linked to the "NC" terminal when the relay is off. This +ve wire from the battery is connected to the "COM" terminal.
· "NC": Normally closed terminal, which will be linked to the "COM" terminal when the relay is off. The phase wire from the water pump is connected to the "NC" terminal. When COM is linked to theNC terminal the water pump is on.
· "NO": Normally opened terminal, which will be linked to the "COM" terminal only when the relay is turned on by applying a HIGH signal from GPIO pins. When COM is linked to NO terminal the water pump is turned off.
C.) Micro Submersible water pump 5V:
For pumping water from the groundwater reservoir to the water tank( in this case a water reservoir)
D.) Bolt IoT Wi-Fi module relay 5V:
It is the brain for this whole system. The ESP8266 chip receives the analog input signal from the REES52 water level sensor via "A0" pins, then computes and processes the data through the bolt cloud, and sends a digital signal to the "IN" pin of the relay via GPIO pins (0, 1, 2, 3, 4).
E.) Jumper wires:
These are used to connect the sensor, relay, and Bolt IoT Wi-Fi module for transmitting and receiving various signals for the working of the system.
F.) USB cable:
The USB cable is connected to the Micro-USB port and GND pins. It provides the required power for the working for the REES52 sensor, relay, and the Bolt IoT Wi-Fi module.
G.) Battery: The water pump is powered by using two AA batteries.(9Volt battery
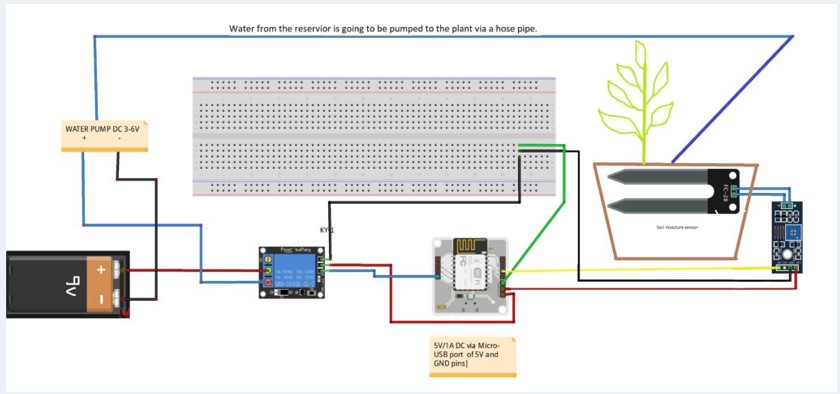
2.) STEPS :A.) Hardware Setupi. Do the connections as shown in the schematics given below.
ii. Place the water pump in the reservoir. The delivery pipe of the pump is placed into the plant pot.
iii. Create a product on bolt cloud: - https://cloud.boltiot.com/
iv. Choose the product as Input devices and collect data through GPIO
v. Go to the Products > click on the product that you have created > then click on configure options
vi. In the hardware tab set 'data collection rate' as 5 minutes.
vii. Name the A0 Analog pin has 'soil_moisture' (any variable name).
viii. Go to the code tab, give a name then put extension as 'js'.
ix. Write the following JavaScript code given below.
x. Download VMWare software from https://my.vmware.com/web/vmware/free#desktop_end_user_computing/vmware_workstation_player/12_0 or
xi. Download Ubuntu Server ISO from http://releases.ubuntu.com/16.04/ubuntu-16.04.6-server-i386.iso
xii. Install this software.
xiii. Now in your Ubuntu Server type in your python code. (Refer the code below) Be careful that API key, device ID, telegram Bot ID, Twilio number are correct.
xiv. Now run the python code after power on the Bolt IOT Wi-Fi module.
B.) Creating the commands to control the GPIO on the Boltwifi device via Alexa· Pump used is an output device and we will have to give 2 inputs so we will use the digitalMultiWrite command that can be sent to Bolt over the internet to turn on the motor.
The structure of the command is:
https://cloud.boltiot.com/remote/API_KEY/digitalMultiWrite?pins=PIN_NUMBER, PIN_NUMBER&states=HIGH/LOW, HIGH/LOW&deviceName=DEVICE_ID
· The parameters that you need to replace are :
i. API_KEY: You can get it from theAPI tab on thecloud dashboard.
ii. PIN_NUMBER: Pins to which you have connected the motor. Values can be either 0, 1, 2, 3 or 4
iii. HIGH/LOW: This value indicates if you want to turn on/off the LED. HIGH will turn it on, LOW will turn it off.
iv. DEVICE_ID: The id of your device. You can get it from thecloud dashboard.
· The sample command to turn the motor ON connected to adevice having ID BOLT13819450 to PIN 1and2 is:
https://cloud.boltiot.com/remote/f1f918e9-d9c2-4e5b-aed0b7cb743f74cf/digitalMultiWrite?pins=1, 2 &states=HIGH, LOW&deviceName=BOLT13819450
· Make sure that you change the API Key to your own API Key and device ID which you will get from your Bolt Account.
· If you have connected the motor to any other pins other than Pin 1 and 2 then make a suitable change in the pin no in your code.
C.) Creating Applet on IFTTT1.) Steps to turn on Watering the plants
· Go to IFTTT to create a new applet by clicking here.
· Login using your Gmail account or sign up manually.
· Click on '+This' to create the trigger.
· Type Alexa and select it.
· Choose Say Specific Phrase
· Type the phrase you want to trigger the action. Make sure to specify the trigger command like
1. Alexa trigger watering my plants on / off
2. Alexa trigger watering on/off
3. Alexa triggers it!
· Now what we going to do is that we are triggering Alexa to water the plants.
We need to perform the action of pumping the water from the reservoir.
So select Then That.
· Select Webhook.
· Enter the API URL accordingly as shown below
Here is how your screen will look like
https://cloud.boltiot.com/remote/API_KEY/digitalMultiWrite?pins=PIN_NUMBER, PIN_NUMBER&states=HIGH/LOW, HIGH/LOW&deviceName=DEVICE_ID
Ø Make sure that you change the API Key and device name.
Ø Method will be GET
Ø Content-type will be Application/JSON
· Click on 'Create Action' and then Click on 'Finish'
2.) Steps to turn off Watering the plants
Now do the same process again as mentioned above for a command to switch of the motor. Here you will change the states i.e. states=LOW, LOW in your code. Here is a sample of the code. Also, add a suitable phrase to switch off the motor.
https://cloud.boltiot.com/remote/API_KEY/digitalMultiWrite?pins=PIN_NUMBER, PIN_NUMBER&states=LOW,&deviceName=DEVICE_ID
D.) Creating an account on Twilio
Twilio provides a free trial account so that you can experience its services. We will be using Twilio to send an SMS later on by using a Python program.
3.)Steps to sign up on Twilio
Step 1 - Open Twilio
· Open www.twilio.com on your browser. Click on the “Sign up” button to go to the Signup page.
Step 2 - Fill in the signup form
· Fill in the sign-up form with your details. You will need to enter your first and last name, email ID, and a 14 digit password.
· Read and accept the checkbox for Terms of Service and Privacy policy of Twilio and then click on “Start your free trial”.
Step 3 - Complete the verification process
· To start using Twilio’s services, you will need to verify your email address and your mobile number.
· You will need to verify your email address first. Twilio will have sent an email to your inbox with a link to verify your email address. Read the email and follow the instructions given in the email to verify your email address.
· Once you have verified your email address, you will then need to verify your mobile number. For this, in the next screen, enter your 10-digit mobile number and click on “Verify”. They will send an OTP to this number for verification.
· Once you have received the OTP code on your mobile number, enter it on the screen and click on “Submit”.
· Now, your account has been verified and you are now one step closer to sending SMSs via Twilio. Now, Twilio will onboard you once your mobile number has been verified.
Step 4 - Onboarding process
· For the onboarding process, you will be asked a few questions on what you plan to do with the Twilio account. Since we will be using the Twilio account to send SMSs via Python code, we will choose the options accordingly.
· Firstly, choose the option “Yes” when asked if you write code. Since we will be writing code to send SMS, this is applicable for us.
· Now, on the next screen, click on Python as we will be writing the code in Python to send the SMS.
· Choose the option “Use Twilio in a project” when asked for the question “What is your goal today?”
· Select “Send or receive an SMS” when asked, “What do you want to do first?”
· When you click on this option, you will then be redirected to the Twilio dashboard.
Step 5 - Get credentials
· Now the onboarding process is completed, we now need to get the credentials for sending the SMS in our python code.
· On the dashboard, search for the button “Get a trial number” and click on it. This should be highlighted for you if you have just completed the onboarding process. We need a trial number in order to send an SMS from Twilio.
· When you click on the button, it will open a popup asking you to choose a number.
· Once you have finalized the number, click on “Choose this number”.
· Now, we have all the credentials required to send an SMS via Twilio. On the dashboard, as highlighted in the picture below, you will need three items.
· Your trial number is the “from number” you will be receiving the SMS from.
· Your account SID and Auth token are highlighted. In order to view the Auth token, you may need to click on the “Show” button next to it.
· Please note these credentials as it will be required.
4.) WORKING OF THE PRODUCT :· Whenever moisture of the soil decreases the message is sent from the Twilio account.
· On seeing the message, I will trigger Alexa to water my plants, and hence the water from the reservoir will start to pump water into the plant
5.) Software ProgrammingRefer to the following GitHub link for the code.https://github.com/ridhap/ALEXA-VOICE-CONTROLLED-SMART-IRRIGATION-SYSTEM
Conclusion
Hence the main intention of this project is to make sure that the plants don't die and how we can use voice to control a simple routine of watering the plants and make it easier for us.
Thank you!! Below is the YouTube link regards to the demo of the project, please do check it out.https://www.youtube.com/watch?v=IOguM5ISOXQ


Comments
Please log in or sign up to comment.