OVERVIEW:
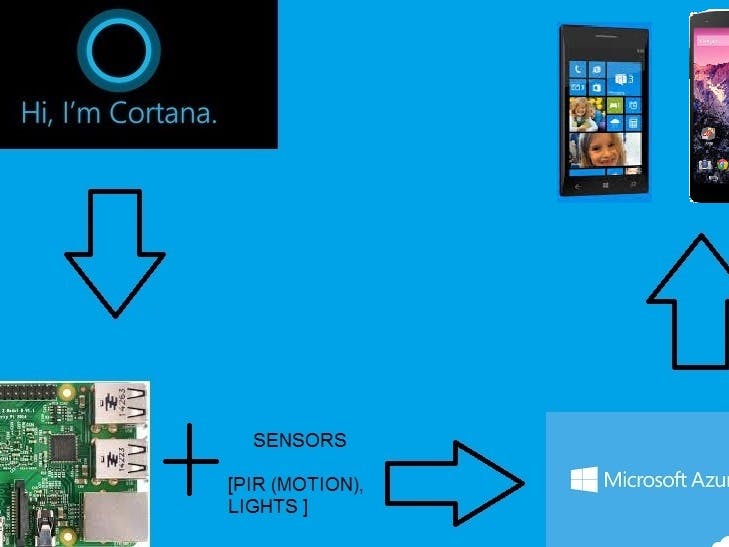
We all know how Home Automation has been integrated into our day to day lives - from controlling window panes to making a secure house free from theft. I plan on going even a step forward by integrating simple sensors that I have lying around in my house and make a secure system that not only detects any activity inside the house but also informs the person of impending fire hazards and thefts. All of this will be sensed via the Raspberry Pi 2 and and sent to the user via a mobile app implementing Microsoft Azure services.
I. SETTING UP VS2015
(I'm assuming you've already installed Visual Studio 2015 Community or Professional, if not just download it from here - http://go.microsoft.com/fwlink/?LinkID=534599)
i) Search for Windows IoT Core Project Templates directly from Visual Studio in the Extension and Updates dialog (Tools > Extensions and Updates > Online).
ii) Make sure you’ve enabled developer mode on your mobile and desktop.
NOTE: If you're using pre-existing Visual Studio version, then
do a Custom install and select the checkbox Universal Windows App Development Tools -> Tools and Windows SDK.
-----------------------------------------------------------------------
II. RASPBERRY PI 2 - HARDWARE SETUP
STEP 1:
Setting up Windows 10 IoT Core.
i. Download the ISO for the Raspberry Pi 2 from the Microsoft Download Center.
ii. Save the ISO to a local folder.
iii. Double click on the ISO (IoT Core RPi.iso).
iv. Install Windows_10_IoT_Core.msi.
v. When installation is complete, flash.ffu will be located at C:\Program Files (x86)\Microsoft IoT\FFU\RaspberryPi2.
vi. Unmount the local drive.
1. Insert Memory Card into Memory Card Reader
2. Use IoTCoreImageHelper.exe to flash the SD card. Search for “WindowsIoT” from start menu and select the shortcut “WindowsIoTImageHelper”
3. The tool will enumerate devices. Select the SD card you want to flash and then provide the location of the ffu and flash the image.
4. Click on the Safely Remove Hardware icon in your task tray and select your USB SD card reader to safely remove it from the system. Failing to do this can cause corruption of the image.
STEP 3:
1. Insert the micro SD card (the slot is on the opposite side of the board as shown below).
2. Connect a network cable from your local network to the Ethernet port on the board. Make sure your development PC is on the same network.
3. Connect an HDMI monitor to the HDMI port on the board.
4. Connect the power supply to the micro USB port on the board.
STEP 4: >
Boot Raspberry Pi.
NOTE: It is highly recommended that you update the default password for the Administrator account. To do this, issue the following commands in your PowerShell connection:
net user Administrator [new password] , where new password is where you'd be inputting your own password.
-----------------------------------------------------------------------
III. RASPBERRY PI 2 - SOFTWARE SETUP
Now that we have the Raspberry Pi 2 up and running we move on to the next step, i.e. make it a IoT slave. It will do what it is told to do, i.e Switch ON/OFF lights when it detects nobody is at home.
1. We will need to install the software packages needed to interact with our Azure Account. This would be done via the Python SDK for Azure. Use git to clone the repo down and install it on your machine.
2. We have quite a few libraries to be imported now. As we are also controlling the pins, we will need to import the GPIO functionality as well. Although it won't even compile right now (we're missing that process_messages function!). But we'd be setting up the structure for how our IoT devices will work.
This is how imports should look like:
import RPi.GPIO as GPIO #For Controlling the Pins<br>import threading #To Run Async
import sys
import select
from azure.servicebus import *
import os
3. Though, it may seem a bit trivial, but it will also help a lot with understanding the connection between Azure and Python. The code is pretty straight forward:
AZURE_SERVICEBUS_NAMESPACE='CustomNamespace'
AZURE_SERVICEBUS_SHARED_KEY_NAME='RootManageSharedAccessKey'
AZURE_SERVICEBUS_ACCESS_KEY_VALUE='<INSERT_YOUR_ACCESS_KEY_HERE>'
GPIO_BCM_PIN = 11 #The Pin your LED is controlled by
The 'namespace' and 'GPIO' variables should be pretty obvious, but the middle two could cause some confusion. Essentially, this is your special "login Key' that will grant access to your Azure Service Bus. For now, don't worry about it (We'll find out where to get this Key in the next step!).
4. Whenever we start our program, we would want to give our Lights, and other electrical appliances a specific state. In this case, we will set it to 'OFF"
# setup the GPIO for the LED
GPIO.setmode(GPIO.BCM)
GPIO.setup(GPIO_BCM_PIN,GPIO.OUT)
# Initially turn off the LED
GPIO.output(GPIO_BCM_PIN, 0)
Then, we will create a thread and have it target a new function (which we have not created yet) called process_messages. We will create this function in the next step. For now, let's create and start the thread.
# start a thread listening for incoming messages
t = threading.Thread(target=process_messages) #will create 'process_messages' next step
t.daemon=True;
t.start()
# wait until the user enters something
char = raw_input("Press enter to exit program")
# release any GPIO resources
GPIO.cleanup()
-----------------------------------------------------------------------
IV. SETTING UP AZURE
Now that the RPi2 is set up, it's time to move the data to the cloud. For this, we'd be going to make a Service Bus that will process Topic and Subscriptions. Steps are as follows (considering that you already have an Azure account. I'm a Microsoft Student Partner, so I already had access to Azure.)
2. Creating a topic
3. Creating a Subscription
4. Write code for the Subscription
We will now be using the Python Azure SDK to actively listen for messages from the Azure subscription and update our LED's accordingly. This will be done by Initializing the Service Bus Object , i.e Getting the Topic and Subscription, looping the logic and finally insert Azure Key (Primary and Secondary).
-----------------------------------------------------------------------
V. USING VOICE ASSISTANCE (WINDOWS AND ANDROID)
I'd be hard-coding Cortana to respond to distinct phrases:
"Turn my lights/fan Off" - Will send a message to the Azure Service Bus to turn off the lights/fan.
"Turn my lights/fan On" - Will send a message to the Azure Service Bus to turn on the lights/fan.
"Check Temperature" - Will send a message to the Azure Service Bus to check temperature and send back the temperature of your room and/or garden.
"Activate Camera" - Will send a message to the Azure Service Bus to switch on cameras installed inside the house
SSML - Speech Synthesis Markup Language is how we tell Cortana what phrases to listen to and basic responses.
Installing - On the first install of the app, we won't be able to interact with our app through Cortana until we manually start the app for the first time. This is because opening our app installs the voice commands Cortana needs to recognize the app.
Pick your App name Wisely - We can't directly interact with our app through Cortana, we have to tell Cortana that we want to use the commands from a specific app, rather than her general list. So, we have to say "HomeAuto, what is the temperature?". This tells Cortana that the command '
what is the temperature? ' belongs to the 'HomeAuto' and she should consult that app to give the proper feedback.
NOTE: You woud encounter issues once you paste the code into your project so follow the following steps:
- Right Click on the WindowsPhone project and select 'Manage NuGet Packages...'
- Search for 'Json' in the search bar on the upper right, and click on 'Json.NET', then 'Install'
- Close out of the Package Manager
Great, we've got the libraries we need. Now we need to enable the 'Microphone' and 'Internet' capabilities for our app. This will let our app allow us to use Cortana and post messages to our Azure Service Bus.
- Double Click on 'Package.appxmanifest'
- Switch to the Capabilities Tab
- Make sure that 'Internet(Client and Server) and 'Microphone' are checked.
Unfortunately I cannot my project/app since it contains private information of my Azure account. Here are some of the files that'll help you in making your own Voice Assistance App. Also the ControlCommands.xml file uploaded here is just to show one aspect of the project and I thank jckelley for helping me this. The final file can be found under the codes section.
-----------------------------------------------------------------------
VI. WHAT NEXT?
Since we're now done with the most crucial parts, the only things that remain are the connections.
As you may have noticed from the Hardware List I have tried to integrate as many components as possible to achieve complete home automation.
Unfortunately I did not get much time to document and click many pictures, and I'm completing this tutorial at the last moment,so i'll try to explain as much as I can.
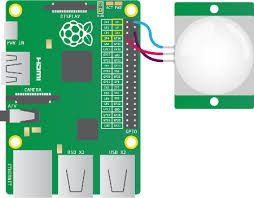
-> Setting up the RaspiCam and PIR:
1) Before starting to configure the Raspberry, you'll need to enable the Raspicam CSI port and expand the root filesystem.
2) First, connect the Raspicam and the Raspberry to a router using an Ethernet cable.
3) Then, power the Raspberry
4) Open the terminal and run:
$sudo raspi-config
Select "Enable Camera" and then "Enable"
Select "Expand Filesystem"
5) Install Raspi Driver and Configure your router.
6) Create the directory where the Python programs will reside and where the photos and videos will be stored using these commands:
cd /home/pi
mkdir python_programs
cd python_programs
mkdir camera_output
Issue the following two commands to get the Python programs:
wget "https://s3-us-west-1.amazonaws.com/talk2bruce/instructables/rpi-ms-camera/rpi-halt-btn.py"
wget "https://s3-us-west-1.amazonaws.com/talk2bruce/instructables/rpi-ms-camera/rpi-ms-camera.py"
7) Issue the command below to configure the Dropbox uploader:
sudo python rpi-ms-camera.py -firsttime8) If you want to have the camera take photos, add the following command to the bottom of the file:
post-up python /home/pi/python_programs/rpi-ms-camera.py -pIf you want to have the camera record videos, add the following command to the bottom of the file:
post-up python /home/pi/python_programs/rpi-ms-camera.py -vOnce this is done, all you have left to do now is Implement the code I have shared for motion detection and you're camera will search for any motion taking place within it's range.
-> Setting up Temperature and Humidity Sensor:
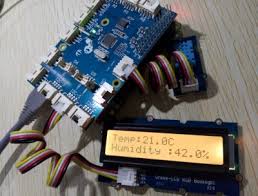
This involves a fairly easier setup. All you have to do is placed the Grove Pi+ shiled on top of the RPi2 properly. Once done with that Connect your Temperature and Humidity Sensor to the D4 socket and run the program that I've given in the Code sections and you're done. (Refer to Schematics for more details regarding the setup).
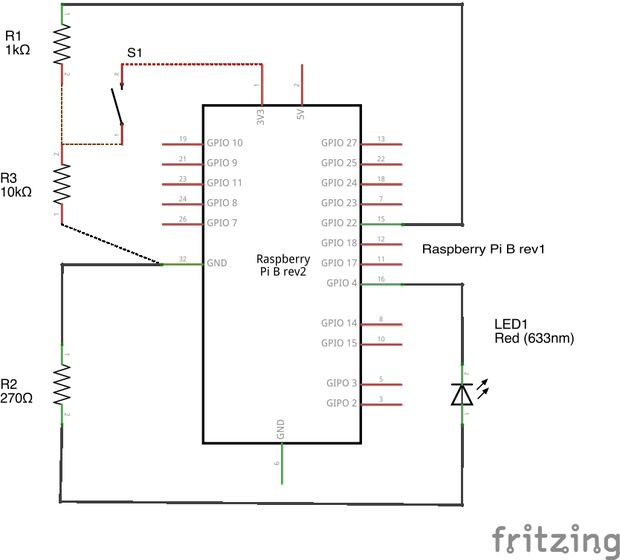
-> Setting up LED Connection:
The image should be self explanatory. Run the code I have provided and using Cortana Switch On and Off the lights or in this case the LED.
-> Automating Door Close based on Presence (WIP):
Although I was able to control the Ultrasonic Sensors and PIR to detect presence of anyone in the house, the part of automatic door lock still remains incomplete.
VII. FUTURE PLANS?
While did try to integrate Motion Sensor, Camera, Temperature and Humidity Sensor and Light controlling functionality, there are still a lot of things that can be achieved namely controlling the printer at your place, dimming lights, automating door close based on presence, controlling Washing Machine and so on.


Comments
Please log in or sign up to comment.