


Hardware components | ||||||
 |
| × | 1 | |||
| × | 1 | ||||
 |
| × | 1 | |||
 |
| × | 1 | |||
 |
| × | 1 | |||
| × | 1 | ||||
Did you ever want to control the things in your life in your way ? Mostly, the answer would be Yes ! Many times whenever we want to switch on the light bulb, we have to go near the switch and press the switch. Even the same for switching off. So, here is a way to control the light bulb i.e; you can make the light bulb on/off without going near the switch. In this project, we are going to control the bulb through java script and Google Voice Assistant.
Step 1 : Assemble all the Components1. Bolt Wifi Module
2. Single Channel Relay Module
3. Jumper Wires
4. Bulb Holder
5. LED Tube Light
6. Android Mobile Charger
7. 2 Pin Socket
In this step, you have to connect your bolt module to bolt cloud.
Just check the below link, which tells you about how to connect Bolt Module to Bolt Cloud :
https://www.hackster.io/104015/setting-up-the-bolt-wifi-module-c5de27
BOLT is an Internet of Things platform Hardware+Software that enables user to build IoT products and projects. Using BOLT, users can control and monitor devices from any part of the world.
Visit boltiot.com to know more...
Step 3 : Connections between the Hardware1. Connect a wire from 2-pin socket to NO pin of relay module.
2. Connect a wire from bulb holder to COM pin of relay module.
3. Connection between relay module and bolt module :
1 / 6
Step 4 : Creating a Product and Uploading Code1. Login into your bolt cloud account by visiting cloud.boltiot.com
2. Create new product as shown below
1 / 3
3. Configure the project.
1 / 2
4. Upload the Code and Save Configuration.
1 / 5
5. Linking Product to Bolt Device and View Device.
1 / 5
Step 5 : Working Principle and Project in ActionWORKING PRINCIPLE
It uses Application Program Interface call which turns the state of the digital pin to HIGH or LOW. The state of this pin also leads to switch the relay ON or OFF. This API call is activated, when you press the button on the browser.When the relay is in OFF state, it breaks the circuit between the Bulb and the power supply, which results in bulb going off whereas, when the relay is in ON state, it completes the circuit connection between bulb and power supply, as a result of which bulb lights up.
PROJECT IN ACTION
1. Power on the bolt device by using Android Mobile Charger and make sure that it is connected to bolt cloud.
2. Connect the 2- pin socket to the AC power supply.
3. Login into your account on cloud.boltiot.com, then go to Products and click on View this device button.
4. Now, control the Bulb using the ON/OFF button over the internet.
Controlling Through Google Voice AssistantThis is an another way to control light bulb i.e; to make light bulb ON/OFF by your Google Voice Assistant. Did you get surprised ? Oh, yes ! Let's Find Out.
You need not change Hardware set up as I mentioned in Step 3 : Assembling The Hardware.
Now, you have to note down your Bolt Device ID and Bolt API Key by Logging into your bolt cloud i.e; cloud.boltiot.com .
1 / 2
Here, you have to click on GENERATE NEW API KEY and ENABLE the Key. Then, copy the API Key as shown.
Since, Light Bulb is a digital output device, we need to get a Digital WriteCommand that can be sent to Bolt over the Internet to switch on the Light Bulb.
The structure of the command :
https://cloud.boltiot.com/remote/API_KEY/digitalWrite?pin=PIN_NUMBER&state=HIGH/LOW&deviceName=DEVICE_ID
Here, you need to replace theAPI_KEY: API key which you've accessed from your bolt cloud.PIN_NUMBER: Pin Number is the number to which you've connected the IN pin of Relay Module to GPIO pin(0-4) of Bolt Module.HIGH/LOW: The high/low indicates to Turn ON/OFF the Light Bulb. HIGH : ON& LOW : OFFDEVICE_ID: The Device ID can be accessed from your bolt cloud dashboard.
The Final Step : Creating an Applet
Visit IFTTT by clicking here
Login using your Gmail account, which you use on your mobile to interact with Google Assistant.
After login, click on +This to create trigger by clicking here
By clicking on +This, choose google assistant as shown
And select on Say a simple phrase
Type the phrase you want to trigger the action.
1 / 2
After that, click on Create Trigger and after click on +That
Select Webhooks and Make a web request as shown below
1 / 2
Enter the API URL you got in the previous Step. Make sure that you change the API Key and Device ID.
Method will be GET
Content type will be Application/json
1 / 3
Then, finally click on Create action and click on Finish
1 / 2
Stepsto turn OFF the LED
Now, follow the same process for a command to switch of the LED. Here, you will change the state to LOW i.e. state=LOW in your command and everything remains same.i.e;
https://cloud.boltiot.com/remote/API_KEY/digitalWrite?pin=PIN_NUMBER&state=LOW&deviceName=DEVICE_ID
Wow, you've done it !
"The project is completed and you can control the light bulb through Java script and your Google Voice Assistant."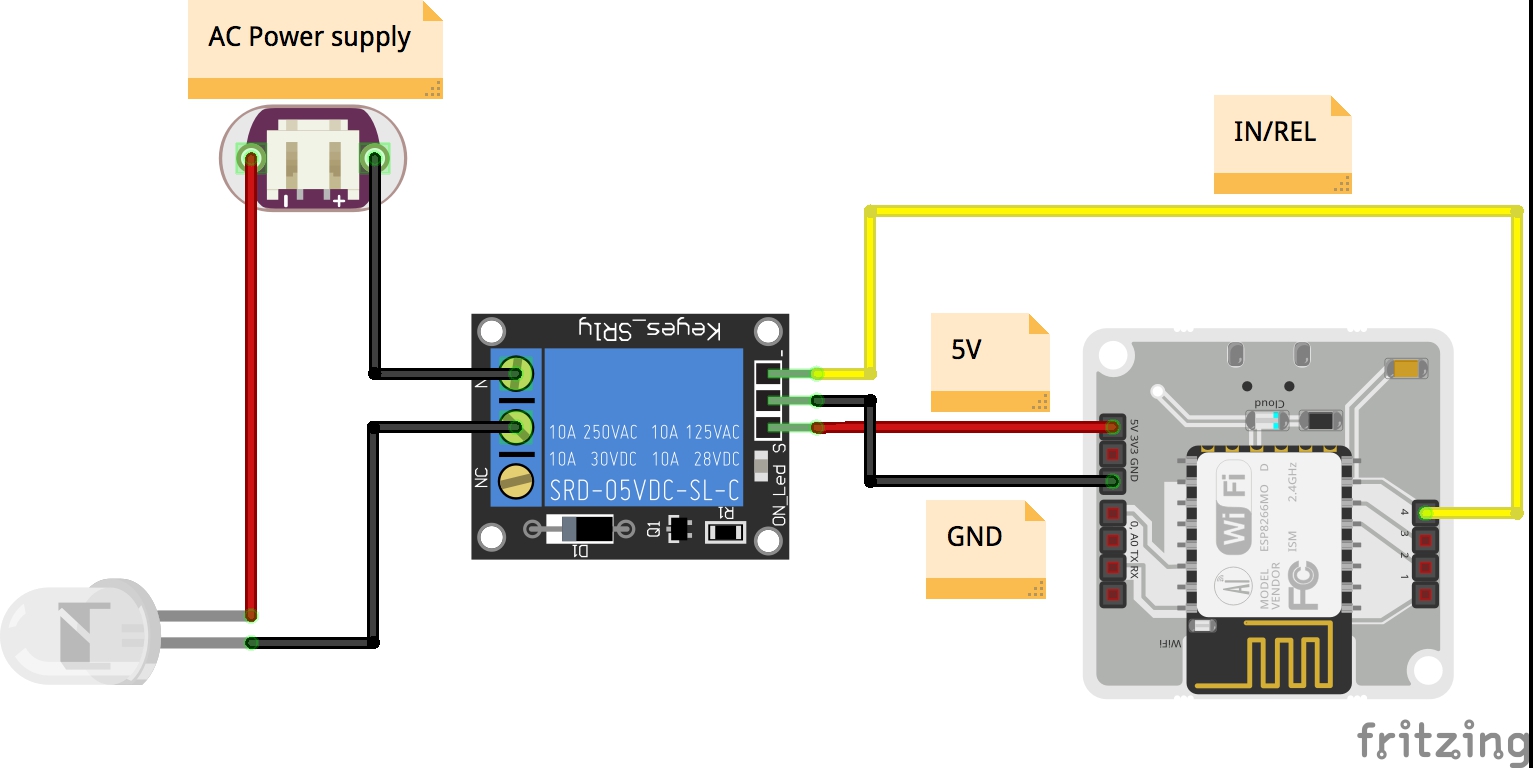


Comments
Please log in or sign up to comment.