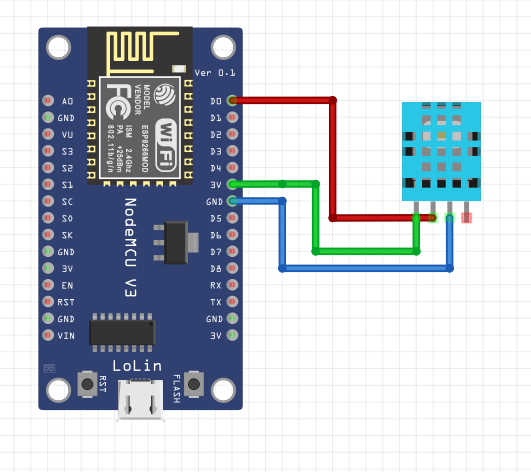
The temperature sensor project with ESP8266 is an IoT (Internet of Things) project which aims to monitor temperature in real-time and display the data in the form of an HTML page that can be accessed via a Wi-Fi network
Required components:1. Node MCU: ESP8266
2. DHT11 Temperature Sensor
3. Jumper Cables, Female to Female
4. Micro USB Cable
Software Used :1. Arduino IDE
Installation steps:1. Connect the temperature sensor to the ESP8266 according to the appropriate pins
VCC -> 3, 3 V
GND -> GND
DAT -> D0
2. Connect the micro USB cable to the ESP 8266 and your laptop or PC.
3. ESP8266 programming uses the Arduino IDE to write code.
// Import required libraries
#include <Arduino.h>
#include <ESP8266WiFi.h>
#include <Hash.h>
#include <ESPAsyncTCP.h>
#include <ESPAsyncWebServer.h>
#include <Adafruit_Sensor.h>
#include <DHT.h>
// Replace with your network credentials
const char* ssid = "ROOM";
const char* password = "qwertyuiop";
#define DHTPIN 5     // Digital pin D1 connected to the DHT sensor
// Uncomment the type of sensor in use:
#define DHTTYPE    DHT11     // DHT 11
//#define DHTTYPE    DHT22     // DHT 22 (AM2302)
//#define DHTTYPE    DHT21     // DHT 21 (AM2301)
DHT dht(DHTPIN, DHTTYPE);
// current temperature & humidity, updated in loop()
float t = 0.0;
float h = 0.0;
// Create AsyncWebServer object on port 80
AsyncWebServer server(80);
// Generally, you should use "unsigned long" for variables that hold time
// The value will quickly become too large for an int to store
unsigned long previousMillis = 0;    // will store last time DHT was updated
// Updates DHT readings every 10 seconds
const long interval = 10000;
const char index_html[] PROGMEM = R"rawliteral(
<!DOCTYPE HTML><html>
<head>
<meta name="viewport" content="width=device-width, initial-scale=1">
<link rel="stylesheet" href="https://use.fontawesome.com/releases/v5.7.2/css/all.css" integrity="sha384-fnmOCqbTlWIlj8LyTjo7mOUStjsKC4pOpQbqyi7RrhN7udi9RwhKkMHpvLbHG9Sr" crossorigin="anonymous">
<style>
html {
font-family: Arial;
display: inline-block;
margin: 0px auto;
text-align: center;
background-color: rgb(0, 0, 0);
}
h2 { font-size: 3.0rem; }
p { font-size: 3.0rem; }
.units { font-size: 1.2rem; }
.dht-labels{
font-size: 1.5rem;
vertical-align:middle;
padding-bottom: 15px;
}
</style>
</head>
<body text="white">
<h2>Weather Station</h2>
<p>
<i class="fas fa-thermometer-half" style="color:#48f5de;"></i>
<span class="dht-labels">Temperature</span>
<span id="temperature">%TEMPERATURE%</span>
<sup class="units">°C</sup>
</p>
<p>
<i class="fas fa-tint" style="color:#48ddff;"></i>
<span class="dht-labels">Humidity</span>
<span id="humidity">%HUMIDITY%</span>
<sup class="units">%</sup>
</p>
<p>
<script src="https://apps.elfsight.com/p/platform.js" defer></script>
<div class="elfsight-app-65e091b0-d33c-4191-81f3-be77c921660a"></div>
</P>
<p>
<span style="font-size:1.0rem;"> </span>
</P>
</body>
<script>
setInterval(function ( ) {
var xhttp = new XMLHttpRequest();
xhttp.onreadystatechange = function() {
if (this.readyState == 4 && this.status == 200) {
document.getElementById("temperature").innerHTML = this.responseText;
}
};
xhttp.open("GET", "/temperature", true);
xhttp.send();
}, 10000 ) ;
setInterval(function ( ) {
var xhttp = new XMLHttpRequest();
xhttp.onreadystatechange = function() {
if (this.readyState == 4 && this.status == 200) {
document.getElementById("humidity").innerHTML = this.responseText;
}
};
xhttp.open("GET", "/humidity", true);
xhttp.send();
}, 10000 ) ;
</script>
</html>)rawliteral";
// Replaces placeholder with DHT values
String processor(const String& var){
//Serial.println(var);
if(var == "TEMPERATURE"){
return String(t);
}
else if(var == "HUMIDITY"){
return String(h);
}
return String();
}
void setup(){B24
// Serial port for debugging purposes
Serial.begin(115200);
dht.begin();
// Connect to Wi-Fi
WiFi.begin(ssid, password);
Serial.println("Connecting to WiFi");
while (WiFi.status() != WL_CONNECTED) {
delay(1000);
Serial.println(".");
}
// Print ESP8266 Local IP Address
Serial.println(WiFi.localIP());
// Route for root / web page
server.on("/", HTTP_GET, [](AsyncWebServerRequest *request){
request->send_P(200, "text/html", index_html, processor);
});
server.on("/temperature", HTTP_GET, [](AsyncWebServerRequest *request){
request->send_P(200, "text/plain", String(t).c_str());
});
server.on("/humidity", HTTP_GET, [](AsyncWebServerRequest *request){
request->send_P(200, "text/plain", String(h).c_str());
});
// Start server
server.begin();
}
void loop(){
unsigned long currentMillis = millis();
if (currentMillis - previousMillis >= interval) {
// save the last time you updated the DHT values
previousMillis = currentMillis;
// Read temperature as Celsius (the default)
float newT = dht.readTemperature();
// Read temperature as Fahrenheit (isFahrenheit = true)
//float newT = dht.readTemperature(true);
// if temperature read failed, don't change t value
if (isnan(newT)) {
Serial.println("Failed to read from DHT sensor!");
}
else {
t = newT;
Serial.println(t);
}
// Read Humidity
float newH = dht.readHumidity();
// if humidity read failed, don't change h value
if (isnan(newH)) {
Serial.println("Failed to read from DHT sensor!");
}
else {
h = newH;
Serial.println(h);
}
}
}
After we change the SSID name and password, upload the code.
4. Then we reset the ESP 8266 by pressing the RST button on the board.
5. Open the serial monitor, and the local IP will appear, which can be accessed via the internet. Then open it in the browser.
To make it easier, you can watch the video tutorial that I made to make it easier to understand


Comments
Please log in or sign up to comment.