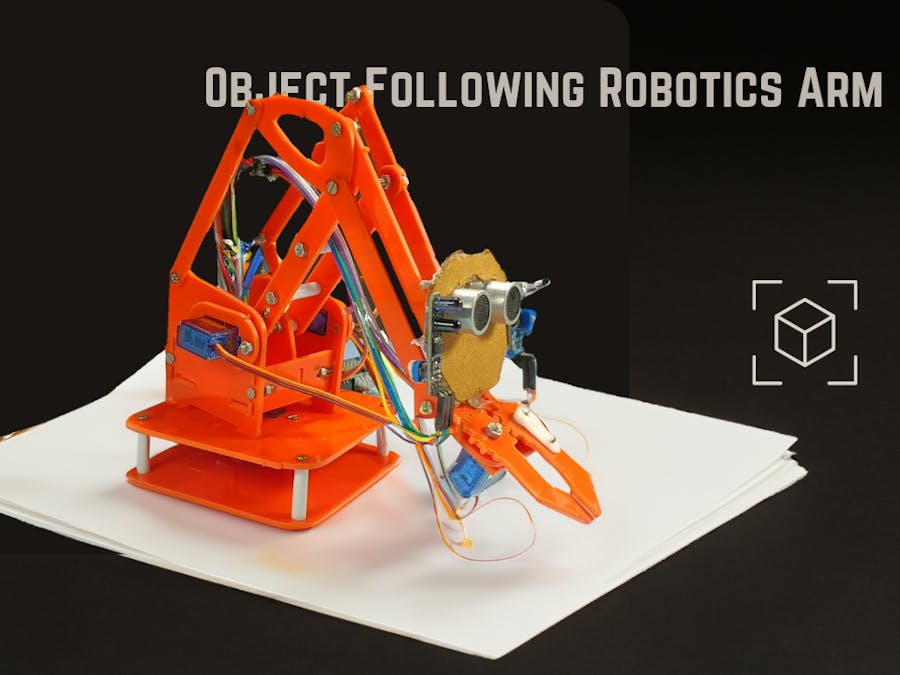
Greetings everyone, and welcome to my Instructables tutorial. Today, I'll guide you through the process of creating an Object Tracking 4-DOF Robotics Arm.
Project Overview:
In this project, the robotic arm will execute actions corresponding to the commands received from the sensors. For example, if the object moves to the left, the robotic arm will respond by moving to the left, and similarly for movements to the right, up, and down.
I want to thank PCBWay for their sponsorship in making this project possible.
Without further ado, let's dive into the project and get started!
(International: amazon.com)
- Ultrasonic Sensor: https://tinyurl.com/k9rxwxbh
- Arduino Uno: https://tinyurl.com/yu9u42nv
- IR Sensor: https://tinyurl.com/mpntrncr
- SG90 Servo Motor: https://tinyurl.com/3y9x3wsa
- Robotic DIY Arm Kit: https://tinyurl.com/23drbvvy
- PWM/Servo Driver I2C interface PCA9685: https://tinyurl.com/bdfz6bra
(India: quartzcomponents.com)
- Ultrasonic Sensor: https://tinyurl.com/mryfn6xn
- Arduino Uno: https://tinyurl.com/43fe8d5f
- IR Sensor: https://tinyurl.com/4ak4xewv
- SG90 Servo Motor: https://tinyurl.com/e4j2tb8k
- Robotic DIY Arm Kit: https://tinyurl.com/2wsv76z6
- PWM/Servo Driver I2C interface PCA9685: https://tinyurl.com/2zrbewh5
Watch the above-attached video for a complete step-by-step assembly of the Robotics Arm Kit.
Refer to the attached image and connect all four servo motors wire to the PWM servo motor driver pins.
- Figure Servo -> PWM servo pin 0
- Right side Servo -> PWM servo pin 1
- left side Servo -> PWM servo pin 2
- Base Servo -> PWM servo pin 3
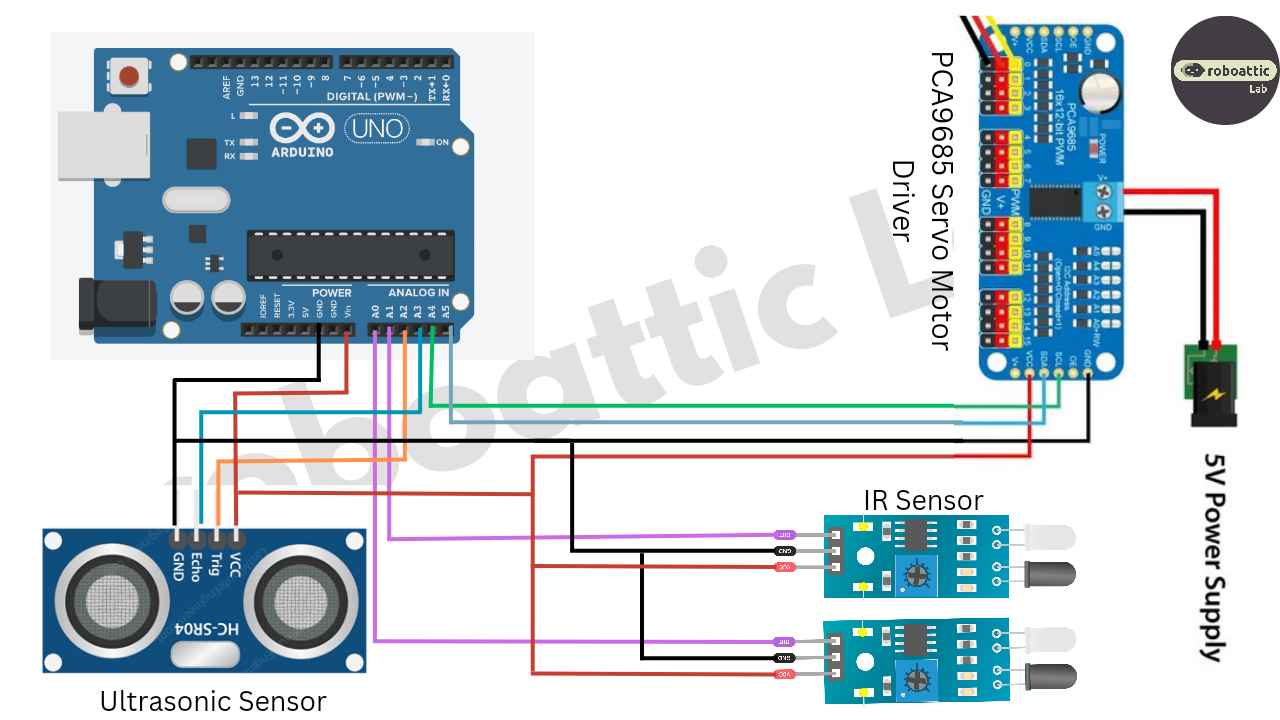
Follow the Circuit Diagram:
PWM Servo Motor Driver -> Arduino Uno
GND -> GND
SCL -> A4
SDA -> A5
VCC -> VIN
Follow the Steps:
- Insert the Ultrasonic Sensor into the designated sensor case.
- Securely attach the sensor case to the robotics arm as illustrated in the provided image.
- Utilize hot glue to ensure proper mounting of the sensor case.
- Affix the IR sensors to the left and right sides of the sensor case using hot glue.
These are all the steps required for this process.
This can be done by using a PCB, I have many times used a custom-designed circuit board to give more professional touch. So I choose PCBWay to design and order the custom-designed PCB for this project.
About PCBWay:
With more than a decade in the field of PCB prototype and fabrication, They are committed to meeting the needs of their customers from different industries in terms of quality, delivery, cost-effectiveness, and any other demanding requests. As one of the most experienced PCB manufacturers in China, They pride themselves to be the best business partners as well as good friends in every aspect of our PCB needs.
They provide 2 layers of PCB just for $5, they also provide 4-6 layers of PCB manufacturing as well as SMT and STENCILS Services at very low cost and their other services are CNC and 3D Printing.
Make sure to visit their website PCBWay.com .
Follow the Circuit Diagram:
Ultrasonic Sensor -> Arduino Uno
GND -> GND
ECHO -> A3
TRIG -> A2
VCC -> VIN
IR Sensor -> Arduino Uno (Right)
GND -> GND
OUT -> A1
VCC -> VIN
IR Sensor -> Arduino Uno (left)
GND -> GND
OUT -> A0
VCC -> VIN
- Now connect the USB cable to the Arduino Uno.
Next, upload the following code:
#include <Wire.h>
#include <Adafruit_PWMServoDriver.h>
#include <SoftwareSerial.h>
#include <NewPing.h>


Adafruit_PWMServoDriver PWM = Adafruit_PWMServoDriver();


const int RIGHT = A2;               // Right IR sensor connected to analog pin A2 of Arduino Uno
const int LEFT = A3;                // Left IR sensor connected to analog pin A3 of Arduino Uno
const int TRIGGER_PIN = A1;         // Trigger pin connected to analog pin A1 of Arduino Uno
const int ECHO_PIN = A0;            // Echo pin connected to analog pin A0 of Arduino Uno
const int MAX_DISTANCE = 200;       // Maximum ping distance


unsigned int distance = 0;          // Variable to store ultrasonic sensor distance
unsigned int Right_Value = 0;       // Variable to store Right IR sensor value
unsigned int Left_Value = 0;        // Variable to store Left IR sensor value


NewPing sonar(TRIGGER_PIN, ECHO_PIN, MAX_DISTANCE);  // NewPing setup of pins and maximum distance


const int servo1 = 0;
const int servo2 = 1;
const int servo3 = 2;
const int servo4 = 3;


int Servo1Degree = 150;
int Servo2Degree = 150;
int Servo3Degree = 150;
int Servo4Degree = 325;


void setup() {
  Serial.begin(9600);
  pinMode(RIGHT, INPUT); // Set analog pin RIGHT as an input
  pinMode(LEFT, INPUT);  // Set analog pin LEFT as an input


  PWM.begin();
  PWM.setPWMFreq(60);
  PWM.setPWM(servo1, 0, Servo1Degree);
  PWM.setPWM(servo2, 0, Servo2Degree);
  PWM.setPWM(servo3, 0, Servo3Degree);
  PWM.setPWM(servo4, 0, Servo4Degree);
  delay(3000);
}


void loop() {
  delay(50);                                      // Wait 50ms between pings
  distance = sonar.ping_cm();                     // Send ping, get distance in cm and store it in 'distance' variable
  Serial.print("Distance: ");
  Serial.println(distance);                       // Print the distance in the serial monitor
  Right_Value = digitalRead(RIGHT);               // Read the value from Right IR sensor
  Left_Value = digitalRead(LEFT);                 // Read the value from Left IR sensor


  Serial.print("RIGHT: ");
  Serial.println(Right_Value);                    // Print the right IR sensor value in the serial monitor
  Serial.print("LEFT: ");
  Serial.println(Left_Value);                     // Print the left IR sensor value in the serial monitor


  if ((distance > 15) && (distance < 25)) {        // Check whether the ultrasonic sensor's value stays between 15 to 25.
    // Move Forward:
    Serial.println("Move Forward");
    PWM.setPWM(servo2, 0, (Servo2Degree += 3));


  } else if ((Right_Value == 0) && (Left_Value == 0)) {
    // Move Right
    Serial.println("Move Right");
    PWM.setPWM(servo1, 0, Servo1Degree += 3);


  } else if ((Right_Value == 1) && (Left_Value == 1)) {
    // Move Left
    Serial.println("Move Left");
    PWM.setPWM(servo1, 0, Servo1Degree -= 3);


  } else if ((distance > 5) && (distance < 15)) {
    // Move Backward
    Serial.println("Move Backward");
    PWM.setPWM(servo2, 0, Servo2Degree -= 3);


  } else if ((distance > 25) && (distance < 35)) {
    // Move Downward
    Serial.println("Move Downward");
    PWM.setPWM(servo3, 0, Servo3Degree -= 3);
  } else if ((distance > 35) && (distance < 45)) {
    // Move Upward
    Serial.println("Move Upward");
    PWM.setPWM(servo3, 0, Servo3Degree += 3);


  } else if ((distance > 1) && (distance <= 5)) {
    // Open Finger
    PWM.setPWM(servo4, 0, 325);
    delay(150);
    PWM.setPWM(servo4, 0, 400);
    delay(900);
    PWM.setPWM(servo4, 0, 325);


  } else if ((distance > 40) && (Right_Value == 1) && (Left_Value == 0)) {
    // Move Stop
    Serial.println("Move Stop");
    PWM.setPWM(servo1, 0, Servo1Degree);
    PWM.setPWM(servo2, 0, Servo2Degree);
    PWM.setPWM(servo3, 0, Servo3Degree);
    PWM.setPWM(servo4, 0, 325);
  }
}
Step 8: Working Video and Tutorial:
Thank you for your interest in this project. If you have any questions or suggestions for future projects, please leave a comment and I will do my best to assist you.
For business or promotional inquiries, please contact me via email at Email.
I will continue to update this article with new information. Don’t forget to follow me for updates on new projects and subscribe to my YouTube channel (YouTube: roboattic Lab) for more content. Thank you for your support.


Comments
Please log in or sign up to comment.