IoT System to control 433 MHz RC power sockets, PIR sensors, Door Sensors and much more.
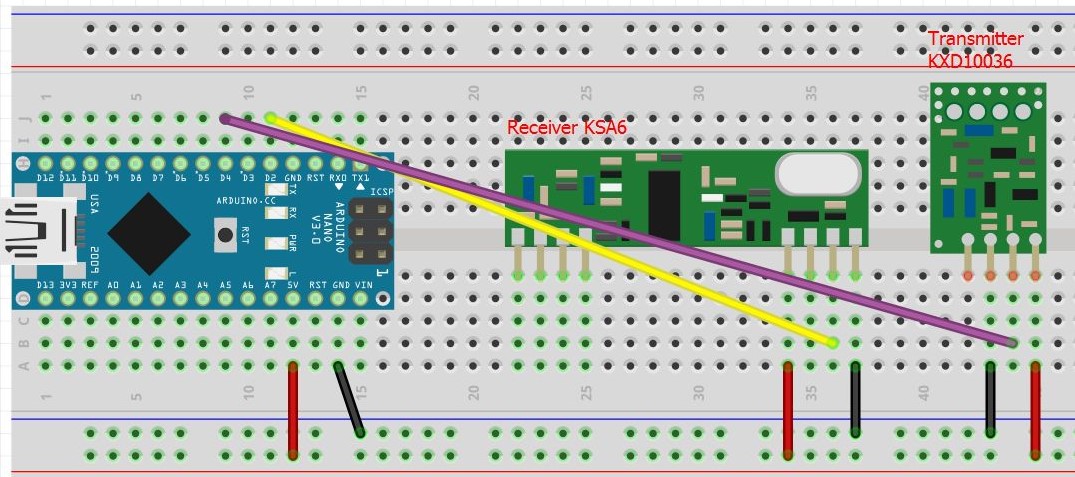
To start is required a 433mhz transmitter and receiver, a connected Arduino with the iot-433mhz sketch or directly with capable hardware like the Raspberry Pi.
UI Demo Features
- Multi-platform (Windows, Mac OS X, Linux).
- Basic Authentication.
- Intuitive API & WebHooks to build your own interface.
- Built-In Material design cards-based template.
- Real-time UI refresh.
- Detect Radio Frequency codes (433mhz).
- Generate Cards and assign it to your rooms.
- Control RC power sockets, PIR sensors, Door sensors and much more.
- Telegram Bot for alarm notifications.
- Totally Open Source & Open Hardware.
For more about the required 433mhz transmitter/receiver and the supported hardware see the hardware-layer page.
General Install
You can get it on npm:
npm install iot-433mhz -g
And then execute it from console with:
iot-433mhz
or Clone this Repo:
git clone https://github.com/roccomuso/iot-433mhz.git
Then don't forget to install all the dependencies with npm install (on UNIX system root privileges are required).
Heads Up: On Raspberry Pi, you can encounter some issue installing all the dependencies, due to permission errors. If that happens try this: sudo chown -R $USER:$GROUP ~/.npm combined with running npm cache clean to get any busted packages out of your cache. In addition, if the error still persist, try adding the flag --unsafe-perm:
sudo npm install --unsafe-perm (if installing from git)orsudo npm install iot-433mhz -g --unsafe-perm (if installing from npm)
If running on different platforms follow the platform-specific setup below:
Specific Setup
Iot-433Mhz is built on top of Node.js.The server is multi-platform, can runs on different hardware combinations shown below:
A. Computer with Arduino connected and a 433 MHz transmitter and receiver.Mac, LinuxThe iot-433mhz server should run smoothly. Remember to install with root permission (sudo):
sudo npm install iot-433mhz -g
and then execute with:
iot-433mhz
To run the server on windows make sure to install python 2.7 and Microsoft Visual Studio Express 2013. (Required by node-serialport). Then just do a:
npm install iot-433mhz -g
and then execute with:
iot-433mhz
To use iot-433mhz on Raspberry Pi first do a system update:
- Update
/etc/apt/sources.listto havejessiewherever you've currently gotwheezy.
sudo apt-get update && sudo apt-get dist-upgrade.
sudo rpi-update.
- Reboot.
Then install Node.js:
wget http:/
ode-arm.herokuapp.com
ode_latest_armhf.debsudo dpkg -i node_latest_armhf.deb# Check installationnode -v
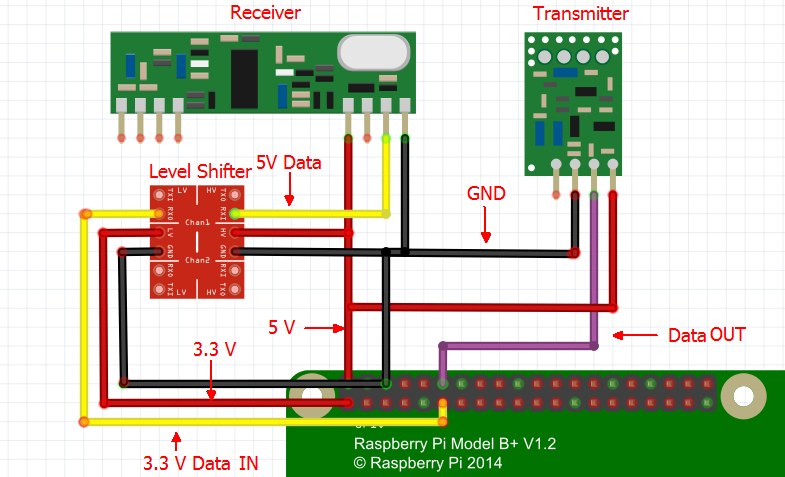
One way to go is directly connecting the radio transmitter and receiver to the GPIO as shown in the following picture, but first remember to install wiringPi (link) and to execute the app with root permission (sudo):
Heads Up. The RF receiver module operates at 5V. THE GPIO data pins can only support 3.3V! If you put your receiver on 5V, the data io pin of the raspberry will also receive 5V which is way too high. A simple resistor (4.7k) should be fine, as already outlined in many forum posts, but is recommendend a logic level converter / level shifter or a simple voltage divider:
Here the voltage divider:
The important thing here is the ratio of R1 to R2; R1 should be just over half R2's value to ensure 5V is divided down to 3.3V. The values shown here should be suitable for most uses.
NB. For this configuration the Raspberry Pi platform uses the 433mhz-utils library through the rpi-433 module. But notice that RFSniffer (compiled c) appears to chew up all the RPi CPU (95%). Not ideal at all, therefore an external Arduino is the recommended solution.
Using RPi with an external Arduino.- Remember to install with root permission.
The system can run on RPi using an external Arduino like the other platforms. To do that, just set to true the use-external-arduino option in the config.json file.
- In this way we'll force the RPi to use an Arduino through USB, using the node.js serialport module.
- I'm not sure if strictly necessary but it's worth installing the arduino IDE and related drivers with
apt-get install arduino.
Heads Up! Sometimes the USB doesn't get detected on the fly (you should be able to see it with ls /dev/tty* - USB not working?). Just plug-it and then reboot your RPi.
Is recommended to run the server on the RPi through a "terminal session". (see screen).
Config
Through the Settings page from the Web Interface, you can change the general settings (stored in config.json). Few of those settings are there listed with their default values:
DEBUG: true, // Start the app in Debugging mode.username: root, // Username required to authenticate (required also during API calls)password: root, // Password required to authenticate (required also during API calls)arduino_baudrate: 9600, // The arduino default baudrate (no need to change it)server_port: 8080, // Choose on which port you wanna run the web interfacedb_compact_interval: 12, // Database needs to be compacted to have better performance, by default every 12 hours it will be compacted, put 0 to avoid DB compacting."backend_urls": "..." // You can specify a backend json file containing the urls to carry out notifications. (NB. this requires the iot-433mhz-backend repo)
If you made a change to the settings from the Web interface, then to make it effective, you need to restart the app.
Usage
Start the system with the console global command:
iot-433mhz
Then you'll have to select the right serial port to which the Arduino is attached to
Once selected you're ready to go!You're then free to use the system through the beautiful web interface (thumbs up for material-design) or use the API to build your own interface.
Built-in Web InterfaceReachable on the http://serverAddress:PORT, the web server_port is defined in config.json, default's value is 8080. It works well in browsers like Chrome (reccomended), Firefox, Safari, Opera, Microsoft Edge (it doesn't on Internet Explorer, avoid it).
Once you open the address on your browser an authentication is required. Username and password are stored inside the config.json file (default values are: root, root).
If you wanna have a live console output of your iot-433mhz running on Node. There's a real time console-mirroring web-console on http://serverAddress:PORT/console.html. (Thanks to console-mirroring).
The web interface provides along with supported browsers the ability to add the page on your homescreen like a native application. The first time you'll open it, a pop up will come out.
Heads Up! If your server is running on a RPi, make sure to have a static ip address assigned to your server. Otherwise the linked app on the homescreen will not work anymore.
What kind of devices the system works withSee the Hardware page.
APIBelow every single API available is documented. Too lazy to copy and paste? just download and import the Postman collection (download).
Tip: The iot-433mhz server requires a basic Authentication also for the API calls. Username and Password are defined inside the config.json file (default username and password: root, root).
GET /api/settings/getReturn the current settings. Useful to see notification status.
GET /api/system/get/uidReturn the unique IoT System UID (a unique random ID generated from the system).
GET /api/system/new/uidGenerate a new unique IoT System UID (a unique random ID generated from the system).
GET /api/system/telegram/enableEnable notification through Telegram Bot.
GET /api/system/telegram/disableDisable notification through Telegram Bot.
GET /api/system/email/enableEnable notification through Email.
GET /api/system/email/disableDisable notification through Email.
GET /api/code/send/[RFcode]send the specified rfcode. Return a status object:{"status": "ok"}or{"status": "error", "error": "error description.."}
GET /api/codes/ignoredReturn a list of ignored codes stored in DB.
GET /api/codes/allReturn all the registered codes stored in DB.
GET /api/codes/availableReturn all the available codes stored in DB. Available codes can be assigned to a new device card.
GET /api/cards/allReturn all the cards stored in DB.
GET /api/cards/get/[shortname]Return a single card with the specified shortname.
POST /api/cards/newform-data required parameters:headline - a brief headline. shortname - lower case, no spaces. card_body - a description, html allowed. room - lower case, no spaces. type - must be one of the following types: switch/alarm/info device - if type==switch gotta have on_code and off_code parameters. if type==alarm just the trigger_code parameter
Optional parameter: card_img, background_color (must be an hex color with). Json response: 200 OK - {"done": true, "newCard": ...} where newCard is the json card just inserted. Or {"done": "false", "error": "error description..."}
GET /api/cards/delete/[shortname]Delete the card with the specified shortname, it returns{"status": "ok", cards_deleted: 1}or{"status": "error", "error": "error description.."}
GET /api/alarm/[shortname]/armOnly alarm type cards can be armed.
GET /api/alarm/[shortname]/disarmOnly alarm type cards can be disarmed. (If disarmed no WebHook callbacks or email notifications will be sent)
GET /api/switch/[shortname]/onTurn on a switch. Example: GET /api/bedroom/lamp1/on
GET /api/switch/[shortname]/offTurn off a switch
GET /api/switch/[shortname]/toggleToggle a switch
Webhooks allow you to build or set up integrations which subscribe to certain events on the iot-433mhz system. When one of those events is triggered, we'll send a HTTP POST payload to the webhook's configured URL. (thanks to node-webhooks) Webhooks can be used to catch several events:
- alarm triggered event.
- new card event.
- card deleted event.
- new code detected event.
- switch toggle event.
NB. In this current release WebHooks are not card-specific. For example, a single alarmTriggered event type catches every alarm trigger. It's up to you parse the payload and make sure that was the sensor you were wishing for.
Use the API below to set up and interacts with WebHooks.
POST /api/webhook/add/[WebHookShortname]Add a new URL for the selected webHook. Required parameters:webHookShortname - Provided in url, it must be one of these*: alarmTriggered, newCard, cardDeleted, newCode, switchToggle. url - the URL to which a HTTP POST request will be sent when the event get fired (the request carries a JSON payload field that gotta be parsed).
Let's describe every event JSON payload you're gonna listen for according to the supplied webHookShortname:
alarmTriggered = {"card_id": "...", "last_alert": 1453..., "code": ..., "shortname": "...", "room": "..." } * NB. an alarmTriggered WebHook callback will be executed only if the alarm card is armed!
newCard = {"card_id":"...", "headline": "", "shortname": "", "card_body": "", "img": "", "type": "switch/alarm/info", "room": "", "device": { *** }} NB. device depends on type: if switch, we would look for these properties: on_code, off_code, notification_sound, is_on. If alarm: last_alert, trigger_code, notification_sound. If info device got no properties.
cardDeleted = {"card_id": "..."}
newCode = {"code": "...", "bitlength": ..., "protocol": ...} NB. The detected code could be ignored or already attached to a device card.
switchToggle = {"card_id": "...", "is_on": true/false, "sent_code": ..., "timestamp": 1453... }
GET /api/webhook/getReturn the whole webHook DB file.
GET /api/webhook/get/[WebHookShortname]Return the selected WebHook.
GET /api/webhook/delete/[WebHookShortname]Remove all the urls attached to the selected webHook.
POST /api/webhook/delete/[WebHookShortname]Remove only one single url attached to the selected webHook. A json body with the url parameter is required: { "url": "http://..." }
POST /api/webhook/trigger/[WebHookShortname]Trigger a webHook. It requires a JSON body that will be turned over to the webHook URLs.
Telegram Bot & Notifications
Out of the box, the iot-433mhz provides notifications through email and through a Telegram Bot. Of course you're free to develop your own notification system using our WebHooks API. Notifications should be enabled and configured through the Menu > Settings page.
The Email notification system is under construction (TODO).
Android & iOS Apps
Soon will be available the official app on both the stores.
Pull requests
If you submit a pull request, thanks! There are a couple rules to follow though to make it manageable:
- The pull request should be atomic, i.e. contain only one feature. If it contains more, please submit multiple pull requests. Reviewing massive, 1000 loc+ pull requests is extremely hard.
- Likewise, if for one unique feature the pull request grows too large (more than 200 loc tests not included), please get in touch first.
- Please stick to the current coding style. It's important that the code uses a coherent style for readability.
- Do not include sylistic improvements ("housekeeping"). If you think one part deserves lots of housekeeping, use a separate pull request so as not to pollute the code.
- Don't forget tests for your new feature.
Inspiration
Inspired by pimatic-homeduino this is a project in his Beta stage. Documentation is under construction.
Author
@ Rocco Musolino - hackerstribe.com


Comments
Please log in or sign up to comment.