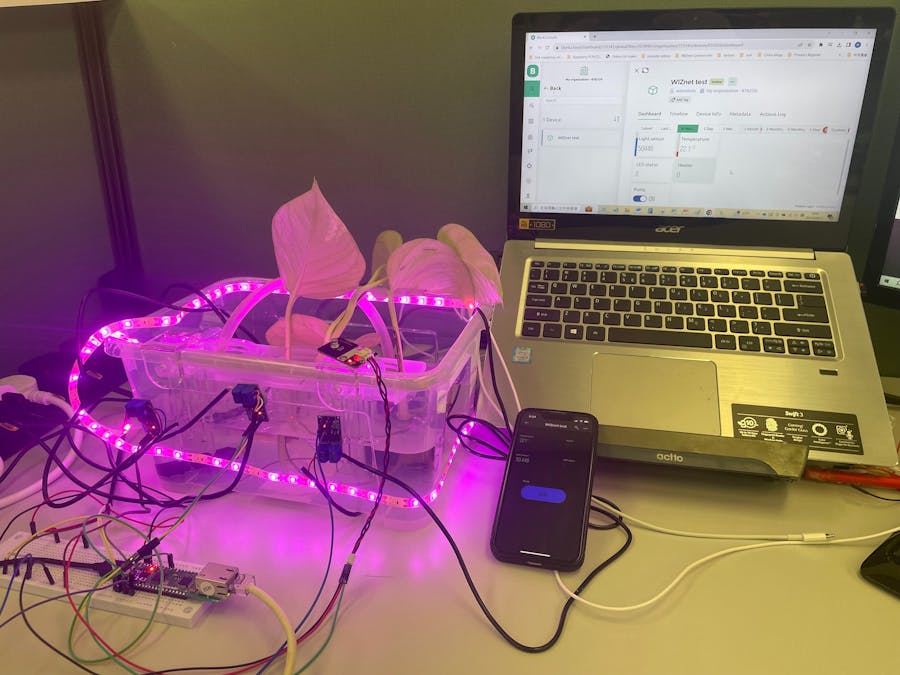
This is an application based on my interested. I always wanted to create some application that is related farming that I could easily create at home.
In my concept of Hyroponic system is an IOT application that could be fully related to automation and IOT platforms.
For this application, I had make it as simple as possible and put all the workloads to IOT platform using W5100S-EVB-PICO to upload data and control those relays.
As usual, I used circuitpython to develop this application.
For details, please refer to the information below.
Structure:
As you could from the image above, it shows the strcuture for my Hydroponic System.
This image has show the connection structure is very direct for this application. It mainly used W5100S-EVB-PICO to collect data from the sensor and delivery it to Blynk Cloud.
Blynk Cloud will handle the judgement from the sensors and make decision to provide data back to W5100S-EVB-PICO to control those devices through relay.
The following are the components that has been used for my Hydroponic System.
1. Light / Photo sensitive Sensor- An module that detects light strength. It shows in Analog ( 0 - 65535).
2. SHT31 - This is a very simple module used I2C to deliver Temperature and Humidity information to W5100S-EVB-PICO. For this application, I just used Temperature information for controlling the heater.
3. Pump - It is a simple water pump used USB to power.
4. LED - USB LED light in red color for plants to grow easily
5. Heater - Heater for fish tank powered by USB
6. Relays - It used to control the power supply to all the output device (Pump, LED and Heater)
7. Blynk Cloud with W5100S-EVB-PICO - The main two component for communicating each other to work as a IOT application.
Programming:This time the coding is simple. Based on my previous experient on different kinds of application development. I just used make some changes on the module controlling section to make it done right away.
import adafruit_sht31d #library for Sht 31

i2c = busio.I2C(board.GP1, board.GP0)
sensor = adafruit_sht31d.SHT31D(i2c)

# Set A0 for receving data from the light sensor module
light = analogio.AnalogIn(board.A0)

#meter = MAX471.MAX471(voltage_pin = board.A1, current_pin = board.A2)

# Set heater
heater = digitalio.DigitalInOut(board.GP2)
heater.direction = digitalio.Direction.OUTPUT

# Set LED light
led = digitalio.DigitalInOut(board.GP3)
led.direction = digitalio.Direction.OUTPUT

# Set pump
pump = digitalio.DigitalInOut(board.GP4)
pump.direction = digitalio.Direction.OUTPUT
These are the handling method when there are instructions provided by Blynk Cloud
@blynk.on("V4")
def Pump(value):
    if value[0] == "1":
        print ("Pump is ON")
        pump.value = 1
    elif value[0] == "0":
        print ("Pump is OFF")
        pump.value = 0

@blynk.on("V6")
def LED_light(value):
    if value[0] == "1":
        print ("LED light is ON")
        led.value = 1
    elif value[0] == "0":
        print ("LED light is OFF")
        led.value = 0

@blynk.on("V8")
def Heater(value):
    if value[0] == "1":
        print ("Heater is ON")
        heater.value = 1
    elif value[0] == "0":
        print ("Heater is OFF")
        heater.value = 0
The information collected from the sensors will directly uploaded to Blynk cloud with few lines:
if client.status == SNSR_SOCK_ESTABLISHED: #when TCP is connected
        blynk.run()
        blynk.virtual_write(1, str(light.value))  #upload light sensor value
        blynk.virtual_write(0, str(sensor.temperature)) #upload
        time.sleep(0.1)
For the detail codes, please refer to the github link in code section.
Blynk Automation setup:
For making a Blynk Automation, there are only few important steps that are required me to work on.
Details: Blynk Documentation (Automation)
1. Set the permission - Since I'm the admin, I don't need to set anything else for making automation happen. For setting this section, I just need to go to settings -> roles and permission -> scroll down to "Automation" to change the settings.
2. Edit your Virtial pins to set those data are used for condition or action or both.
For my sensors, I had used for condition purpose only. Those data are used for judgement handling for my Applicaiton.
The remaining virtial pins are controlling the relays. Thus, it will be set as action to allow blynk to deliver correct message to W5100S-EVB-PICO.
3. Set Automation.
Since all the previous settings has been set, I started to create auotmation as follow. This section, I had made some automation to turn on heater and LED lights.
For example, I had set the light sensor value is lower than certian of value. It will automatically turn on the LED light.
These are the result that I made for Hydroponic system.
Pump Turn ON
Pump Turn OFF
When the light sensor is sensor a lot of light, the LED is OFF.
When the light sensor is receving a lower light, the LED will automatically Turned ON.
When the Temperature is lower than 23 degree celsius. The Heater has turned ON.
When the Temperature is higher than 23 degree celsius. The Heater has turned OFF.
For having a better understanding, I had made a YouTube demo video about it.


_xcg7vos8ax_LjVH1Q6mKB.png?auto=compress%2Cformat&w=48&h=48&fit=fill&bg=ffffff)


Comments
Please log in or sign up to comment.