The Music and Lights Workbench (MLWB) has been designed to introduce anyone new to or not familiar with the subject of computer programming to the subject and its concepts by providing a range of simple commands that will allow the construction of musical scores/tunes and/or lighting effects. It will be through the use of these commands and their application that will provide the user with the beginnings of insight into what programming is and, hopefully, spawn their further interest.
However, it is equally applicable to those more experienced who may like to explore writing music on Arduino and putting together lighting effects.
The approach taken is to provide a set of simple to use and logically applied commands (functions) that link the computer to the outside world through the playing of musical notes and/or the lighting of LEDs (lights).
The MLWB commands are largely independent of each other and may be used for playing just music, illuminating just lights, or a combination of both.
The MLWB does not require the use of any other programming functions, techniques or logic, just the simple statement of its commands. Whilst conditional constructs like if/then, do/while, for-loops, etc. can be used for more advanced use, under suitable teaching, they are not necessary to achieve immediate results from the MLWB.
Anyone trying to get to grips with a new subject, here basic computer programming, benefits from some direction by someone versed in the subject. The MLWB is no different and its use and application is best achieved through guidance and mentoring from someone taking the lead of tutor to the student.
MotivationThe MLWB was designed for the author's grandchildren, to provide them with some opportunity to understand how a computer program can be easily created to produce effects in the real world. It was hoped that through thinking about the logical steps needed to play simple music and/or turn lights (LEDs) on and off that this would peak and stimulate their desire to explore the potential of programming more deeply.
Okay, at this point, some quotations:
Tell me and I forget, teach me and I may remember, involve me and I learn. ― Benjamin Franklin
Education is not the filling of a pot but the lighting of a fire. — W.B. Yeats
Education is the passport to the future, for tomorrow belongs to those who prepare for it today. – Malcolm X
Noble wisdoms, certainly, but they do make the point I was trying to get to quite nicely.
Prerequisites'Getting the ducks lined up', or what is needed to get things in order and moving:
a target audience - the student, young or old, who has a willingness to explore how a computer program can do something quickly, easily and interesting,
a supervisor - tutor, to act as educator - mentor and teacher of the MLWB. The tutor should have some experience of Arduino and IDE and its programming, but this can be at a rudimentary level,
if the music element of the MLWB is to be explored/used then it is helpful for both tutor and student to have some musical knowledge, but, again, this can be at a rudimentary level - knowing about note names, scales, note intervals would be very beneficial,
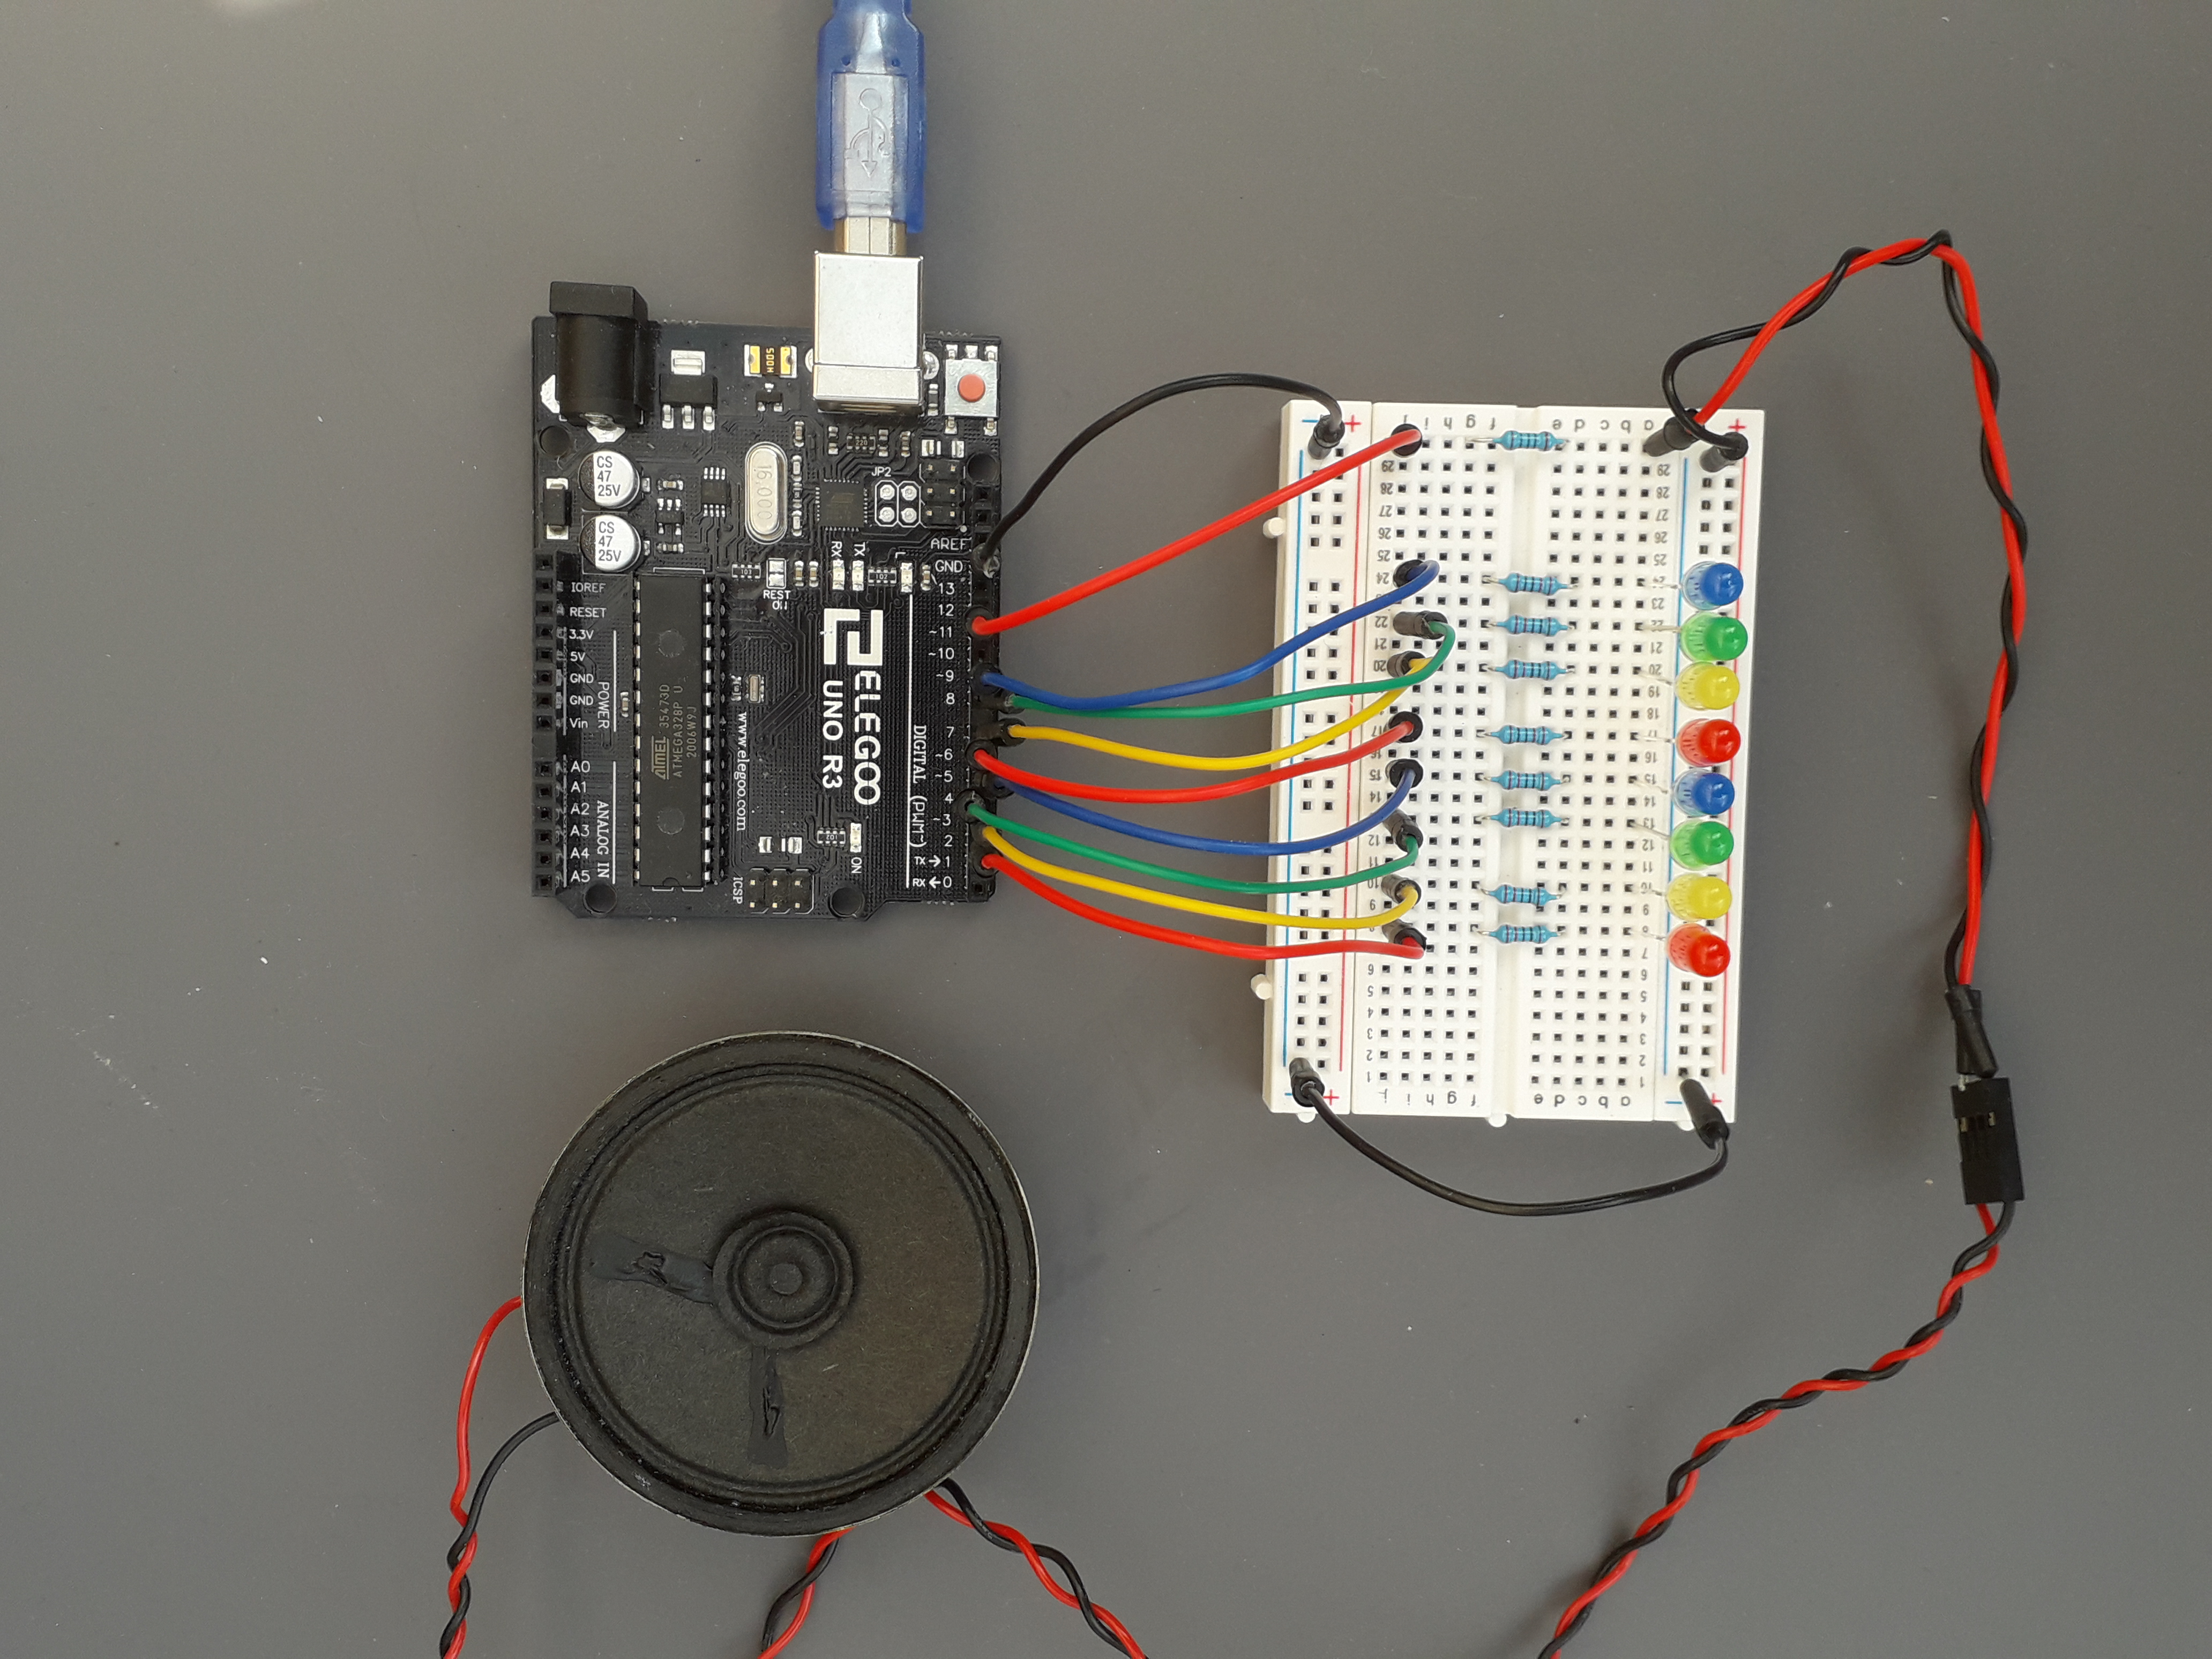
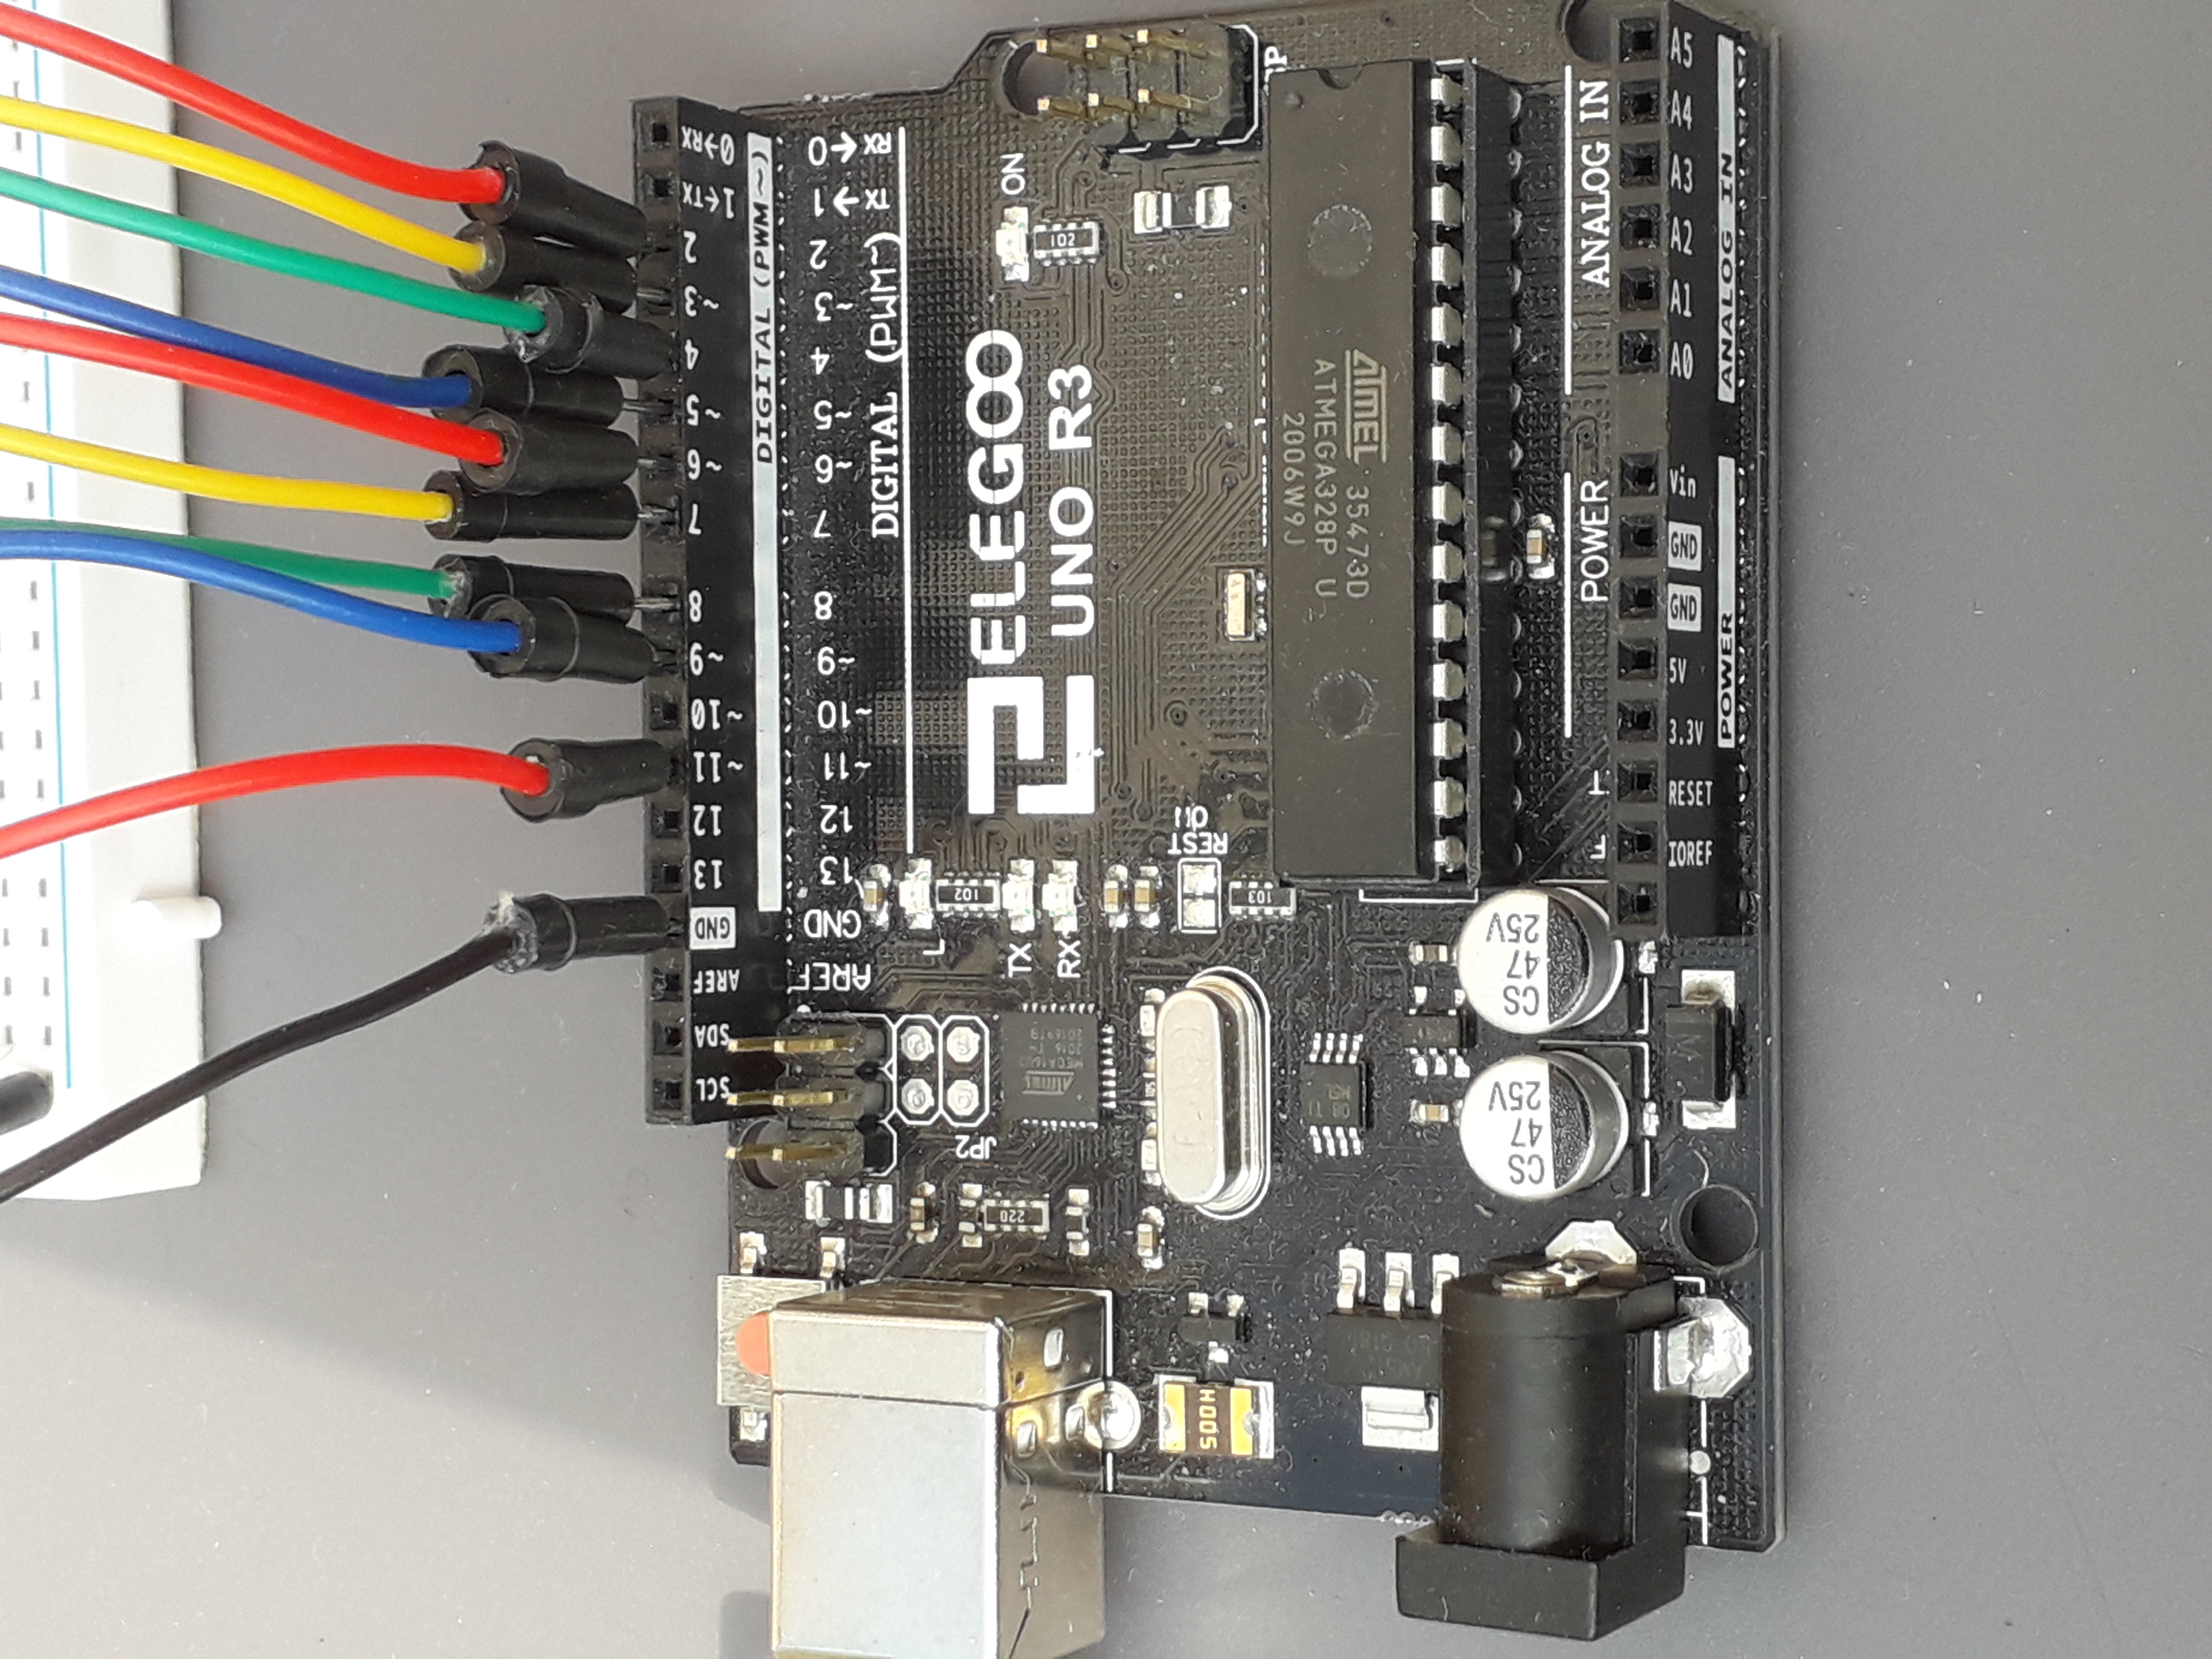
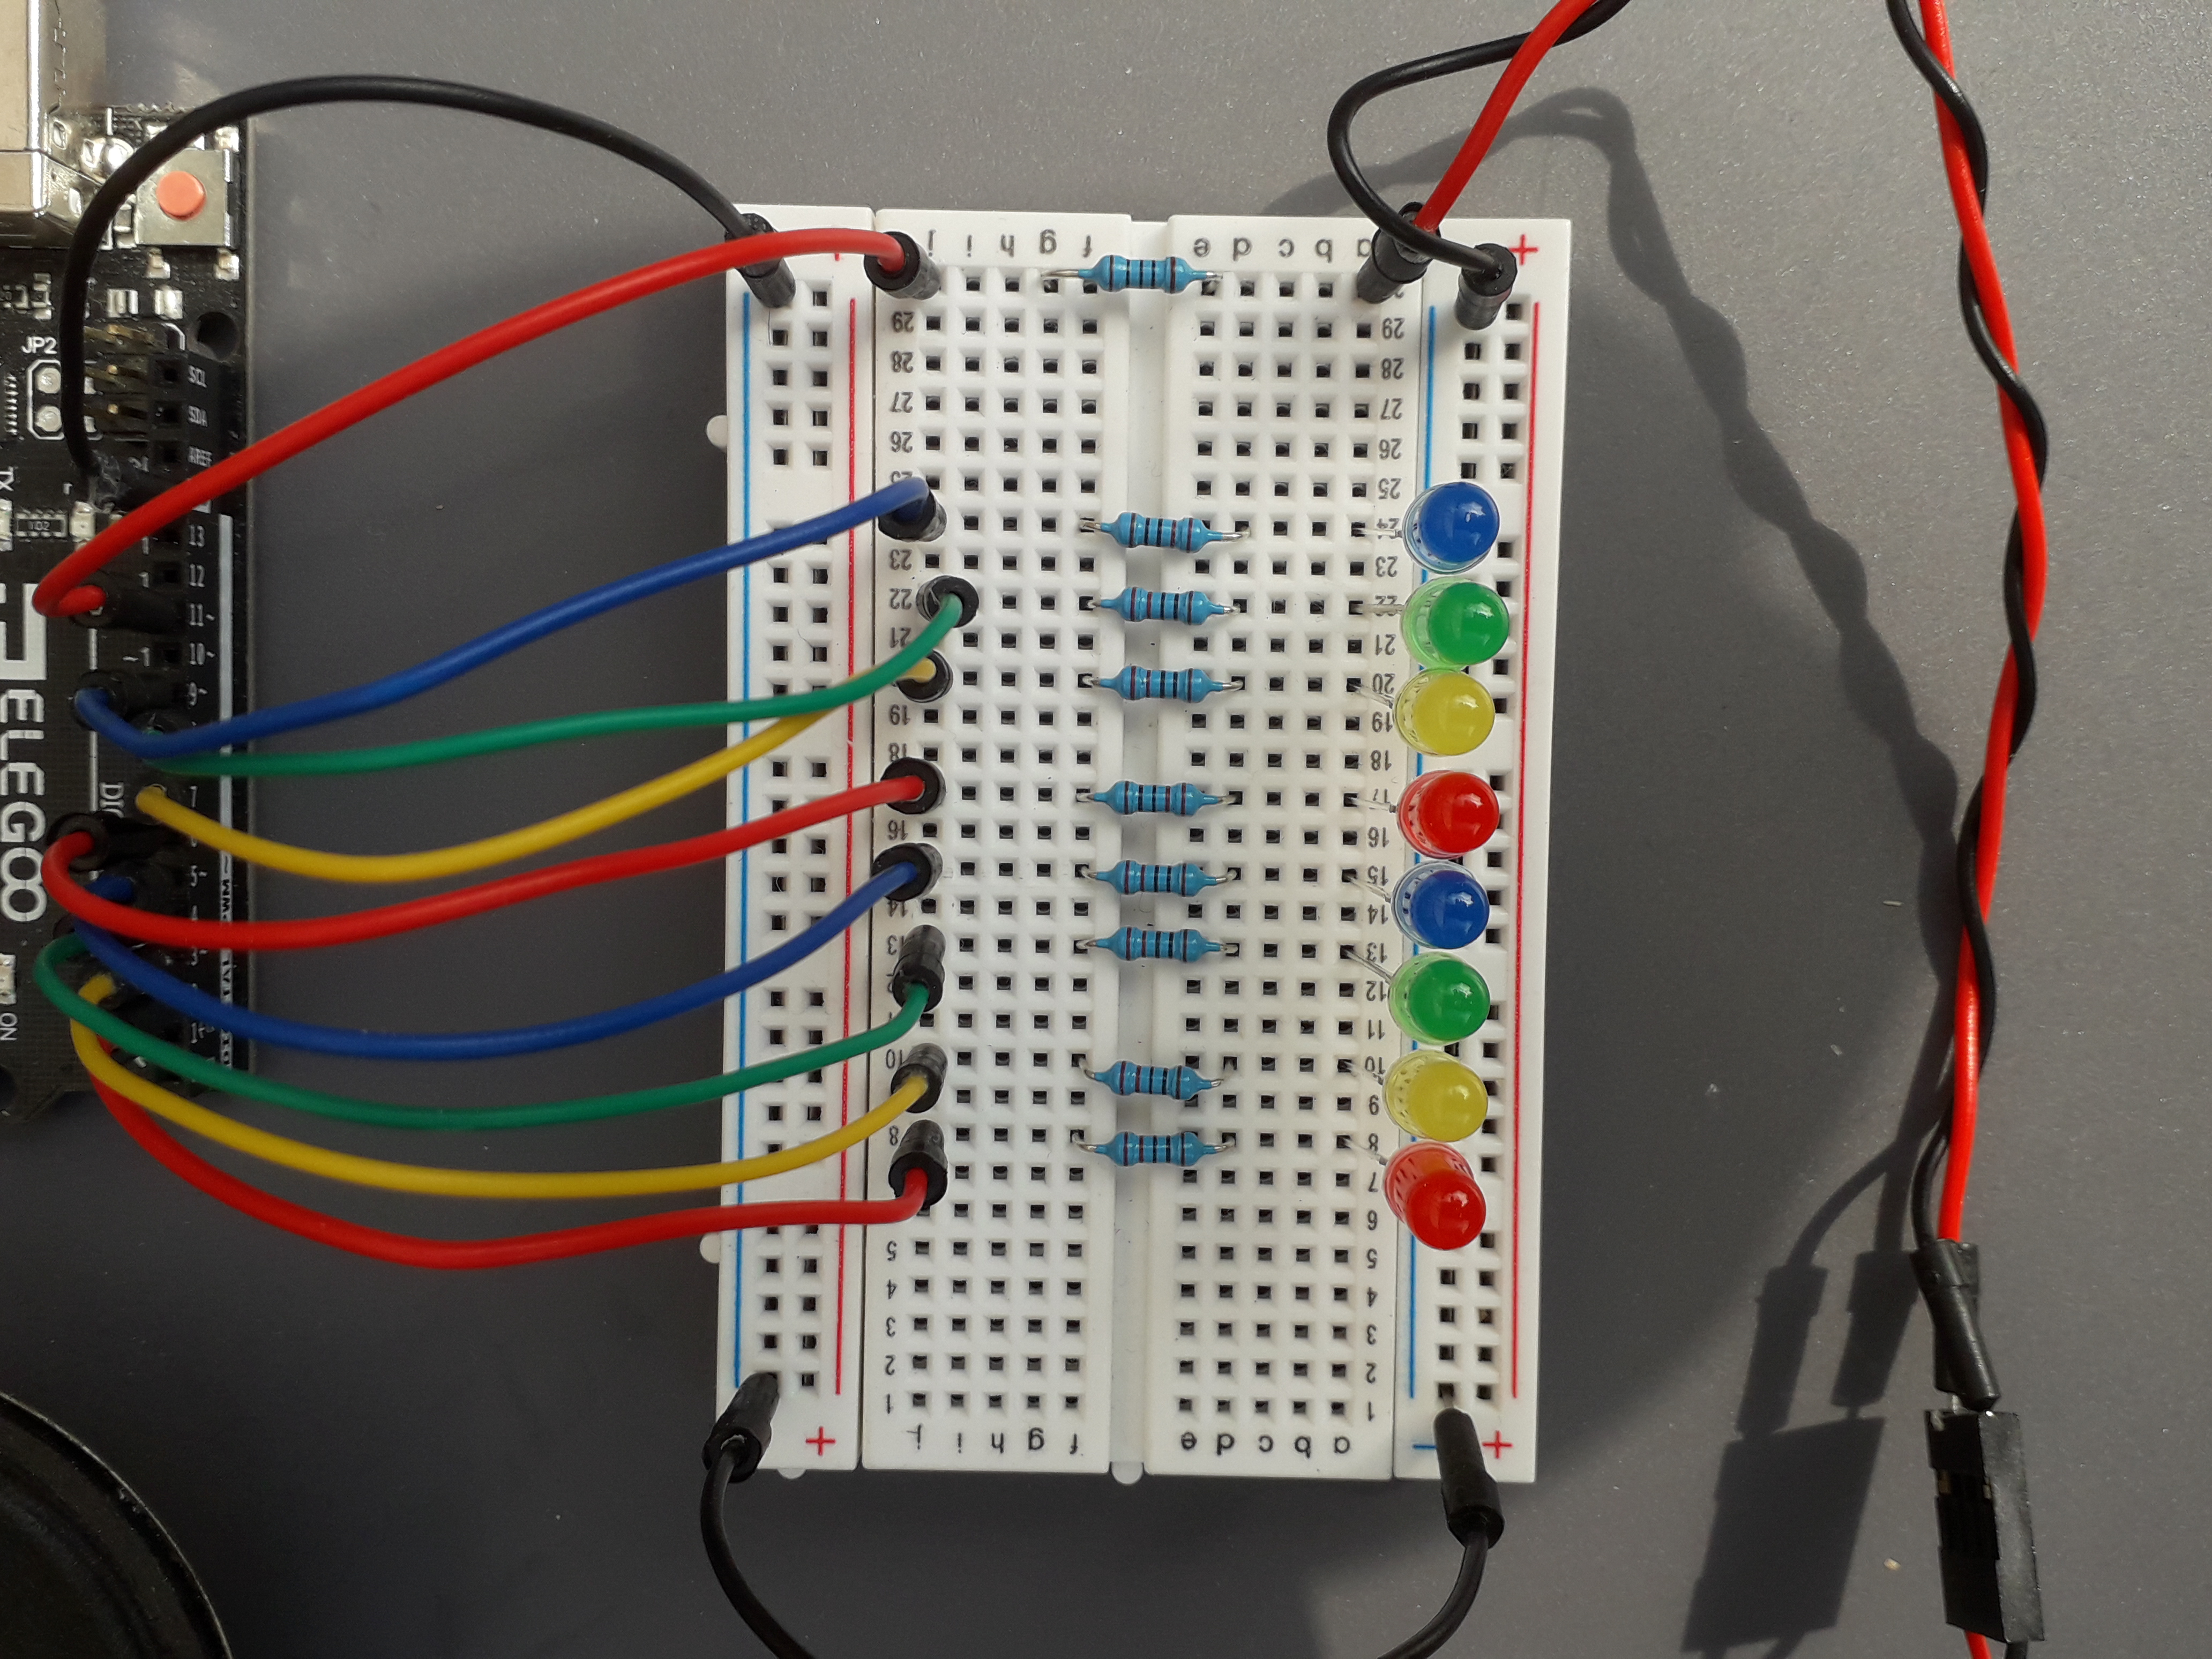
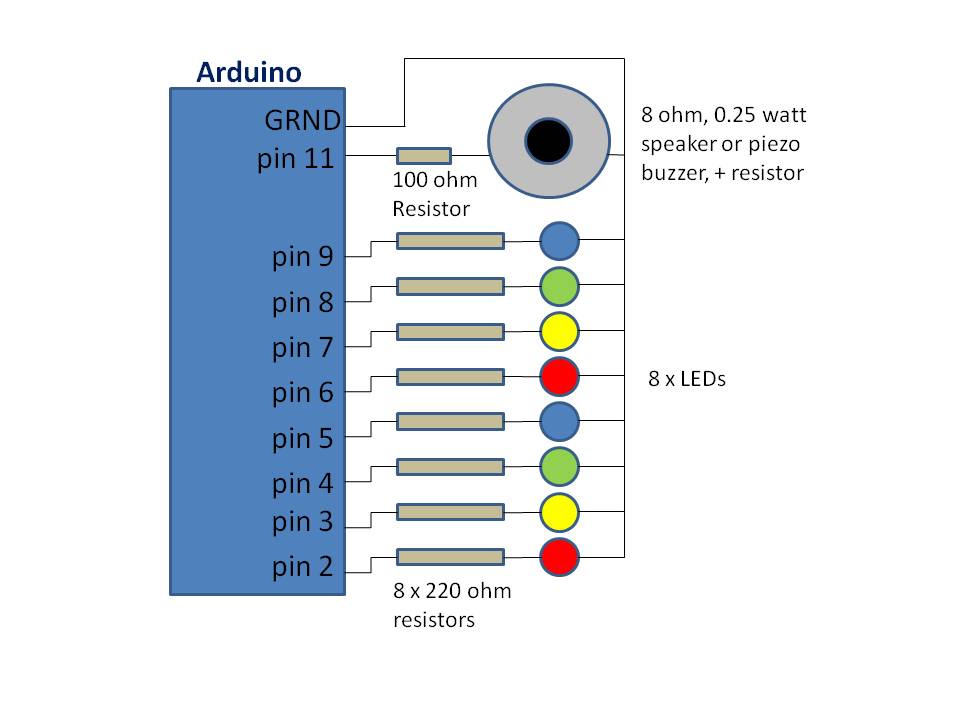
hardware configured as below,
ARDUINO IDE installed on a Windows PC,
ahead of use by the student, the tutor to gain thorough familiarisation with the MLWB through exploration of its commands and inbuilt examples. Download the crib sheet as a guide and aide memoir to keep at hand,
and finally, a plan for what the tutor will introduce to the student, building from session to session. The included examples can form the basis of many exercises.A Note About Index Referencing, Terminology, & Data Entry
Index ReferencingandTerminology
Youngsters and those new to doing anything computing related often find it difficult to understand computing related terms and that referencing can start at 0 (zero). Therefore, to ease the student gently into the world of computing, the MLWB has been designed such that:
1. technical computing terms are avoided, for example the term LED is not used, but rather 'light',
2. referencing starts at 1, not 0. For example, in the MLWB one would refer to LED 0 as 'light1', LED 1 as 'light2', and so on.
Data Entry
To make keyboard data entry as easy as possible for the student, lowercase is used by the MLWB. When the sketch is downloaded it will be seen that all commands and the music pitch constants are all largely defined in lowercase. The 'pitches.h' file commonly available contains all of the same pitch definitions contained within the MLWB but these are in uppercase. Each pitch definition has therefore been redefined to reduce any capitalisation demands. For example, 'note_C4', rather than 'NOTE_C4', etc. The exception here, as will be immediately spotted, is the note name which is retained as uppercase to improve reading.
MLWB CommandsThe MLWB command set falls largely into two groups - those performing musical instructions and those performing actions with lights. However, there is one command that bridges both 'camps'. This is the play command which is an overloaded function. It can be used either to:
1. play a given note for a given duration, or
2. as for 1. but with an additional parameter specifying a light number (LED) to be illuminated whilst the note is playing. It is an overloaded function which can be used in either way.
Music Commands
play - will play the given note for the given duration, eg play(note_C4, minim), play(note_FS2, crot + quav), etc.
play - an overloaded version of the command, this one allowing a light (LED) to be specified for illumination whist the given note is playing, eg play(note_C4, minim, light5), play(note_FS2, crot + quav, light1), etc.
rest - rests for the given duration, during which time silence is maintained, eg rest(quav), rest(0.5), etc
set_tempo - sets the tempo (pace) of a musical piece in beats per minute, eg set_tempo(allegro), set_tempo(144), etc. The value of a crotchet is calculated as 60/tempo. All other note durations are then determined from this calculated value.
Light Commands
light_on - turns on the given light (LED). eg light_on(light1), light_on(7), etc.
light_off - turns off the given light (LED), eg light_off(light1), light_off(7), etc.
all_lights_on - turns on all eight lights. eg all_lights_on().
all_lights_off - turns off all eight lights. eg all_lights_off().
flash_light - flashes the given light for the given flash interval until the light is redefined by another command, eg flash_light(light3, 0.5), flash frequency is 1 second - 0.5 seconds on, 0.5 seconds off. This command is controlled by the microcontroller's timer1 via an Interrupt Service Routine (ISR). In this way, flash sequences will continue to run even though other commands may be executed subsequent to a flash_light command. Flashing continues until another command is executed on the same light (LED).
strobe_all_lights - this command will strobe all eight lights in the given direction (forwards or reverse/backwards) for the given number of cycles with each light illuminating for the given time. eg strobe_all_lights(forwards, 10, 0.1). Control remains with the command until it completes the given number of cycles.
wait - waits for the given duration (seconds) halting any processing other than existing flash_light commands which continue to operate. eg wait(5.5), waits for 5.5 seconds.MLWB Layout
The MLWB software is written in Arduino C++ and comprises six tabs. The tabs are:
music_and_lights_workbench - this tab provides an overview of the MLWB, and echoes much of this article.
functions_lights - this tab defines the functions underpinning the MLWB commands dealing with light (LED) control, see above.
functions_tones - this tab defines the functions underpinning the MLWB commands dealing with music/tone control. Additionally, this tab also defines the setup() function, see above.
main_work_area - this is were a student's coding should be inserted and be the central focus for teaching, exploring and consolidating ideas.
xample_lights - the MLWB is provided out of the box (OOTB) with several readymade examples demonstrating the use of commands for controlling lights (LEDs). These can be used as instructional examples between tutor and student, see below.
xample_tunes - the MLWB is also provided OOTB with several other readymade examples demonstrating the use of commands for playing tones (music) on the attached speaker/buzzer. Again, these can be used as instructional examples between tutor and student, see below.Shrink-wrapped Examples
To kick things off, two tabs are included that provided examples of musical melodies/tunes and lighting sequences. Use these to see how each native command (function) can be used, individually and together. Indeed, these may also be used as instructional guides between tutor and student.
The musical examples tab is called 'xample_tunes' and comprises the following instructional examples:
middle_C - plays the C Major scale, firstly up and the down again. As a suggestion, why not have the student commit other scales and arpeggios into the MLWB?
twinkle_twinkle - plays the very well known nursery song Twinkle, Twinkle, Little Star.
jingle_bells - the clue is in the name!
happy_birthday - birthday celebrations!
ditty_1 - play it and you are certain to recognise it. In addition to playing the melody, the example also illuminates the first seven lights as it is played.
door_bell_1 & door_bell_2 - ding, dong! Both door bell examples also illuminate lights as they play.
ode_to_joy - Beethoven symphony 9 (choral), final movement.
(There was to be an additional music example. I wanted to provide something iconic, popular and a tune I really like - Penny Lane, Lennon & McCartney. I did complete the exercise in committing the G Major score for this piece of music into the MLWB (with some help from my daughter) and it ran beautifully. However, I decided not to publish it as I did not wish to infringe copyright. It was not a wasted effort for me, though, as I learned a great deal about reading a score).
The light examples tab is called 'xample_lights' and comprises the following instructional examples:
sweep_lights - the eight lights are swept to the centre from each end and back again.
chasing_lights - the lights follow a chasing effect from one end to the other.
marching_lights - the lights form a marching pattern across all eight lights.
flash_all_lights - flashes each of the eight lights each at a different frequency. Note that flashing continues until another light command is executed.
sos_morse_code - flashes all eight lights for one sos cycle, ie dash, dash, dash, dot, dot, dot. Why not explore Morse code further, both in lights and musical tones?
traffic_lights - performs the lighting transition for two roads from red/green to green/red (one cycle). This is a useful exercise for students to extend to the opposite (original) state settings (green/red to red/green). Note that the logic can get a little confusing and it is helpful to use a transition state table to plan the sequencing of lights and their timings.Circuit Design & Layout
The components for this project are uncomplicated, readily available and configured in a simple and straight forward way - see the schematics diagram below. (Warning: do not connect the speaker/buzzer output pin directly to an audio input as this may damage your microcontroller.)
Whilst any colour of lights (LEDs) may be used, it may be a more colourful experience for the student if several differently coloured lights are configured. If the traffic light example is to be used then arrange your lights as
light1 - red, light2 - amber, light3 - green, light4 - any (road 1)
light5 - red, light6 - amber, light7 - green, light8 - any (road 2).The Crib Sheet
The crib sheet documents all of the preset values and commands available for use by the MLWB. Download this as an aide memoir and keep to hand as a ready reference.
FinallyI feel I need to declare that my musical knowledge, skill and prowess is next to nil - I would think that a post box is musically more gifted!
My approach in all matters musical has been mechanistic with much use of the internet in constructing the musical elements of this workbench, so I apologise to anyone that may be affronted by inadequate terms or implementation. My defence is that it seems to work as I intended and my grandchildren seem to be quite happy, one of whom is more knowledgeable about music than I.
I hope you enjoy your experiences.
Further ReadingYou might also find these contributions interesting and useful, by the same author:
- Add a heart beat to your sketches - include a visible means to see that your code is running on your microcontroller without any additional components or wiring!
- Unlimited timers in your sketches - easy to implement non-blocking timers
- A flexible, scalable library (ez_SIPO8_lib) supporting the implementation of multiple serial-in/serial-out ICs, 74HC595, either individually or in cascaded banks, up to 255 ICs (2040 output pins)
- A general switch library (ez_switch_lib), suitable for most switch types and wiring schemes, incorporating novel features
- UnderstandIng and UsIng Button SwItches, the basIcs - button switches, a simple but often tricky piece of kit. The tutorial provides in ins and outs of implementing a simple button switch, with flexibility to explore differences in circuit design, different reading methods and debouncing.
- Interrupts Driven Button Switches - an approach and example of tying a button switch to an external interrupt.
- Toggle Switches - how to reliably read a toggle style switch.
- Buttons & Lights Game - a bit of fun using button switches and LEDs.
- External Interrupts, a generic framework supporting concurrent asynchronous multiple interrupts. Configure multiple external interrupts with different characteristics and add code to provide post-interrupt asynchronous processing.
- Programmatic Timed Reminder Alerting, a programmatic framework for both elapsed and real-time asynchronous alerting. Define any number of reminder alerts (sub second to hours) and process asynchronously.


_ztBMuBhMHo.jpg?auto=compress%2Cformat&w=48&h=48&fit=fill&bg=ffffff)




Comments
Please log in or sign up to comment.