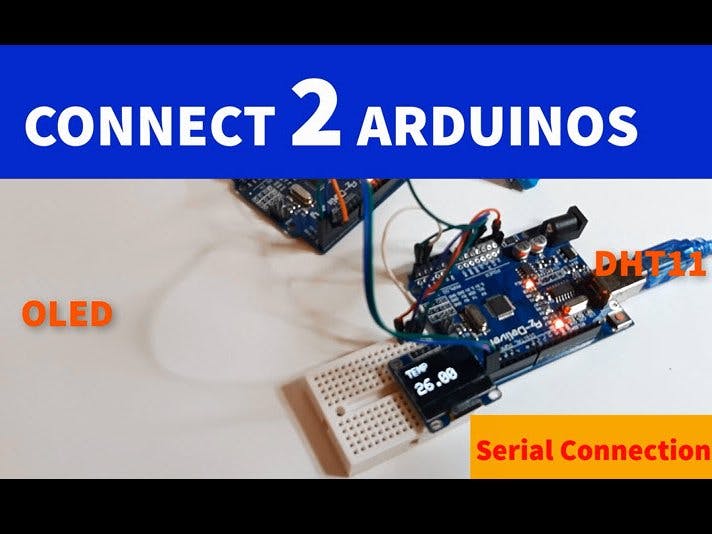
In this tutorial we will learn how to connect Two Arduino boards using Serial Communication by connecting a DHT11 Temperature sensor to the Slave Arduino and send it over the Serial communication to the Master Arduino and Display the Temperature value on the OLED Display.
This project serves as an example what can be done, you are free to send any data that you want.
Step 1: What You Will Need
- 2X Arduino UNO (or any other Arduino)
- DHT11 Temperature & Humidity sensor
- OLED I2C Display
- Breadboard
- Jumper wires
- Visuino program: Download Visuino
Step 2: The Circuit
- Connect OLED Display pin [SCL] to Arduino1-Master pin [SCL]
- Connect OLED Display pin [SDA] to Arduino1-Master pin [SDA]
- Connect OLED Display pin [VCC] to Arduino1-Master pin [5v]
- Connect OLED Display pin [GND] to Arduino1-Master pin [GND]
- Connect DHT11 Sensor pin [VCC] to Arduino2-Slave pin [5v]
- Connect DHT11 Sensor pin [GND] to Arduino2-Slave pin [GND]
- Connect DHT11 Sensor pin [S] to Arduino2-Slave Digital pin [2]
- Connect Arduino1-Master pin [RX] to Arduino2-Slave pin [TX]
- Connect Arduino1-Master pin [TX] to Arduino2-Slave pin [RX]
Step 3: Start Visuino, and Select the Arduino UNO Board Type
The Visuino: https://www.visuino.eu also needs to be installed. Download Free version or register for a Free Trial.
Start Visuino as shown in the first picture Click on the "Tools" button on the Arduino component (Picture 1) in Visuino When the dialog appears, select "Arduino UNO" as shown on Picture 2
Step 4: For Master Arduino - in Visuino Add, Set & Connect Components
- Add "OLED" component (See Picture1)
- Add "Split Structure" component (See Picture2)
- Double Click on the "SplitStructure1" and in the "Elements" Window drag "Analog" to the left side (See Picture3)
- Close the "Elements" window
Double Click on the "DisplayOLED1" and in the "Elements" Window:
- drag "Draw Text" to the left side (See Picture4)
- In the Properties window set size to 2 and Text to TEMP (See Picture5)
- drag "Text Field" to the left side (See Picture6)
- In the Properties window set size to 3 and Y to 30 (See Picture6)
- Close the "Elements" window
- Connect "Arduino board" Serial pin [Out] to "SplitStructure1" pin [In]
- Connect "SplitStructure1" Analog1 pin [Out] to "DisplayOLED1" Text Feld1 pin [In]
- Connect "DisplayOLED1" I2C Pin [Out] to "Arduino board" I2C pin [In]
Step 5: For Slave Arduino - in Visuino Add, Set & Connect Components
- Add "DHT11" component (See Picture1)
- Add "Make Structure" component (See Picture2)
- Add "Clock Generator" component (See Picture3)
- Double Click on the "MakeStructure1" and in the "Elements" Window drag "Analog" to the left side (See Picture4)
- Close the "Elements" window"
- Connect "HumidityThermometer1" pin [Temperature] to "MakeStructure1 Analog1" Pin [In]
- Connect "HumidityThermometer1" pin [Sensor] to Arduino board Digital pin [2]
- Connect "ClockGenerator1" pin [Out] to "MakeStructure1" pin [Clock]
- Connect "MakeStructure1" pin [Out] to Arduino board Serial pin [In]
Upload the Project to the Arduino Board (see the Generate, Compile, and Upload the Arduino Code step)
Step 6: Before Uploading
Before Uploading to Arduino Disconnect PIN RX and PIN TX !
After the Upload is finished for the Master and Slave reconnect the wires back.
Step 7: For Both Master & Slave Generate, Compile, and Upload the Arduino Code
In Visuino, at the bottom click on the "Build" Tab, make sure the correct port is selected, then click on the "Compile/Build and Upload" button.
Step 8: Play
If you power the Arduino modules, the OLED Display connected to the Master Arduino will start to show the Temperature values from the DHT11 sensor that is connected on the Slave Arduino.
Congratulations! You have completed your project with Visuino. Also attached are the Visuino project files for Master and Slave, that I created for this Tutorial, you can download it and open it in Visuino: https://www.visuino.eu


_ztBMuBhMHo.jpg?auto=compress%2Cformat&w=48&h=48&fit=fill&bg=ffffff)


Comments
Please log in or sign up to comment.