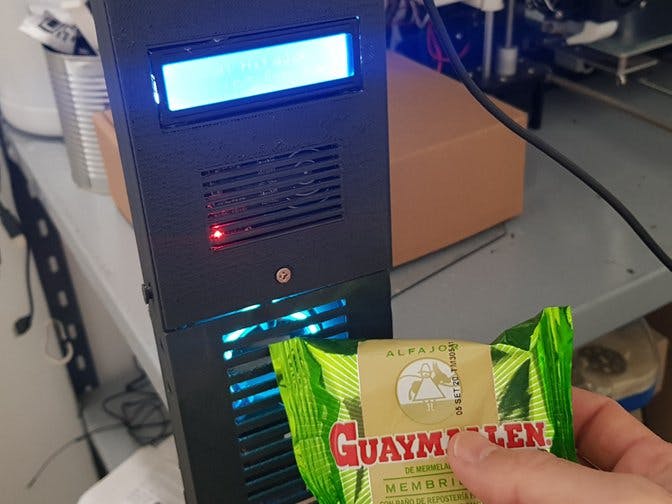
Alfajor is a traditional and exquisite Argentine confection. This Arduino MKR based dispenser will read RFID cards and provide UV sterilized alfajores for authorized employees in your office.
- Arduino MKR 1010 - awarded in Touch Less, Do More contest :)
- SG90 Servo Motor
- Oled 128x32 (Previous version with LCD Display 16x2 with I2C )
- RC522 RFID Reader
- UV lamp and circuit from a cheap pacifier sterilizer
- 5V Buzzer
- Custom case and dispenser mechanism
- BC 548 transistor
When you turn the machine on, Argentine anthem is played through the buzzer – BTW, I know that other countries from South America have their own exquisite alfajores as well-, then Arduino MKR will connect to the WIFI router and listen for RFID cards.
Every time a new card is detected, card ID is sent to a remote server and compared to a database.
If the card is authorized, a counter is increased for reporting purposes and employee name is sent back to the dispenser and displayed on screen. Next, the dispenser turns the UV lamp on to sterilize the alfajor and, finally, the alfajor is released by moving a servo arm (this demo contains one unit but design is extensible so you can hold several ones)
With a little help of Google charts and PHP, consumption reports are displayed through a web page.
After some cardboard testing, I’ve decided to use an extensible vertical tunnel – thanks again Newton's law of universal gravitation – with a servo motor at the bottom. When the servo arm is moved from 0 to 90, the last alfajor is released and the rest goes down.
With Fusion 360 I've designed 3 types docking modules. The first module is for the "brain" (Arduino MKR, RFID reader, buzzer and display) , intermediate tunnel modules hold the alfajores, and the final dispenser module has the UV Lamp and servo arm.
Another small complexity of this project was the sterilization procedure with UV lamp. Living in Argentina means little resources and expensive and almost closed customs, so after some research I’ve got for $50 ($0.40 USD) a used pacifier sterilizer that works with 2 AA batteries
The UV sterilizer is turned on with a single button that must be pressed first for 2 seconds to load the capacitor circuit and then another small press to actually turn on the UV lamp. Even with third world wages, a person to push the button was out of the question and changing the circuit was a little bit complex. I’ve decided to focus on the push button: a single BC 548 transistor used as a digital switch and some code to replicate UV turn on algorithm.
A little more Fusion 360 to design a holder the rounded UV lamp and that was it.
Coding snippetsConnecting the dispenser to WiFi router
// attempt to connect to Wifi network:
  while (status != WL_CONNECTED) {
    Serial.print("Attempting to connect to SSID: ");
    Serial.println(ssid);
    status = WiFi.begin(ssid, pass);
    // wait 10 seconds for connection
    delay(10000);
  }
  Serial.println("Connected to wifi");


  Serial.print("SSID: ");
  Serial.println(WiFi.SSID());
  ip = WiFi.localIP();
  Serial.print("IP Address: ");
  Serial.println(ip);

  display.clearDisplay();
  display.drawBitmap(90, 7,  wifi1_icon16x16, 16, 16, 1);
  display.setCursor(0, 0);
  display.println("Clean Alfajor");
  display.setCursor(0, 10);
  display.println("Local IP");
  display.setCursor(0, 20);
  display.println(ip);
  display.display();
RFID reading
if ( mfrc522.PICC_IsNewCardPresent())
        {
            // New card present
            if ( mfrc522.PICC_ReadCardSerial())
            {

                  tone(BUZZ_PIN, 700);
                  delay(200);
                  noTone(BUZZ_PIN);

                  s1="";
                  // Send card UID
                  Serial.print(" Card:");


                  for (byte i = 0; i < mfrc522.uid.size; i++) {
                          Serial.print(mfrc522.uid.uidByte[i] < 0x10 ? " 0" : " ");
                          Serial.print(mfrc522.uid.uidByte[i], HEX);
                          s1 = s1 + String(mfrc522.uid.uidByte[i], HEX);

                  }

                  Serial.println();
                  Serial.println(s1.substring(0, 14));
                  // Ends reading
                  mfrc522.PICC_HaltA();
                  Serial.print("");
Query remote server
Serial.println("Connection to server...");
                if (client.connect(server, 80)) {
                  Serial.println("connected to server");
                  client.println("GET /server/alfajor.php?uid=" +s1+ " HTTP/1.1");
                  client.println("Host: yourserverhere.com");
                  client.println("Connection: close");
                  client.println();
                }
Release the candy
servo.write(0);
                    delay(dispenserDelay);
servo.write(90);https://github.com/ronibandini/CleanAlfajor
Demo video
What about alfajores?
If you did not try Argentine alfajores, then this is a good time to do so.
Notes about Arduino MKR 1010
Since the contest deadline was approaching and my Arduino MKR 1010 was delayed I’ve made a first version using Arduino Nano. Changing to MKR was easy but I had to replace LCD 16x2 I2c by an Oled screen due to some complications with voltage and interfacing. Oled screen is smaller but I was able to use icons and more information.
Another obstacle found with MKR 1010 was related to the remote server query to authenticate RFID cards. I wasn’t able to parse the response and these "buffer" lines did the trick:
while (!client.available() && timeout < 5000) {
timeout++;
delay(1);
if (timeout >= 5000) {
Serial.println(F("Error, max timeout reached"));
break;
}
}
From server side, I could have used mySQL databases but I wanted to simplify the procedure so a 2 column .csv file is used instead.
01:13:18am~Elon Musk
01:14:52am~Roni Bandini
01:15:47am~Bioy Casares
01:17:08am~Bioy Casares
01:17:26am~Bioy Casares
01:17:53am~Roni Bandini
01:18:49am~Roni Bandini
01:24:15am~Roni Bandini
01:48:50am~Roni Bandini
02:17:08pm~Elon Musk
02:33:08pm~Bioy Casares
The file is readed increasing counters and then Google Charts are populated:
$fn = fopen("alfajor.txt","r");
while(! feof($fn))  {
$result = fgets($fn);
$line = explode("~", $result);
for ($row = 0; $row < $max; $row++) {
if (trim($employees[$row][1])!=""){
if (strcmp(trim($employees[$row][1]),trim($line[1])) == 0) {
$employees[$row][2]++;
}
}
}
}
Follow me for other projects https://www.instagram.com/ronibandini/https://twitter.com/RoniBandini


_3u05Tpwasz.png?auto=compress%2Cformat&w=40&h=40&fit=fillmax&bg=fff&dpr=2)
Comments