This is a controller that maps real-life body movements into the video game Minecraft to get a low-budget AR-ish experience. Unlike most other controllers of this sort, this device also maps realistic walking into the game where each meter walked in real life corresponds to a meter walked in Minecraft.
The device uses force-sensitive resistors attached to the feet to detect steps and an MPU-6050 IMU to measure rotational movements. An Arduino MKR microcontroller, behaving like a keyboard and mouse, then presses the corresponding keys based on the sensor measurements. It also includes mechanical keyboard switches for movements that are more difficult to map from real-life like hitting and breaking.
This project started as a breadboard and then evolved into a printed circuit board; the schematics and code for both can be found later in this page. Check out the development process and gameplay in this video!
InstructionsBreadboard Instructions (Beginner Difficulty)
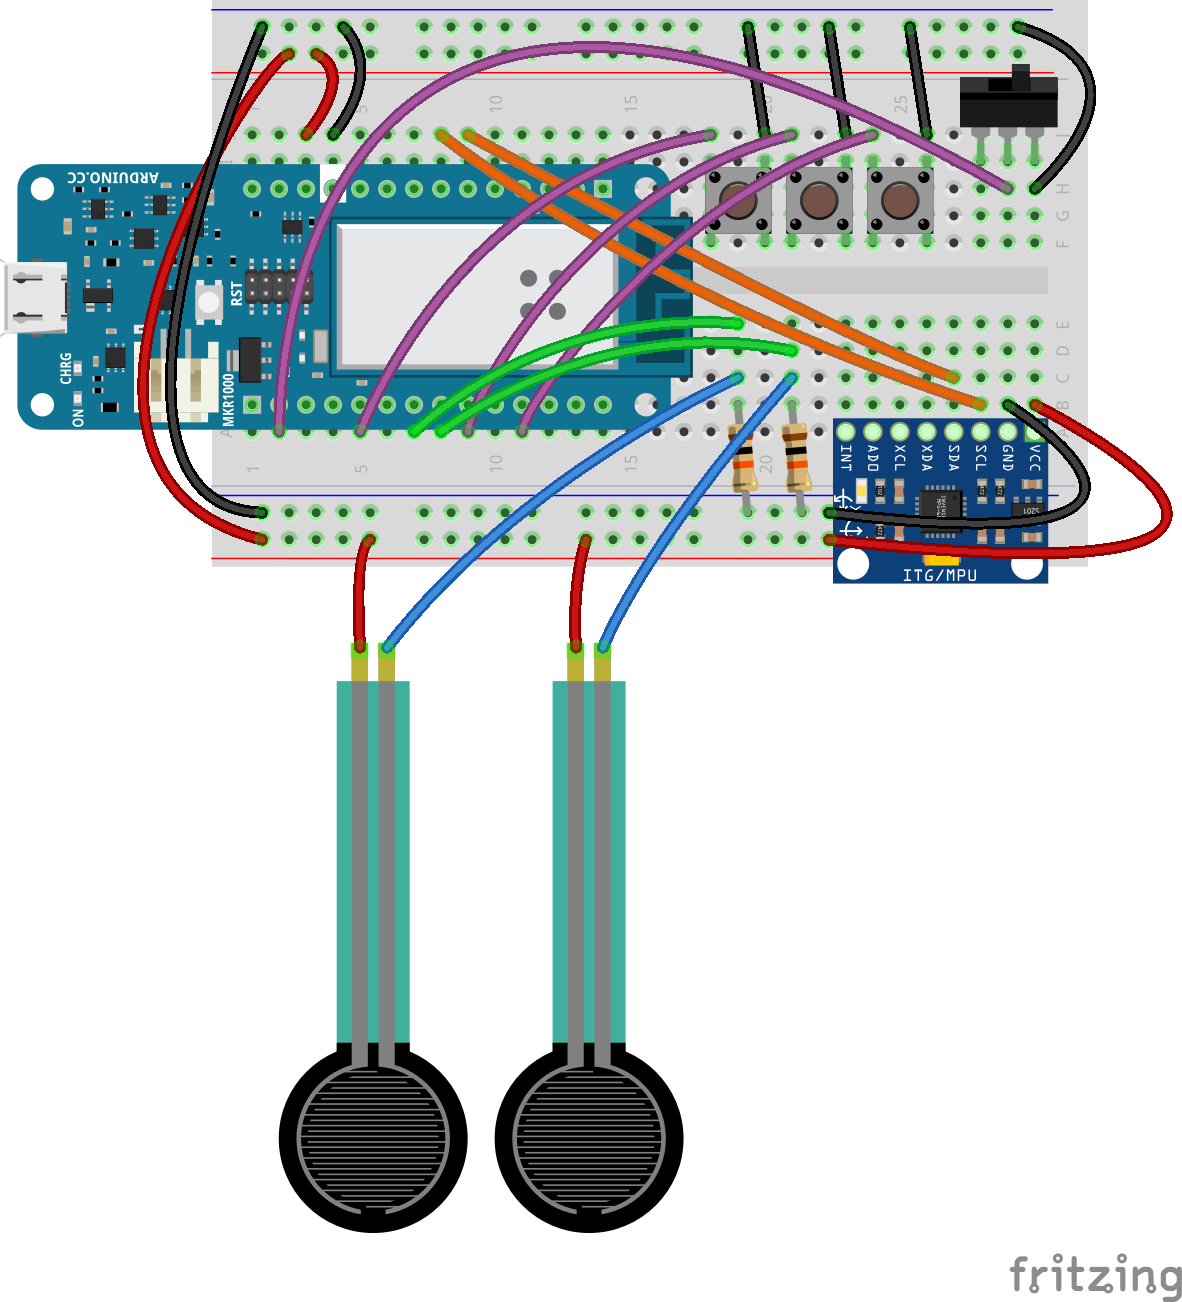
1.) Build the circuit using the schematic in the "Schematics" section on the bottom of the page. It should look something like this (but with longer wires to the force-sensitive resistors so it reaches the feet):
2.) Download the code from the "Code" section on the bottom of the page and open it in the Arduino IDE.
Install the AbsMouse, Adafruit_MPU6050, and Adafruit_Sensor libraries from the Library Manager in the Arduino IDE.
Adjust the screenWidth and screenHeight variables on lines 13 and 14 based on your computer screen (or try using it without adjustments and see if it works fine). Adjust the other variables in lines 12-18, like horizontalRotationSensitivity and stepTime, based on your preferences.
3.) Before uploading the code, make sure to switch the Keyboard/Mouse Activation Switch (the switch on the top-right) off. Then upload the code to the Arduino.
4.) Plug in the device and flip the Keyboard/Mouse Activation Switch on. You're ready to go!
PCB Instructions (Intermediate Difficulty)
1.) Download the PCB files in the "Custom Parts" section on the bottom of the page and fabricate the PCB.
2.) Solder and install the components into the PCB, it should look something like this:
3.) Download the code from the "Code" section on the bottom of the page and open it in the Arduino IDE. Make sure to change buildType on line 12 from 0 to 1.
Install the AbsMouse, Adafruit_MPU6050, and Adafruit_Sensor libraries from the Library Manager in the Arduino IDE.
Adjust the screenWidth and screenHeight variables on lines 13 and 14 based on your computer screen (or try using it without adjustments and see if it works fine). Adjust the other variables in lines 12-18, like horizontalRotationSensitivity and stepTime, based on your preferences.
4.) Before uploading the code, make sure to switch the Keyboard/Mouse Activation Switch (the switch on the top) off. Then upload the code to the Arduino.
5.) Plug in the device and flip the Keyboard/Mouse Activation Switch on. You're ready to go!


_3u05Tpwasz.png?auto=compress%2Cformat&w=40&h=40&fit=fillmax&bg=fff&dpr=2)


Comments
Please log in or sign up to comment.