As the pandemic is getting in control all over the world, many countries are moving forward to open their cities to bring back the momentum but, due to which people are getting out of their homes for work, public gatherings, emergencies etc.
- A big population all over the world does not own a personal vehicle due to which they have to travel to their work, events or simply anywhere with the help of a public transport like buses, trains, cabs etc.
- These public transports can really prove to be the infestation zones for Covid-19 viruses which can lead to another wave for the breakouts again and again.
To control the measures of safety regarding the Covid-19 guidelines and the problem stated above I'm going to build a Pandemic Smart System base upon "AWS IoT EduKit", which can be used in several ways like,
1. Counting the fixed number of people that should travel within a bus/train maintaining safety guidelines released by authorities. (Machine learning can be used for this)
2. Figuring out the temperature of all the travelers according to the mentioned guidelines.
3. Figuring out the social distancing among the travelers.
4. Figuring out the Air Quality within the closed environment of the public transport and applying various measures to keep the air flow good enough to 'prevent virus transmission'.
5. Making an AV(Audio-Visual) feedback system and alert system based upon all points mentioned above for that the safety guidelines can be followed by everyone within economic ways possible by implementing this technology.
6. Raising alarm whenever situation gets out of the limits of feasible safety measures and to guide authorities to re-control them.
- >It is different from existing technology because it is mobile, smarter, easy to use, small sized and cheaper in cost. It is user friendly and simple and easy to implement!
- >It is really useful as AWS IoT EduKit is equipped with all the necessary technology to solve the above mentioned problems in a feasible, easy and economic ways as it has IoT, machine learning, TinyML, Alexa, and other technologies which can be used enough strategically.
Our solution work upon IoT, machine learning, TinyML, Alexa integrated with the sensor grid for air quality, temperature measurement, cameras integrated with the AWS IoT EduKit. Main features:
1. Figuring out that the people are wearing masks properly according to the guidelines(Machine learning can be used for this)
2. Figuring out the temperature of all the travelers according to the mentioned guidelines.
3. Figuring out the social distancing among the travelers.
4. Figuring out the Air Quality within the closed environment of the public transport and applying various measures to keep the air flow good enough to 'prevent virus transmission'.
5. A feedback system and alert system based upon all points mentioned above for that the safety guidelines can be followed by everyone within economic ways possible by implementing this technology.
6. Raising alarm whever situation gets out of the limits of feasible safety measures and to guide authorities to re-control them.
Getting Started1. The very first thing you will be needing to develop any electronics project including microprocessors, circuits, programming languages etc is a developing environment which can be easily provided by an IDE.
So here, we are going to be Installing a suitable IDE for this project which is Visual Studio Code with PlatformIO.
To not make the written content too long and boring, I'm mentioning the official tutorial link for Amazon AWS Edukit Workshop:
Link to basic setup: https://edukit.workshop.aws/en/getting-started/prerequisites.html
Follow this link to install all the prerequisites like:
- git & git dependencies
- Silicon Labs USB to UART bridge setup
- Visual Studio Code installation
- PlatformIO
- Smartphone apps, etc
In my project we'll be implementing the Smart Thermostat setup with the help of which we'll be controlling a home/public space cooling/heating appliances(based upon your own territorial weather conditions) to save electricity/fuel, whether we are in a public transport, public space or even at home.
As the setup and steps for Smart Thermostat implementation is pretty long and not to make all this too long to be boring, I'm sharing the official Edukit Workshop link so you can follow and implement the Smart Thermostat over your own AWS IOT Edukit.
Link: https://edukit.workshop.aws/en/smart-thermostat.html
But, I'll be sharing all of the things I have implemented myself over Smart Thermostat :
#So, first, we are going to be implementing the economic solution to save power within a space and use the cooling/heating device efficiently without letting it run unnecessarily wasting power.
- For that, we going to be syncing data MQTT Messaging Protocol with IoT Core Cloud and our physical M5Stack Core2 machine. I hope you've followed all the steps properly AWS Edukit tutorial, right from assigning certificates, policies to Implementing HVAC application and making good use of the features of the Shadows!!! ;)
State, while HEATING the Space
- Finally! The very successful moment when you start receiving updates on your device as well as over subscribed topics over IOT Core with MQTT and when the side bar LEDs also starts to show Red/Blue color while detecting room temperature change updates for Cooling/Heating, you can now connect it with a power RELAY over to a AC power device for COOLING/HEATING within a Smart Space!
Note: I could not implement over to a direct AC current power device due to safety reasons and no availability of a Grove Relay in my region.
Further
Download my version of Smart Thermostat Code from here: https://github.com/SAILARK001/Smart-Thermostat/blob/main/ST_1.c
1. Open the code and jump to the line 174. Here you'll find a void function named 'pin_read_task()' to read GPIO pin status (digitally -> 0 or 1).
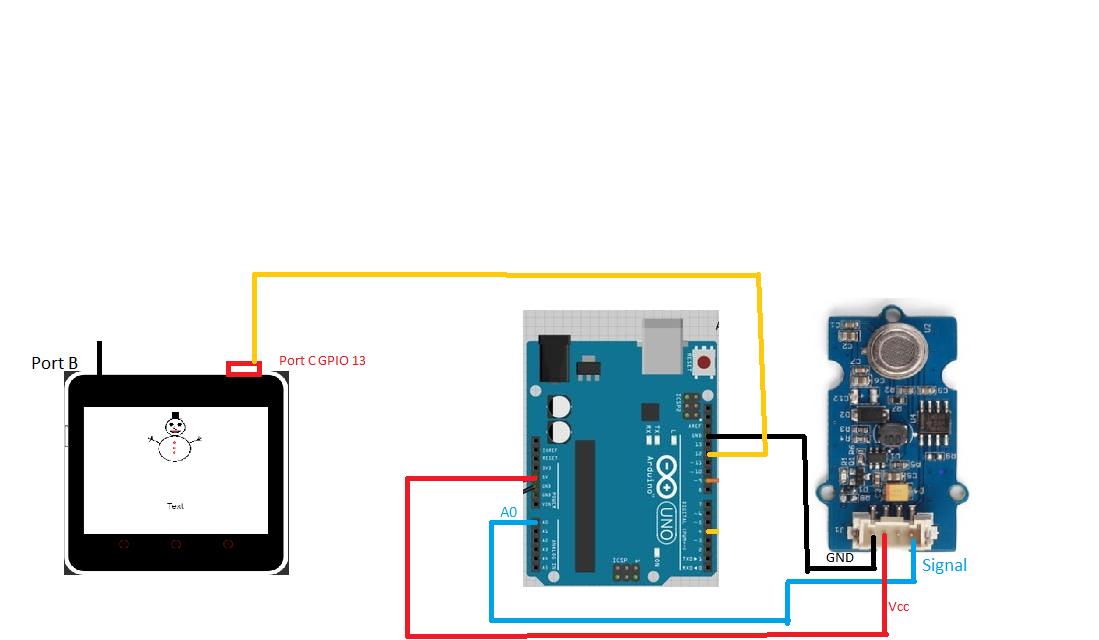
This GPIO pin is connected to an Arduino. Arduino, which is receives data regarding Air Quality Index from a Grove Air Quality Sensor v1.3 sends data to M5Stack IOT Edukit at the GPIO pin specified into the code(in digital form 0 or 1).
- Here arduino is being uploaded with a code which determines the AQI for the surrounding air and updates M5Stack's GPIO pin with 0 or 1. If 1/HIGH is transmitted by arduino, that means AQI is harmful for a "Public Space" and fresh air must be circulated. Note: What's happening on the Arduino side, we'll be learning soon.
- If 0/LOW is transmitted, the ventilation fans circulating fresh air will be turned OFF making it an economic implementation over a public space.
2. Now, jump to line 182 of ST_1.c. Here, you will find a function to write a digital command over a M5Stack's GPIO pin. This pin activates a Ventilation fan to supply fresh air and also filters the air with a 2.5m filter to resist covid-19 viruses and harmful pm particles entering a public space. This pin is activated in response to exceeding AQI range within a public space.
3. Logic Explanation:
- Core2ForAWS_Port_Write(GPIO_NUM_14, output);
ESP_LOGI(TAG, "Output on GPIO %d: %s", GPIO_NUM_14, output ? "HIGH" : "LOW");
here, GPIO Number 14 for Core2 Edukit M5Stack is being activated over Outout mode and the logic is being mentioned for High/Low state accordingly.
- Then comes the do-while loop - which is used to figure out the Input pin state of M5Stack. While the input is 1(binary data coming form arduino with AQI sensor) means the AQI is high enoguh to activate the ventilation fan, the 26th GPIO at port C of M5Stack gets activated and fan starts to run.
- Lastly, the main funtion at the very end of the program calls both the read and write functions to perform there respected task!!!
So here the 4th point of the problem statement in the story of this problem is getting soled:
Figuring out the Air Quality within the closed environment of the public transport and applying various measures to keep the air flow good enough to 'prevent virus transmission'.
This section is achieved with the help of AWS IOT Core where we are using IOT Core services like, MQTT, Detector models, IOT Analytics, IOT Lambda, Arduino and various sensors.
Note: I could not show you it's implementation over Smart Spaces Data sets and model as I have already exceeded the charges for AWS Sagemaker based upon my budget for this project.
But, as I believe you've followed the tutorials over AWS Edukit Workshot for Smart Spaces, It is mainly used to nullify any false values received and refining the working of application for achieving a precised outcome. "Smart Spaces" model is recommended for the accuracy of this project!
Figuring out the second covid-19 guideline - Social distancingHere, we are going to be using another awesome software technology developed by M5Stack, which is UIFlow which is based upon MicroPython. It is used to develop a smart interactive Graphical User Interfeace(GUI) over M5Stack.
Their are a big amount of Grove based sensors that can be used with M5Stack with incorporation of UIFlow
But here, in this module we are only going to be using Buzzer, PIR & Relay sensor units
To maintain and analyze that proper social distances is being followed so that the Covid-19 Virus Transmission can be controled as mentioned in the point 3 of the Problem Statement & Solutions for this project. For this, 2 methods are being applied:
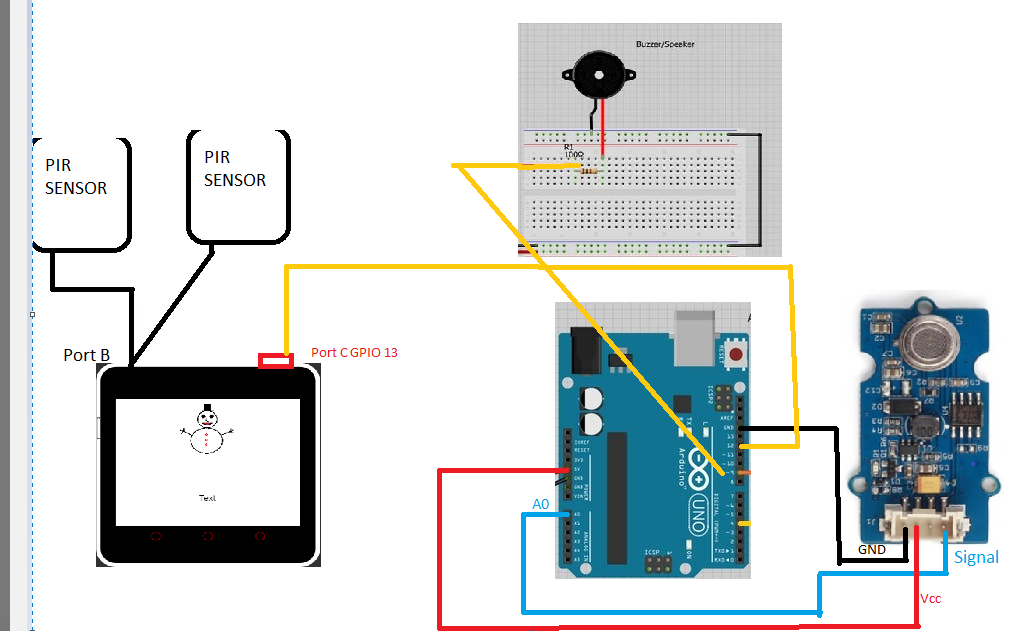
- Passive InfraRed - PIR : As a basic PIR sensor has the sensor field of ~120 degrees, we will be using a Conical projection to control it's angle of spread down to 20 degrees so that only a single person can be identified standing beneath it. A grid of these sensors will be laid within a Public Conveyance so that when 2 person comes closer, the alternate sensor detects them and raise a warning alarm. So, for that,
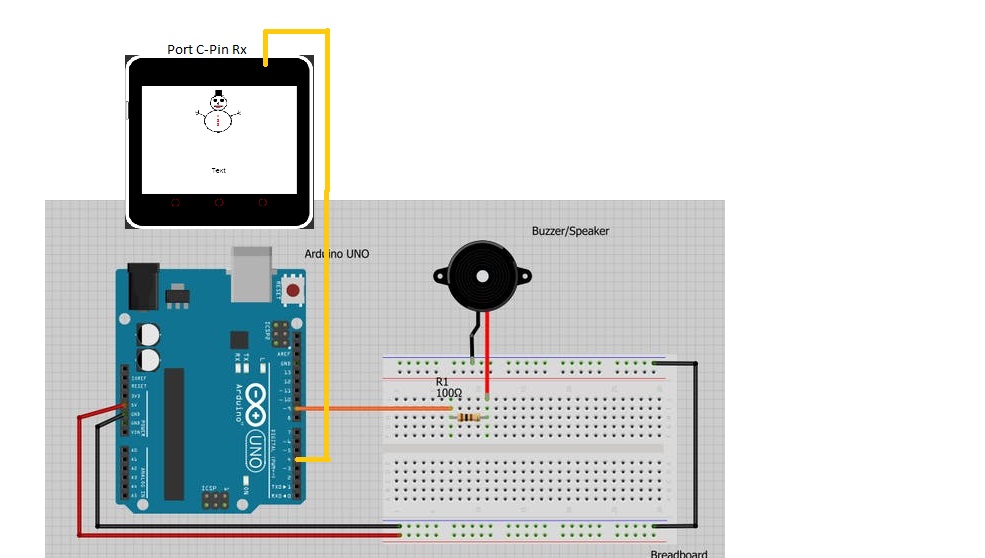
- We will be connecting a Buzzer over to an Arduino and Specifying an input pin for the arduino so that when M5Stack's PIR program executes a (HIGH/1) over to the port C of M5Stack, the arduino code will activate an Output pin over the Arduino which is then connected to a Buzzer, which will act as a warning alarm to maintain safer distance!
Note: You must be thinking that, why can't we connect a buzzer directly to the M5Stack? Reason: UIFlow IDE doesn't have a Buzzer option in Units section so, we are going to be declaring a "Relay" unit and sending an output to the arduino to raise alarm indirectly. Now, follow the tutorial ahead...
Tutorial for UIFlow Social Distance Alarm System1. Follow these steps to install UIFlow software : https://docs.m5stack.com/en/quick_start/m5core/m5stack_core_get_started_MicroPython
2. Installing the software, select the device:
3. Follow the steps in the video to program & setup the UIFlow over your Edukit M5Stack
4. After setting up and Uploading the UIFlow program that you've made, your screen will look something like this:
5. Also connect the Output pin to Arduino. Output pin is the one which has been mentioned as a relay in UIFlow program. Connect pin Rx on Port C of M5Stack to Arduino's Digital Pin 2. Snippet of the code is below for Arduino to read from M5Stack:
// THIS IS JUST A PARTIAL PROGRAM SNIPPET, WHOLE PROGRAM IS DOWNLOADABLE BELOW
const int buzzer = 9; //buzzer to arduino pin 9 // DECLARE BEFORE VOID SETUP
pinMode(2,INPUT);   //DECLARE INSIDE VOID SETUP
pinMode(buzzer, OUTPUT); // Set buzzer - pin 9 as an output
    Serial.begin(9600);
//DECLARE IN VOID LOOP
Serial.println("High pollution!");
          digitalWrite(12,HIGH);
THIS IS JUST A PARTIAL PROGRAM SNIPPET, WHOLE PROGRAM IS DOWNLOADABLE BELOW
6. Make connections like this:
7, Now comes the important step:
- Rather then making multiple coding files, I have merged all the Arduino apecific code within a single file which you can download below or copy the code form here, as this code also carries the code for AQI sensor and other functioning as well:
/*
    Grove_Air_Quality_Sensor.ino
    Demo for Grove - Air Quality Sensor.

    Copyright (c) 2019 seeed technology inc.
    Author    : Lets Blu
    Created Time : Jan 2019
    Modified Time:

    The MIT License (MIT)

    Permission is hereby granted, free of charge, to any person obtaining a copy
    of this software and associated documentation files (the "Software"), to deal
    in the Software without restriction, including without limitation the rights
    to use, copy, modify, merge, publish, distribute, sublicense, and/or sell
    copies of the Software, and to permit persons to whom the Software is
    furnished to do so, subject to the following conditions:

    The above copyright notice and this permission notice shall be included in
    all copies or substantial portions of the Software.

    THE SOFTWARE IS PROVIDED "AS IS", WITHOUT WARRANTY OF ANY KIND, EXPRESS OR
    IMPLIED, INCLUDING BUT NOT LIMITED TO THE WARRANTIES OF MERCHANTABILITY,
    FITNESS FOR A PARTICULAR PURPOSE AND NONINFRINGEMENT. IN NO EVENT SHALL THE
    AUTHORS OR COPYRIGHT HOLDERS BE LIABLE FOR ANY CLAIM, DAMAGES OR OTHER
    LIABILITY, WHETHER IN AN ACTION OF CONTRACT, TORT OR OTHERWISE, ARISING FROM,
    OUT OF OR IN CONNECTION WITH THE SOFTWARE OR THE USE OR OTHER DEALINGS IN
    THE SOFTWARE.
*/
#include "Air_Quality_Sensor.h"

AirQualitySensor sensor(A0);
const int buzzer = 9; //buzzer to arduino pin 9

void setup(void) {
  pinMode(2,INPUT);
  pinMode(12,OUTPUT);//LED

  pinMode(buzzer, OUTPUT); // Set buzzer - pin 9 as an output
    Serial.begin(9600);
    while (!Serial);

    Serial.println("Waiting sensor to init...");
    delay(20000);

    if (sensor.init()) {
        Serial.println("Sensor ready.");
    } else {
        Serial.println("Sensor ERROR!");
    }
}

void loop(void) {
    int quality = sensor.slope();

    Serial.print("Sensor value: ");
    Serial.println(sensor.getValue());

    if (quality == AirQualitySensor::FORCE_SIGNAL) {
        Serial.println("High pollution! Force signal active.");
    } else if (quality == AirQualitySensor::HIGH_POLLUTION) {
        Serial.println("High pollution!");
          digitalWrite(12,HIGH);
          delay(5000);
          digitalWrite(12,LOW);
    } else if (quality == AirQualitySensor::LOW_POLLUTION) {
        Serial.println("Low pollution!");
    } else if (quality == AirQualitySensor::FRESH_AIR) {
        Serial.println("Fresh air.");
    }
if(digitalRead(2)==HIGH){
  tone(buzzer, 1000); // Send 1KHz sound signal...
  delay(1000);        // ...for 1 sec
  //noTone(buzzer);     // Stop sound...
  //delay(1000);        // ...for 1sec
}
else{
  noTone(buzzer);
}
    delay(1000);
}Now comes the 3rd and the most important implementation, The Smart Air Quality Maintenance.
This thing is also a part of the whole setup which is taking place between Edukit IoT Core2 M5Stack + Arduino(with AQI sensor Grove v1.3)
First of all, pin-up all the components like this:
- After this, run this command over VSCode PlatforIO CLI Terminal:
pio run --environment core2foraws --target monitorI'm expecting that you have already replaced my Smart Thermostat & Air quality control.h file in your Smart Thermostat registry.
After running the command, you'll see something just like this:
- When Air is fresh, the output from AQI Sensor through arduino is '0'
- When Air is Polluted, the output from AQI Sensor through arduino is '1', and GPIO 14 for Activated to 'HIGH'
Playlist Link for Edukit Core2 M5Stack Project
https://www.youtube.com/playlist?list=PLDXn0VmddguvLC-j_KRdAFpM5bIJRnpvt
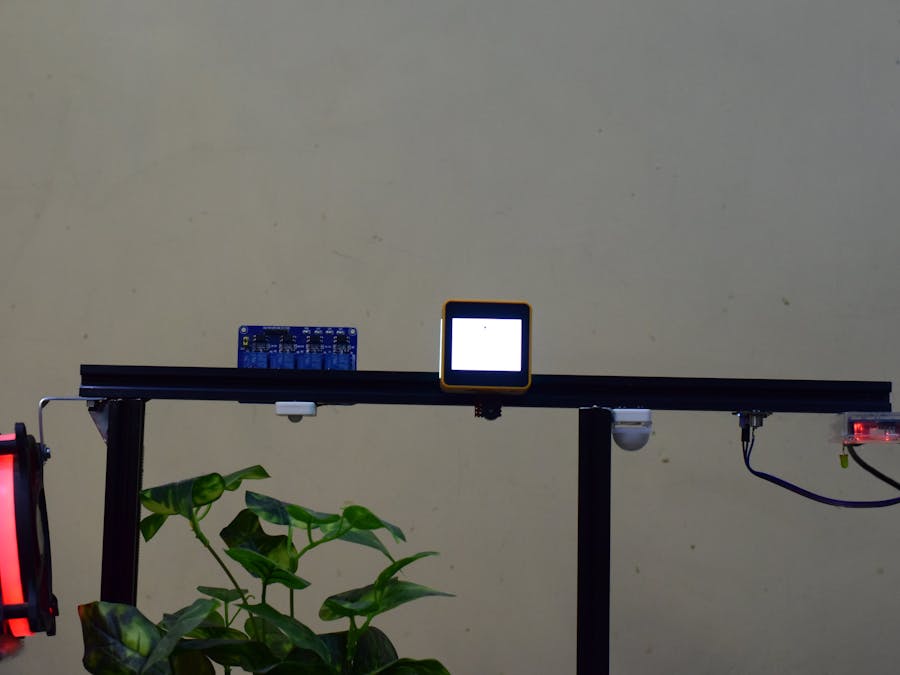
After combining all the modules, the Public Conveyance Supervisor will look like this and is fully functional! ;)


_ztBMuBhMHo.jpg?auto=compress%2Cformat&w=48&h=48&fit=fill&bg=ffffff)


Comments
Please log in or sign up to comment.