

Hardware components | ||||||
_ztBMuBhMHo.jpg?auto=compress%2Cformat&w=48&h=48&fit=fill&bg=ffffff) |
| × | 1 | |||
Software apps and online services | ||||||
 |
| |||||
Hello guys, today in this basic tutorial we will learn about I2C and I2C addresses. These are generally used in microcontrollers having SDA and SCL pins. As like USB port we can pair up to 127 devices to this I2C port. And like USB this one also need 4 pins, VCC, GND, SDA, SCL. USB stands for Universal Serial Bus and I2C for Inter-Integrated Circuit and this protocol widely used for short distance communication.
Arduino I2C:The I2C protocol involves using two lines to send and receive data: a serial clock pin (SCL) that the Arduino Controller board pulses at a regular interval, and a serial data pin (SDA) over which data is sent between the two devices. As the clock line changes from low to high (known as the rising edge of the clock pulse), a single bit of information - that will form in sequence the address of a specific device and a a command or data - is transferred from the board to the I2C device over the SDA line. When this information is sent - bit after bit -, the called upon device executes the request and transmits its data back - if required - to the board over the same line using the clock signal still generated by the Controller on SCL as timing.
Because the I2C protocol allows for each enabled device to have its own unique address, and as both controller and peripheral devices to take turns communicating over a single line, it is possible for your Arduino board to communicate (in turn) with many devices, or other boards, while using just two pins of your microcontroller. Our Arduino uno board has one I2C port, same at two different place in one board. A4 as SDA and A5 as SCL, the other one is above A-reference pin known as D18 and D19, SDA and SCL respectively.
Why I2C Address:We can connect many devices to this port, every device need a unique address so that Arduino can send proper signals and distinguish between the devices. All this is done by finding the address of that connected device. Now follow these steps to get the I2C address of any connected device or sensor.
This is very awesome when using own Arduino for this work, because you can manage the pins and overall looks of any project. All of this is possible by JLCPCB.
I made my own Arduino board, compatible and fully working one. Check them from here with all the circuit and Gerber files. JLCPCB is the only company providing high quality PCB’s in just $2. And If you sign-up using this link, you will get extra rewards and free coupons of worth $30. Checkout to JLCPCB and SMT assembly service from here.
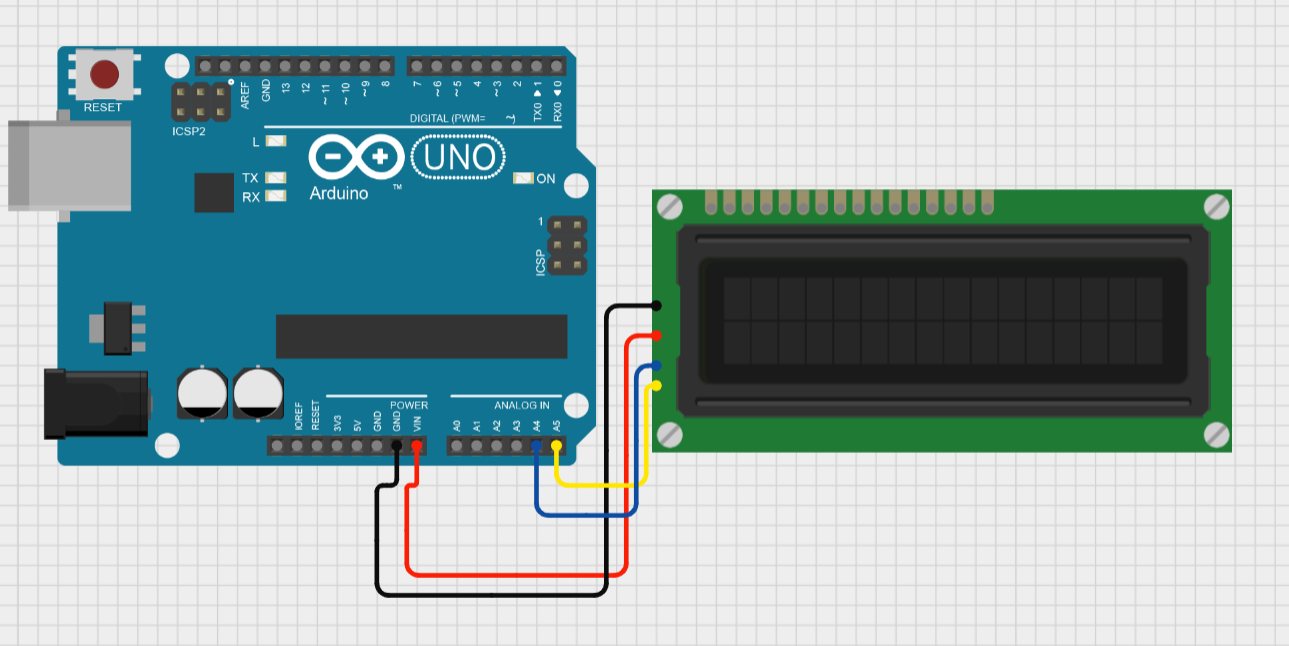
First of all, make the connection of device with Arduino using I2C pins. For example, if you want to know the address of LCD display. Connect using this schematic here.
Cirkit Designer Is a one-stop-shop desktop application for designing and documenting circuits and electronics projects. With Cirkit Designer, you can lay out realistic circuit diagrams that are linked to a bill-of-materials so that you can seamlessly order the parts to your circuit.
Download cirkit designer from Here
In the next release, Cirkit Designer is adding a code IDE with full support for compiling and programming Arduino boards, as well as a library of reference circuit designs (circuit templates including documentation, components and wiring, and code). Cirkit Designer will become the one-stop-shop to help you progress from concept to fully working breadboard prototypes. Simulation will also be added in the future, so that you can test your circuit before buying parts and building anything.
Now flash this code file to Arduino’s memory:
/*I2C_scanner
  This sketch tests standard 7-bit addresses.
  Devices with higher bit address might not be seen properly.*/

#include <Wire.h>

void setup() {
  Wire.begin();

  Serial.begin(9600);
  while (!Serial);
  Serial.println("\nI2C Scanner");
}

void loop() {
  byte error, address;
  int nDevices;

  Serial.println("Scanning...");

  nDevices = 0;
  for (address = 1; address < 127; address++ ) {
    Wire.beginTransmission(address);
    error = Wire.endTransmission();

    if (error == 0) {
      Serial.print("I2C device found at address 0x");
      if (address < 16)
        Serial.print("0");
      Serial.print(address, HEX);
      Serial.println("  !");

      nDevices++;
    }
    else if (error == 4) {
      Serial.print("Unknown error at address 0x");
      if (address < 16)
        Serial.print("0");
      Serial.println(address, HEX);
    }
  }
  if (nDevices == 0)
    Serial.println("No I2C devices found\n");
  else
    Serial.println("done\n");

  delay(5000);
}
Open the serial monitor and get the right address of the device, use one device at a time when finding the address.
Accessing real-time clocksand NVRAM chips that keep user settings.
Accessing low-speed DACsand ADCs.
Changing sound volume in intelligent speakers.
Controlling small (e.g. feature phone) LCDor OLED displays.
Reading hardware monitors and diagnostic sensors, e.g. a fan's speed.
Turning on and off the power supply of system components.


Comments
Please log in or sign up to comment.