Netduino is an open-source electronics platform using the.NET Micro Framework. With Netduino, the world of microcontroller programming is at your fingertips. Netduino is designed to enable both personal projects and sophisticated commercial endeavors. In this section, we’ll set up the Netduino development environment on your computer and build your first Netduino App. This guide was written by Secret Labs LLC. With Netduino and your imagination, you can create great electronic projects.
Development EnvironmentWindows- Visual Studio 2015 - Note, community edition is free, but you’ll need to create an account if you don’t already have one.
- .NETMF Plugin for:
Once these free tools are installed, you’re ready to create your first Netduino App.
UnboxBefore starting Visual Studio 2015 for the first time, unpack your Netduino. Attach its sticky feet. Grab a Micro USB cable and plug the Netduino into your computer. The Netduino drivers should have been installed automatically with the Netduino SDK. If you experience any troubles, they are also available for download from our website.
Many modern cell phones use Micro USB cables for charging. If you did not get a Micro USB cable with your Netduino, you may be able to borrow one from your cell phone.
CreateStart Visual Studio 2015. The installer should have created a folder and shortcut for this program in your Start menu (Programs). The Visual Studio programming environment should launch. Let’s create our first project.
Click on the “New Project…” link. If no link is visible, go to the File menu and select New > Project…
The New Project window should pop up. Visual Studio displays a set of installed templates. We want to pick “Visual C# >.NetMicro Framework” from the list on the left. Then pick “Netduino Application” from the list on the right. Name your project, and press OK.
CodeNow, we’ll write our Netduino App’s code. For a first project, we’ll blink the Netduino’s programmable (blue) LED.
On the right side of the screen, the Solution Explorer shows your project files. Program.cs holds the startup code for your project. We’re going to open it and write a half dozen or so lines of code. Double-click on Program.cs (or right-click and select Open).
In the main section of the window, we are now editing Program.cs. Click on the line underneath the text “// write your code here”. This is where we’ll write our code.
Now, type the following:
OutputPort led = new OutputPort(Pins.ONBOARD_LED, false);
This first line of code creates an OutputPort. An OutputPort lets us control the voltage level of the pins on the Netduino (or in this case the voltage to the blue LED). Pins.ONBOARD_LED is shorthand which tells the Netduino which “pin” of the microcontroller we want to control and the second parameter (false) puts the LED in an initial state of OFF (false).
Now, we’re going to blink the LED on and off repeatedly. A straightforward way to create an action which repeats forever is to put it inside a loop which never ends. Add the following code to your project.
while (true)
{
}
The keyword while tells the microcontroller to do something in a loop while a certain condition is met. This condition is placed in parenthesis. In our case, we use a condition of true. Since conditions are met when they are “true”, passing it “true” means that the loop will repeat forever.
Now, we’ll create the blinking LED code. Between the two sets of curly braces, insert the following four lines of code:
led.Write(true); // turn on the LED
Thread.Sleep(250); // sleep for 250ms
led.Write(false); // turn off the LED
Thread.Sleep(250); // sleep for 250ms
Your final program should look like this:
public static void Main()
{
    // write your code here
    OutputPort led = new OutputPort(Pins.ONBOARD_LED, false);
    while (true)
    {
        led.Write(true); // turn on the LED
        Thread.Sleep(250); // sleep for 250ms
        led.Write(false); // turn off the LED
        Thread.Sleep(250); // sleep for 250ms
    }
}
Now, we’ll deploy your Netduino App to the Netduino and watch it run. By default, Visual Studio runs projects in an emulator. This allows software developers to create and test programming logic for a new hardware product before the actual hardware is built. We won’t use the emulator for our purposes, so we’ll let Visual Studio know that we have physical hardware it should use instead.
Click on the Project menu and select your project’s properties (generally, the last item in the Projects menu). When the project properties appear, click on the “.NET Micro Framework” category on the left side.
Now we will change our deployment target from the Emulator to the Netduino. Change the Transport from “Emulator” to “USB” and then make sure that the Device selection box shows your Netduino. If it doesn’t, unplug and re-attach your Netduino.
Now, we’ll run the project. When we run the project, your code is deployed to the Netduino and then automatically started. We’ll just watch the program run for now, but when you start building sophisticated Netduino Apps you may want to explore the advanced features: while running Netduino Apps you can debug, set breakpoints, step through code, analyze the value of variables, etc.
To run your project, press the “Start Debugging” button in the toolbar at the top of the screen. It looks like the Play button on a music player. You can also press F5 instead.
Visual Studio will now deploy your first Netduino App to the Netduino hardware. In a few seconds, you’ll see the blue LED blinking on and off every half second.
CelebrateYou’ve now created, deployed, and run your first Netduino project. You can unplug the Netduino for your computer and demonstrate your success to others. When you ran the program, it was written into the Netduino’s microcontroller chip…so all you have to do to run the program again is plug it in via a MicroUSB cable or with a power adapter (using the power barrel jack).
You can rewrite over your Netduino App. Visual Studio will automatically stop your current Netduino App whenever deploying a new one.
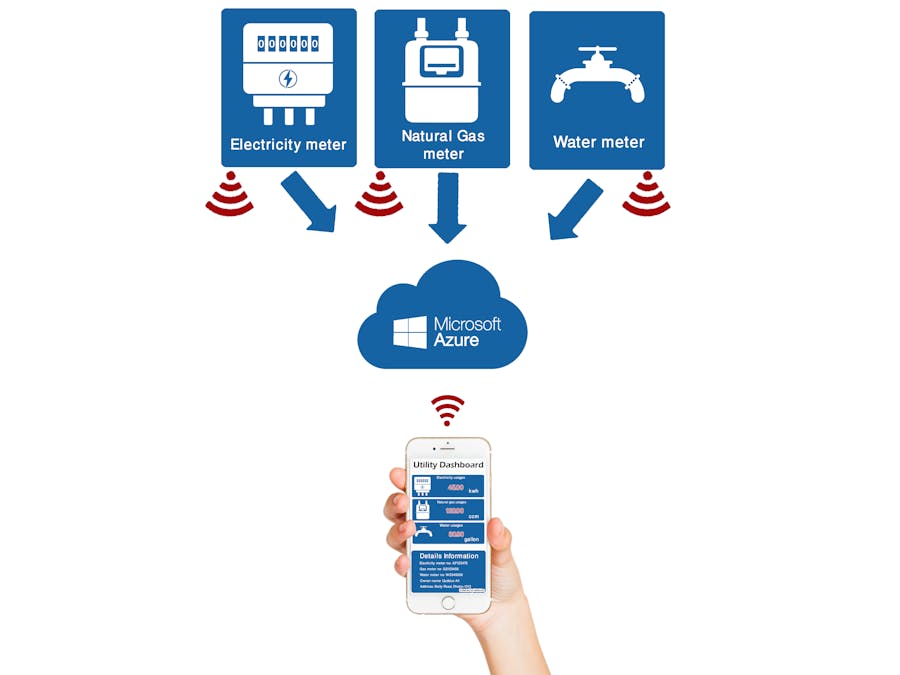
SummaryThe main idea for this project is, building a dashboard for monitoring the utilities usages such as water, gas, electricity. The system is helpful for prepaid users, since prepaid users need to buy credits before use them. Its really difficult for users to check the usages and tracking the remaining credits regularly. The prepaid utility system automatically cut the line if the remaining credits goes zero. This project helps users to prevent cut off situation by monitoring the usages regularly. The system also provides sms based push notification to users if the credits goes low (This part is left for future work). The postpaid users also get benefited from this system. postpaid users able to know the usages amount, which is helpful for excess bills. The utility companies remotely monitor their meters by using this system which is helpful for preparing the postpaid bills. Additional features may be added depending the user’s/company’s needs.
Things you need- Netduino 3 Ethernet version.
- Current sensor.
- Water and Gas flow sensor.
- Android Device
- Internet connection
- Jumper wire.
- CAT5 cable.
- soldering Iron.
- Android Application Development platform.
- IoT Cloud Platform (thinger.io is used here).
- Visual Studio 2015.
- Portable battery or power supply.
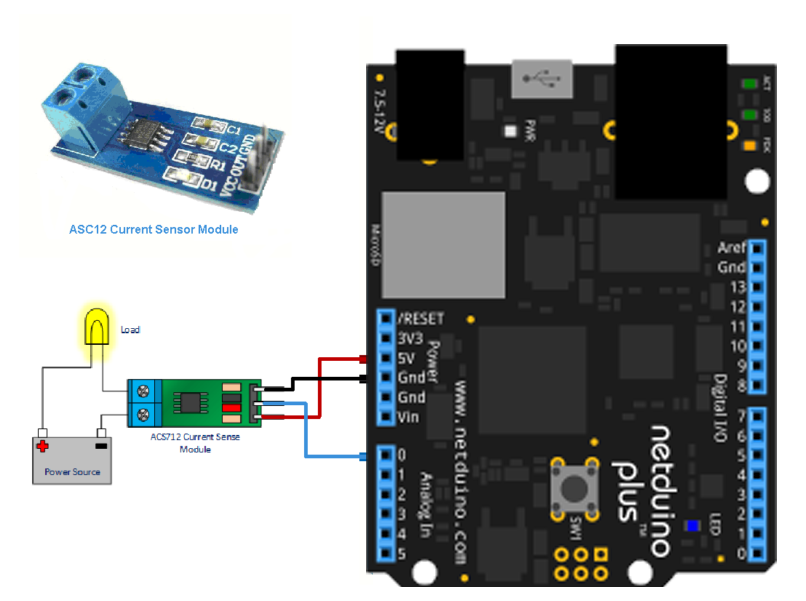
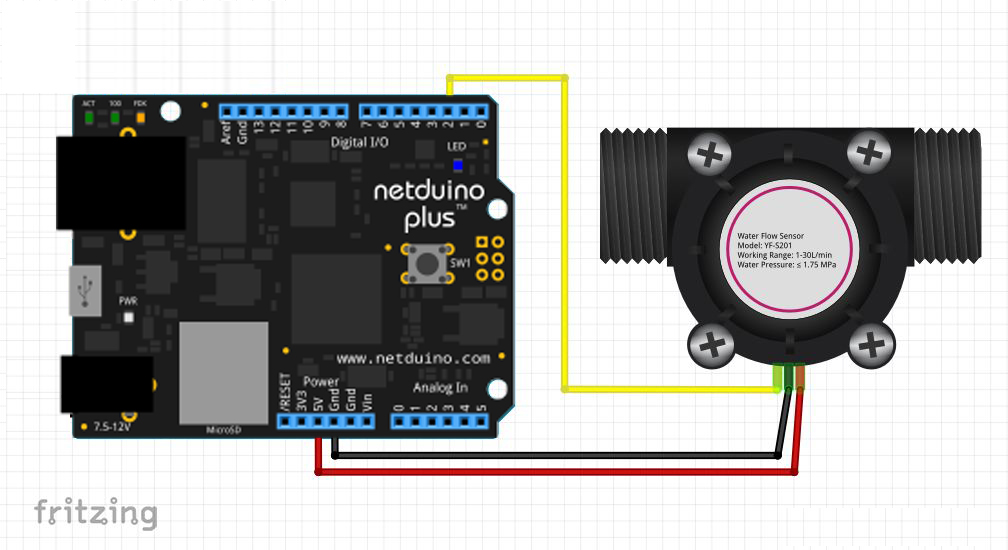
The circuit diagram is given bellow:
The Water and gas flow sensor have three pin.
- Red wire (for VCC).
- Black wire for GND.
- Yellow wire for signal.Connect the signal wire with netduino D3 and D4 pin respectively for GAS and Water sensor. The more details about those sensors are available in SeeedStudio. Please refer their wiki page.
The circuit diagram shows; how current sensor is used for determining the load.
IoT CloudThinger.io IoT cloud platform is used here for building the project. An account is mandatory for connecting the device with thinger.io. please refer the thinger.io documentation section for more details about device connectivity and others.
Mobile AppsA mobile application for remotely monitoring the utilities usages is also developed. The application is directly connected with iot-cloud and it visualizes the real-time information of every meter. Refer the demonstration section for more details. An open-source android application development platform is used for developing the apps.The APK file is available in my git repository
DemoReference


Comments
Please log in or sign up to comment.