The small size and connectivity aspects of Raspberry Pi Zero W makes it a great candidate for IoT Hub scenarios. It can be easily programmed using Python, so it has great potential. This project primarily explains how to do the headless installation of Raspbian OS and Python using Windows and VS Code. It will get you started.
Setting up Raspberry Pi Zero WDownload Raspbian Buster Lite for headless install. If you want desktop version, feel free to choose another version.
- When the App starts, choose Raspbian Lite as OS for headless install.
- Choose SD card drive and start the install.
- When the install is complete, you may have to remove and re-insert the SD card.
Headless Pi can be accessed using SSH via WiFi.
- To enable SSH, create an empty file named
sshin the root folder. Note: No extension - For WiFi connectivity create
wpa_supplicant.conffile in the root folder with the following contents adjusted as per your WiFi. - Note that it must have Linux style line ending. In VS code, it can be done by changing CRLF to LF in the right bottom.
country=US
ctrl_interface=DIR=/var/run/wpa_supplicant GROUP=netdev
update_config=1

network={
ssid="YOUR_SSID"
scan_ssid=1
psk="YOUR_SSID_PASSWORD"
key_mgmt=WPA-PSK
}
Apart from SSID and password, the file may need some other changes. Here are some tips:
- Login into your WiFi portal to see if it is of type WPA-PSK or WPA2-PSK
- If it is of WPA2-PSK, setkey_mgmt=WPA2-PSKCheck how encryption is done in the portal. If it is AES, add the following line before key_mgmtpairwise=CCMP
- If you would like to share more tips, please add them to the comments.
Pleasesave the files locally too. As the wpa_supplicant.conf file may needing tweaking. And after you plug the SD card in the Raspberry Pi Zero and again in the PC, you might find that the files that you created have disappeared. That is normal.
- Plug your SD card in the Raspberry Pi and connect it to your PC using USB cable. It takes several minutes for it to boot.
Open Terminal in VS Code with Powershell
- Type command
ssh pi@raspberrypi.local - If you get response like unable to find host, some troubleshooting tips are listed above.
- By default the user name is pi and password is raspberry
- If you are successful at the login, initial installation and connection to Wi-Fi is successful :)
Before installing Python, you may want to make sure that the Raspbian OS is up to date. To get the latest update, run the following command:
sudo apt-get update
Raspbian comes with Python 2.7.xx installed (as of this writing). You should uninstall that and install Python 3. To uninstall Python 2.7.xx, run the following commands:
sudo apt-get remove pythonsudo apt autoremove
Now start installing Python 3 and the required packages
sudo apt-get install python3sudo apt-get install python3-rpi.gpiosudo apt-get install python3-smbus
Now you are ready to program Raspberry Pi Zero W. Before you connect your circuit, shutdown the Pi from SSH using the following command and disconnect the USB.
sudo shutdown
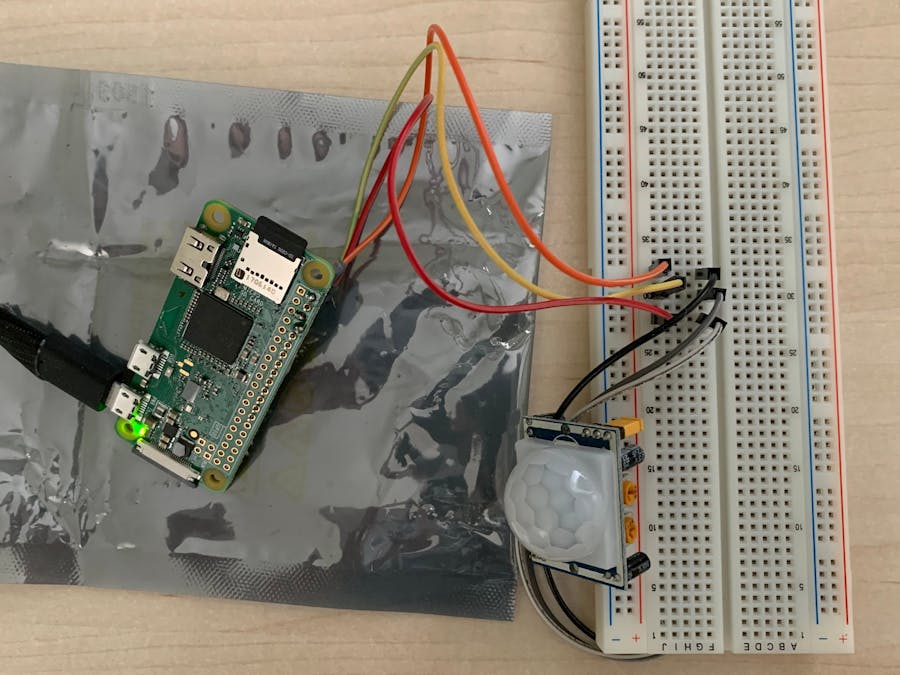
This is a small project that shows communication with GPIO port and prints a message. It consist of a PIR motion sensor that detects if a human is in front of it. Based on that it sets the port to High when something is in its vicinity and to low when nothing is near by. The program will print 111 or 000 depending upon the state of the port. (Why take trouble to turn LED on/off, if you can see the print message?)
Connect the circuit as follows (Refer to Schematics section for Fritzing file):
It is assumed that you are familiar with Python. In the program, GPIO ports are declared using BCM convention and are initialized using RPI library. The loop monitors the port with 1 second interval and prints corresponding message. Here is the code:
# import library for GPIO
import RPi.GPIO as GPIO
# print GPIO info
print(GPIO.RPI_INFO)

# time library
import time

# Port of PIR
pir_port = 14

# Setup GPIO mode to Broadcom
GPIO.setmode(GPIO.BCM)

# configure the pin as input pin
GPIO.setup(pir_port,  GPIO.IN)

# do the loop
try:
    while (True):
        # if the input is zero, nobody is there at the sensor
        if GPIO.input(pir_port) == 0:
            print("000")
        else:
            # found somebody at the sensor
            print("111")
        # wait for 1 sec whether you detect someone or not
        time.sleep(1)
# If user presses ^C cleanup the GPIO
except KeyboardInterrupt:
    GPIO.cleanup()
print("Exiting")
This code can be saved locally on your windows machine and transferred to Raspberry Pi. Transfer the file checkPresense.py to Raspberry Pi using WinSCP. (Alternatively, the file can be edited in Raspberry Pi using nano editor.)
After the transfer, go to VS Code -> Terminal, SSH into Raspberry Pi.
With ls command you will see the transferred file there. Now run the following command:
python3 checkPresense.py
You will see 000 and 111 being printed based on what is in front of the PIR sensor.
Hope this gets you started on Raspberry Pi Zero W with Python 3. Please share the post to spread the word.
PS: Thanks to Brother Hackathon for providing Raspberry Pi Zero W.


Comments
Please log in or sign up to comment.