


Hardware components | ||||||
 |
| × | 1 | |||
Software apps and online services | ||||||
 |
| |||||
| ||||||
| ||||||
The following tools are required to run this demonstration.
- A runtime environment for the chosen oneM2M platform (cf. section 3) : - Java Runtime Environment (JRE >= 1.8) if you use Eclipse OM2M - Python 3 environment if you use ACME - NodeJS environment if you use KETI Mobius
- Arduino IDE 1.8.9 (or later)
- Your favorite IDE to develop your IoT application
- Node.js environment OR Python environment for IoT Applications
- Postman (Optional)
- A weather info API access from OpenWeatherMap
Download the necessary resources from the main repository:
https://github.com/oneM2M-Tutorials
This repository includes different projects:
- oneM2M-IoT-Device: The NodeMCU Sketch(es)
- oneM2M-IoT-Application: IoT applications written in Node.js & Python
- oneM2M-IoT-Device-Simulator: Node.js program to simulate various IoT sensors & actuators
You will also need an implementation of oneM2M platform. Different platforms exist, we can cite some:
- Eclipse OM2M: An open-source implementation in Java (link)
- ACME: An open-source implementation in Python (link)
- KETI Mobius: An open-source implementation in Node.js (link)
For this tutorial, ACME implementation will be used. Refer to the official documentation for installing, configuring, and running the platform.
https://github.com/ankraft/ACME-oneM2M-CSE
4. Start the oneM2M-compliant IoT Platform4.1. Configure the IoTPlatform (ACME)
The default configuration can be used for a local demonstration. The IoT platform will listen on port 8080. The database is reset after each restart.
If needed, you can change the configuration of the IoT Platform by editing the file: "acme.ini”.
4.2. Start the IoTPlatform (ACME)
The IoT Platform can be launched through:
python3 acme.pyYou should see at the end of the logs "CSE Started".
4.3. Login to ACME web interface
Open the following URL in your browser to access the ACME IoT platform web interface: http://127.0.0.1:8080/
With the default configuration, enter the originator "CAdmin" and then "Connect"
You will be then able to see the oneM2M resource tree:
The NodeMCU source code is available on the folder "oneM2M-IoT-Device" folder.
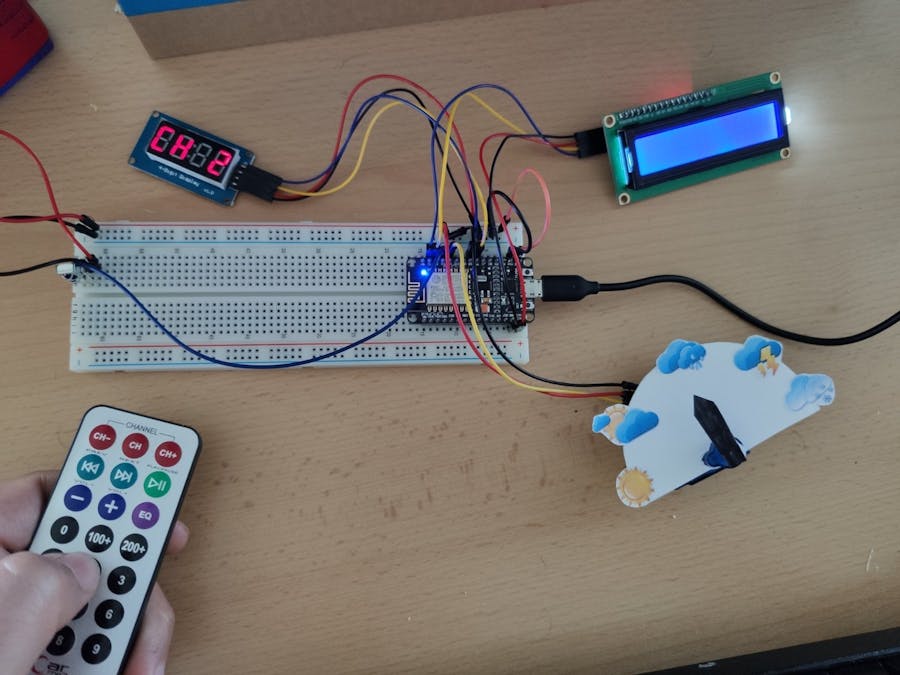
5.1. Schematics
Connect the IR Receiver, the 4-Digits Display, the Servo Motor, the LCD Display to the NodeMCU board using the following components:
- Breadboard
- NodeMCU board
- IR Receiver (+ its Remote Control)
- Servo Motor
- 4-Digits 7-Segments Display (TM1637)
- LCD Display (2x16)
5.2. Set up Arduino IDE for NodeMCU development
If not already installed, download and install the Arduino IDE from the following link: https://www.arduino.cc/en/Main/Sousing
NB: We do not recommend using the Arduino Web Editor for this demonstration because the NodeMCU board is not supported.
When plugged, if the NodeMCU port is not detected, then you need to download and install the USB driver manually using the following link: https://github.com/nodemcu/nodemcu-devkit/tree/master/Drivers
5.3. Add NodeMCU board support to Arduino IDEFirstly, open the Arduino IDE, go to "Files" > "Preferences" entry.
Copy the below URL in the "Additional boards Manager URLS" Textbox:
http://arduino.esp8266.com/stable/package_esp8266com_index.json
Click "OK" to close the "Preferences" dialog box.
After completing the above steps, go to "Tools" > "Board:..." and then select "Board Manager"
Type in the textbox "esp8266", then navigate to "esp8266 by esp8266 community" and "install" the software for Arduino.
Go to "Tools" > "Board...", and then select "NodeMCU 1.0" board.
Once all the above process been completed, you are ready to program the NodeMCU board with Arduino IDE.
5.5. Configure the NodeMCU sketch
Open the sketch "NodeMCU_RemoteControlSensor-ServoActuator.ino" in your Arduino IDE.
Set your WIFI parameters
char* WIFI_SSID = "FILL_THE_WIFI_SSID";
char* WIFI_PSWD = "FILL_THE_WIFI_PSWD";
Set the IP address of the ACME IoT platform in your network:
String CSE_IP = "X.X.X.X";
5.6. Compile the NodeMCU sketch
Click on verify button to compile the sketch.
Compilation output:
5.7. Upload the sketch to theNodeMU board
Click on upload button to upload the sketch to the NodeMCU board.
Upload output:
5.8. Debug the code execution using serial monitorClick on button to open the Arduino Serial Monitor to display the NodeMCU console.
Then after opening the Serial Monitor select 115200 from the drop-down list.
5.9. Check IoT device resources on ACME web interface
You should see “RemoteControlSensor” Application Entity resource with “DESCRIPTOR” and “DATA” containers created on the oneM2M web interface.
You should also see “ServoActuator” Application Entity resource with “DESCRIPTOR”, “DATA”, and "COMMAND" containers created on the oneM2M web interface.
The potentiometer monitoring and display management application source code is provided in NodeJS and Python. The source code is available on the folder:
"oneM2M-IoT-Application/nodejs/onem2m-monitor.js""oneM2M-IoT-Application/python/onem2m-monitor.py"
6.1. Configure the application
You can use one of the two provided applications: NodeJS OR Python
6.1. Option A = NodeJS IoT Application
Open the file nodejs/config/default.json with your favorite text editor. and edit the necessary configuration parameters.
Set the IP address of the ACME platform (variable "monitorIP"). You can keep localhost (127.0.0.1) if you are running the ACME platform and the application in the same computer.
Fill in the API Token obtained from OpenWeatherMap in the variable "weatherAPIToken"
6.1. Option B = Python IoT Application
Open the file python/default.json with your favorite text editor. and edit the necessary configuration parameters.
Set the IP address of the oneM2M platform (variable "monitorIP"). You can keep localhost (127.0.0.1) if you are running the oneM2M platform and the application in the same machine.
Fill in the API Token obtained from OpenWeatherMap in the variable "weatherAPIToken"
6.2. Start the application
6.2. Option A = NodeJS IoT Application
On a terminal, install the following Node.js modules using the npm tool (installed by default when Node.js is installed):
> npm install express
> npm install request
> npm install body-parser
> npm install request
> npm install yargs
> npm install config
Start the Node.js oneM2M IoT application using the following command:
> node onem2m-monitor.js -s RemoteControl -a Servo6.2. Option B = Python IoT Application
On a terminal, install the following Python modules using the pip tool (can be installed when Python is installed):
> pip install requests
> pip install flask
Start the Python oneM2M IoT application using the following command:
> python onem2m-monitor.py -s RemoteControl -a Servo6.3. Check IoT application resource on ACME web interface
You should see “Monitor” Application Entity (AE) resource created on the oneM2M web interface. Also check the creation of Subscription resource under "RemoteControlSensor/DATA"
When you click on the RemoteControl buttons, the selected "channel/command" is directly copied on the 4-Digits Display.
The value of the "channel/command" is sent over WiFi to the remote CSE. This value is then notified to the monitor application. The value is assumed to represent a predetermined city name.
Based on the received value, the monitor application will look in the Web for the corresponding weather information and then it will send a specific position to the ServoMotor on the NodeMCU through the CSE.
The ServoMotor is attached to a paper where each position is related to a specific weather state :
Sunny = 180°Cloudy = 135°Rainy = 90°Stormy = 45°Snowy = 0°
The corresponding weather state to the received ServoMotor position is also shown on the LCD Display.
If you have a second NodeMCU, you can split the sensors and actuators over the two NodeMCU devices.
8.1 Architecture
8.2 Schematics
8.3 NodeMCU Sketchs
You can find the original sketch code splitted into two new sketchs in the folder:
"oneM2M-IoT-Device/RemoteControlSensor_ServoActuator"
NodeMCU 1 (sensor only)
"RemoteControlSensor/RemoteControlSensor.ino"
NodeMCU 2 (actuator only)
"ServoActuator/ServoActuator.ino"
8.4 IoTApplication
Thanks to oneM2M standard, you can use the same IoT application without any changes :-)


Comments
Please log in or sign up to comment.