Follow the Arm Software Developers team for more resources like this! Twitter: @ArmSoftwareDev YouTube: Arm Software Developers.
IntroductionMy colleague David Henry recently built a new office in his garden to work from home in as part of Arm's approach to hybrid working. Since the office is separated from the main house, he was not being informed when someone rang the doorbell to deliver a package.
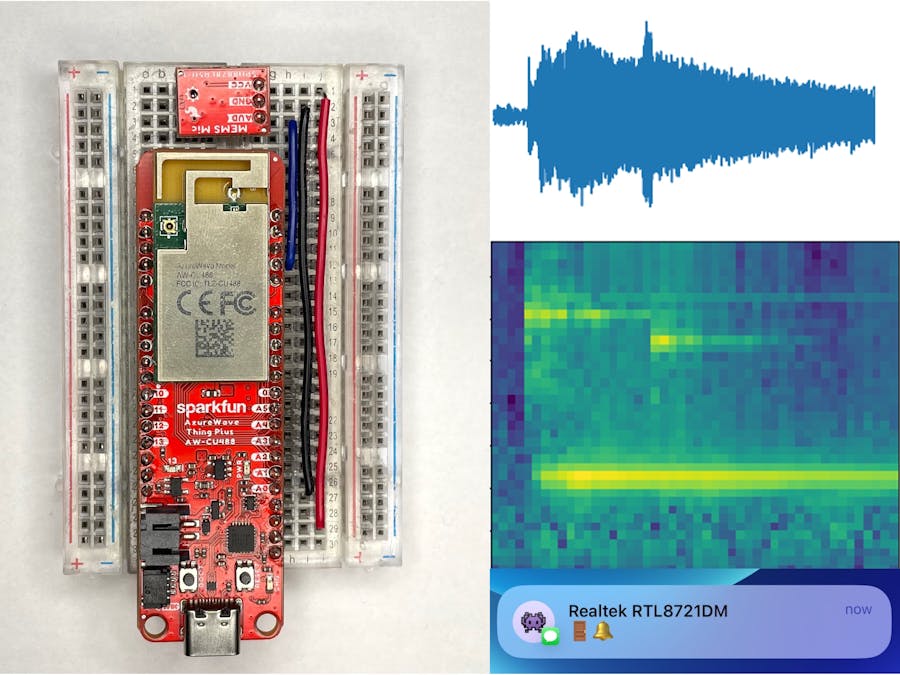
This inspired me to create an Arm microcontroller-based doorbell notifier device. The device is focused on preserving privacy by capturing audio data from a microphone and processing it locally on the device using on-board Digital Signal Processing (DSP) and Machine Learning (ML) inferencing. When the device detects a doorbell sound in the main house it sends David an SMS message.
This guide will provide an overview of the hardware and software used in this project, and will also run through how to create your own device. The source code for this project can be found on GitHub
HardwareSparkFun recently introduced the SparkFun AzureWave Thing Plus - AW-CU488 development board. This board features a Realtek RTL8721DM SoC which contains:
- An Arm Cortex-M33 compatible Real-M300 CPU that runs at 200 MHz
- 512 KB of SRAM and 4 MB of PSRAM
- 4 MB of flash
- Built-in 2.4 GHz and 5 GHz Wi-Fi connectivity
- Built-in audio codec with two analog inputs and two analog outputs
The SoC's compute, built-in audio input and Wi-Fi connectivity make it the perfect platform for this project!
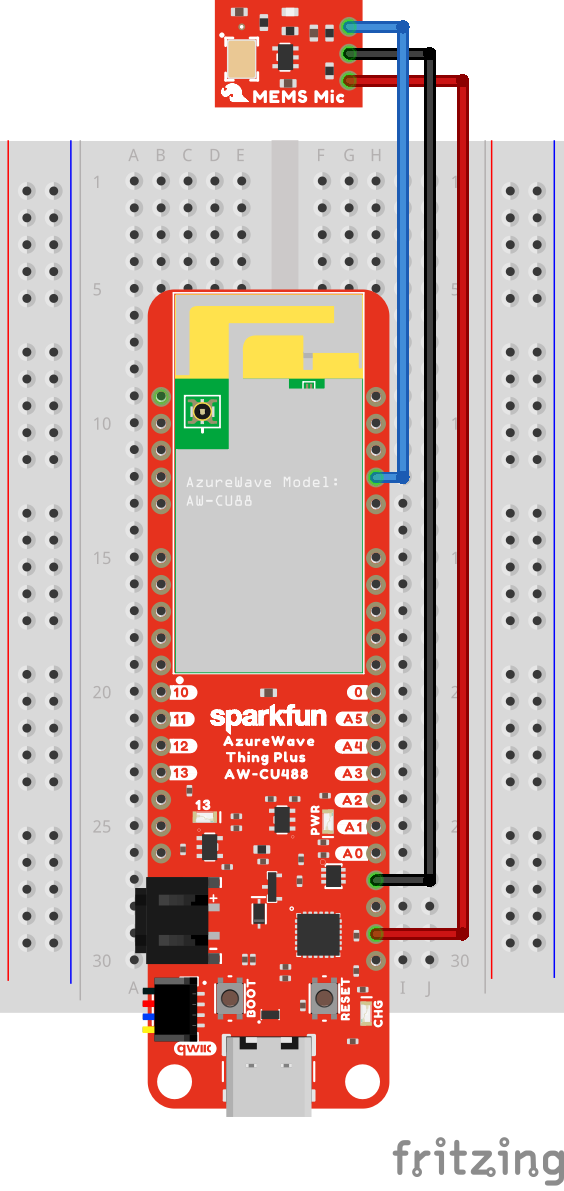
As per SparkFun's hookup guide, a SparkFun Analog MEMS Microphone Breakout - SPH8878LR5H-1 can be connected to the boards using a breadboard:
+------------------------------ + ------------------------------- +
| SparkFun AzureWave Thing Plus | Analog MEMS Microphone Breakout |
| ----------------------------- + ------------------------------- +
| 3V3                           | VCC                             |
| GND                           | GND                             |
| 22 (PA4)                      | AUD                             |
+ ----------------------------- + ------------------------------- +
Important: The microphone breakout captures sound from the side of the breakout with the labels. So make sure the labels on the breakout are facing up when soldering headers to it!
The Realtek Ameba team has created an Arduino IDE board package that supports several RTL8721DM based boards including the SparkFun AzureWave Thing Plus. This board package allows developers to use the Arduino IDE and Arduino APIs to develop applications for the board. It contains many built-in libraries, including:
- AudioCodec - to control and manage the hardware Audio Codec
- WiFi - to control and manage the hardware Wi-Fi interface and UDP or TCP sockets
The board package also includes Arm's CMSIS-DSP library which is used in this project for optimized Digital Signal Processing. Realtek also provides TensorFlow Lite for Microcontroller (TFLM) support for the board using the Ameba_TensorFlowLite Arduino Library. This library includes Arm's CMSIS-NN library, which provides optimized Neural Network compute kernels for Arm Cortex-M processors.
The board can leverage an internet connection and use Twilio's Programmable SMS API over HTTPS to send SMS messages to a cellphone.
The Arduino sketch for the application does the following:
=> setup()
- Initializes the DSP pipeline and ML model (more details on these next)
- Connects to the Wi-Fi network
- Initializes the Audio Codec for (mono) microphone 16-bit input and a sample rate of 16 kHz
=> loop()
- Waits for new audio input from the Audio Codec
- Runs the new audio input through the DSP pipeline
- Performs ML inferencing
- Exponentially smooths the model's prediction
- If a doorbell sound is detected and a message has not been sent in the last 30 seconds, use the Twilio's Programmable SMS API to send an SMS message
The AudioCodec library provides 512 new samples at a time when capturing 16-bit audio data from an analog microphone at a sample rate of 16, 000 Hz. To achieve real-time processing the DSP and ML processing steps must take less the 32 milliseconds (512 / 16000 = 0.032 seconds) in total.
The audio data is first transformed into a spectrogram, which will show how the frequencies in the audio change over time. A window length of 480 samples, stride of 320 samples, and a Fast Fourier Transform (FFT) length of 256 is used to generate the spectrogram on 1 second of audio (16, 000 samples). This step results in a 49x129 2D array. The spectrogram below was created from a doorbell which emits a "ding-dong" style sound. You can see the "ding" sound has a frequency of ~4000 Hz, and the "dong" sound has a frequency of ~3000 Hz, there is ringing sound below 1000 Hz.
Mel scale can then be used to reduce the output of the 129 FFT bins to 40 Mel bins, this transforms the 49x129 spectrogram data to a 49x40 Mel spectrogram.
The data in the Mel spectrogram is then converted to dB scale by using the following formula:
mel_power = 10 * log(mel * mel) / log(10)Updating the Mel power spectrogram using floating point operations on the board with the data of 512 new samples of audio takes ~3.4 milliseconds. The code for these operations can be found in the QuantizedMelPowerSpectrogram.h file on GitHub.
An image classification ML model can then be used to classify the 49x40 Mel power spectrogram version of the audio. This project uses the same tiny_convmodel architecture that is used in the TFLM Micro Speech example.
However, instead of having 4 types of classification, our model will have 5:
- Doorbell -🚪🔔
- Music - 🎶
- Domestic and home sounds - 🏠
- Human voice - 🗣
- Hands (clapping, finger snapping) 👏 🫰
The model can be created with TensorFlow Keras API's:
import tensorflow as tf

# ...
norm_layer = tf.keras.layers.Normalization(axis=None)
# ...

model = tf.keras.Sequential([
  tf.keras.layers.Input(shape=(49, 40, 1)),
  norm_layer,
  tf.keras.layers.DepthwiseConv2D(
    kernel_size=(10, 8),
    strides=(2, 2),
    activation="relu",
    padding="same",
    depth_multiplier=8
   ),
   tf.keras.layers.Flatten(),
   tf.keras.layers.Dense(5, activation="softmax"),
])
The Python notebook used to train the ML model and convert it to TensorFlow Lite format to run on the board can be found on GitHub. The model was trained on a subset of the FSD50K dataset.
Model inferencing takes ~14 ms on the board and the source code for this can be found in the Model.h file on GitHub. The combined ~3.4 ms from the DSP step and ~14 ms from model inferencing step is well under the 32 ms requirement to achieve real-time processing - this leaves breathing room to expand the number of outputs the model has and/or explore more complex model architectures.
Follow the instructions below to set up Twilio and get the required configuration values for the Arduino sketch:
1)Sign up for a Twilio account and log in.
2) Scroll to the "Account Info" section and make note of the Account SID, Auth Token and My Twilio phone number values - these values will be needed for the Arduino sketch.
The WiFi library in the Realtek Ameba board package provides a WiFiSSLClient class, which can be used for the SSL/TLS connection to Twilio's REST API server. This class is compatible with the ArduinoHttpClient library, and will enable us to send requests to Twilio's Programmable SMS API using HTTPS.
The board will need to send an HTTP POST request to https://api.twilio.com/2010-04-01/Accounts/<Account SID>/Messages.json with a application/x-www-form-urlencoded request body containing the following values:
To- the phone number to send the message toFrom- the Twilio number the message is fromBody- the message text
Twillio's API requires HTTP Basic Access Authentication, with the username and password having values of the Account SID and Auth Token respectively.
The code used to send the message can be found in the TwilioClient.h file on GitHub.
1)Follow the "Setting Up Arduino" section of SparkFun's "AzureWave Thing Plus (AW-CU488) Hookup Guide"
2) Install the "ArduinoHttpClient" library in the Arduino IDE using: Sketch -> Include Library -> Manage Libraries ..., search for "http", click the Install button:
3) Follow the steps in the TensorflowLite_patch read me and patch the Arduino board package.
4) Download Ameba_TensorFlowLite.zip from the Arduino_zip_libraries folder on GitHub. In the Arduino IDE, Sketch -> Include Library -> Add .ZIP Library... and select theAmeba_TensorFlowLite.zip file that was downloaded in the previous step.
5) Then select board type using Tools -> Board -> AmebaD ARM (32-bit) Boards -> SparkFun AzureWave Thing Plus - AW-CU488 (RTL8721DM).
6) Connect the board to your PC with a USB C cable and select the serial port for the board using Tools -> Port.
1) Download the code using git:
git clone https://github.com/ArmDeveloperEcosystem/aiot-doorbell-notifier-example-for-ameba.gitYou can also, download the code as a zip file.
2) Open the ameba_doorbell_notifier/ameba_doorbell_notifier.ino sketch in the Arduino IDE.
3) Configure your Wi-Fi settings and Twilio account information in the arduino_secrets.h tab.
#define WIFI_SSID          "<Wi-Fi network SSID>"
#define WIFI_PASS          "<Wi-Fi network password>"

#define TWILIO_ACCOUNT_SID "<Twilio Account SID>"
#define TWILIO_AUTH_TOKEN  "<Twilio Auth Token>"
#define TWILIO_TO          "<Phone number to send SMS messages to>"
#define TWILIO_FROM        "<Twilio number to send SMS messages from>"
4) Put the board into flash download mode by holding down the BOOT button while pressing and releasing the RESET button.
5) Then press the Upload button in the Arduino IDE to start uploading the code.
6) After the sketch is uploaded, open the Arduino IDE's Serial Monitor, using Tools -> Serial Monitor, and set the baud rate in the bottom left-hand corner to 115200.
7) Press the RESET button on the board to start the application.
8) In the Serial Monitor you will see the board trying to connect to the Wi-Fi network and if successful a message indicating the board has starting the audio codec and is listening for doorbell sounds.
9) In your browser playback the Door Bell Chime slow.aif clip from FreeSound to test if the board detects it as a doorbell and sends an SMS message to you via Twilio. (You might have to adjust the playback volume.) Try some other doorbell audio samples from the FSD50K dataset as well as test sound from your own doorbell.
ConclusionThis project demonstrated how the compute, audio codec, and Wi-Fi connectivity features of the Realtek RTL8721DM SoC can be combined to detect a doorbell sound in real-time and send an SMS notification message.
We encourage you to get a SparkFun AzureWave Thing Plus - AW-CU488 and SparkFun Analog MEMS Microphone Breakout - SPH8878LR5H-1 board to try it yourself, as well as try out other Arduino based examples for the board. You can also use the Python notebook on GitHub to train a model that detects other sounds using data from open audio datasets.


_3u05Tpwasz.png?auto=compress%2Cformat&w=40&h=40&fit=fillmax&bg=fff&dpr=2)

Comments
Please log in or sign up to comment.