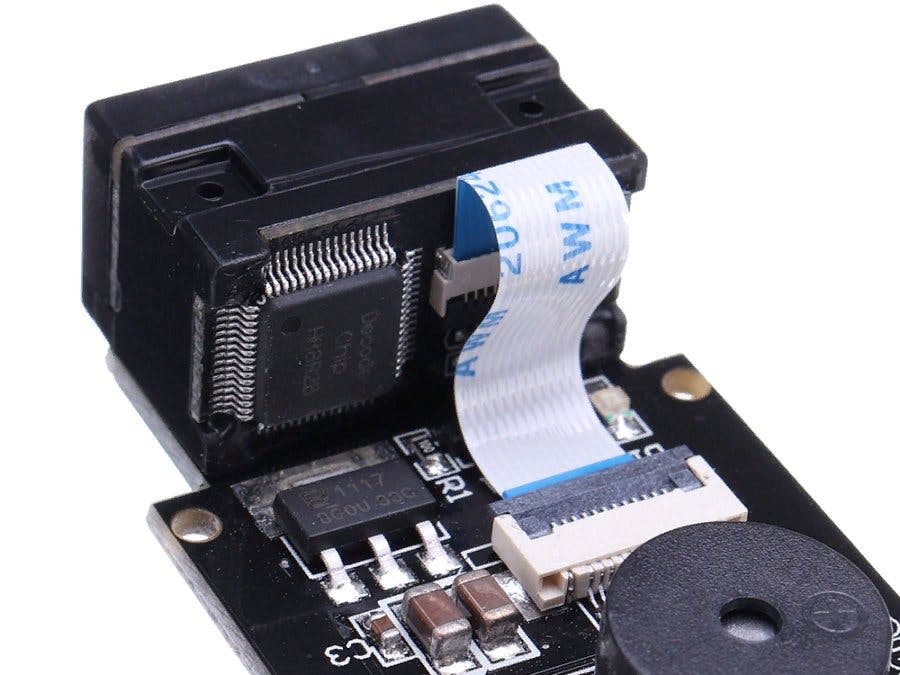
The GM65 barcode scanner identifies a product by its barcode. Then we enter the quantity of the product on the Nextion touch screen display and send it via WiFi to the server, where we enter it in the database. This device allows you to automate the process of inventory of goods.
Step1. The GM65 barcode scannerThe secret of the device is a combination of a digital camera and an image processing module. It has an algorithm that recognizes barcodes and QR codes in the field of view of the camera, and if it does not have enough external lighting, the built — in LED backlight comes to the rescue. A light marker in the form of a red stripe is provided for precise pointing at the scanner's barcode.
We bring the barcode at a distance of about 20 cm to the lens, and a characteristic buzzer signal is heard, as at a supermarket checkout. To speed up the process, you need to align the bar code plane perpendicular to the scanner. The maximum deviation angle is 60 degrees.
The barcode scanner works directly with the computer without any applications: it pretends to be a typical USB keyboard and outputs the data in the form of a string of text. This is the default operating mode.
You can configure the scanner using UART commands, but it is much easier to use service QR codes: switch reading modes, control the LED and buzzer, save and reset settings by simply targeting the corresponding QR code in the device instructions. This allows you to change the configuration on the fly.
The button on the Board is used by default to activate the scanning process. The built-in buzzer signals successful code reading and changes in the device operation.
Connect the scanner to the computer using a USB cable and read the following codes sequentially.
// Restore Factory Settings
// UART Output (UART exchange)
// Continuous Mode (scanning continuously, without pressing a button)
// Non-Scanning Interval (2000 MS)
// Lighting - No light (without led)
To connect the GM65 barcode scanner to the Arduino MCF 1000 WiFi Board, we will use pins 2 and 3.
For programming, we will use the Arduino SoftwareSerial library.
We use the Arduino MKR 1000 WiFi Board as the controller. We will program in the Arduino IDE. By default, the Arduino IDE is configured only for AVR boards. To work with the Arduino MK Wi-Fi 1000 platform, you need to add support for the Arduino SAMD (32bit ARM Cortex-M0+) in the card Manager. In the Board Manager (Tools > Board > Boards manager), find the Arduino SAMD and click the Install button.
After installing the software in the Arduino IDE, the Tools Board menu will support the Arduino Zero and MKR boards, including the MKR 1000 WiFi Board). Connect the MKR 1000 card to your computer using a USB cable. The driver should be installed automatically.
Sketch for getting barcodes and output them to the Arduino serial port
// QR
// Restore Factory Settings
// UART Output
// Continuous Mode
// Non-Scanning Interval
// Lighting - No light

#include <Arduino.h>
#include <wiring_private.h>


// data coming from the serial port
String inputString = "";
// the line has arrived
boolean stringComplete = false;
int countstr=0;
// to search for an ending
unsigned long millisendstr=0;


void setup() {
  //
  Serial.begin(9600);
  Serial1.begin(9600);               // Begin Serial1

  // резервирование 50 bytes для inputString:
  inputString.reserve(50);
}

void loop() {
  //
  serialScanerEvent();
  //
  if (stringComplete) {
    Serial.println(inputString);
    // очистить строку
    inputString = "";
    stringComplete = false;
    countstr=0;
   }

}

void serialScanerEvent() {
  //
  if (Serial1.available()>0) {
    // get the new byte:
    char inChar = (char)Serial1.read();
    // add it to the inputString:
    inputString += inChar;
    countstr++;
    millisendstr=millis();
  }
  else {
    if(millis()-millisendstr>1000 && countstr>0) {
       stringComplete=true;
    }
  }
}
Upload the sketch to the Arduino Board and scan several barcodes (including QR). Data is output to the serial port.
As a display, we use the Nextion 320x240 touch screen. Programming the display in the Nextion Editor program.
Upload images and make a design.
Assign Touch Release events to send commands over the serial port.
You can view the sending codes by running the debugger.
Now connect the display to the Arduino MKR 1000 Board. Connection diagram
Adding additional serial interfaces to SAMD (SERCOM) microcontrollers)
One of the advantages of the Arduino platform is the simplification of the embedded software, assigning each pin of the microcontroller one of the many possible functions.
Adding new Serial 2 and Serial 3 interfaces
#include <Arduino.h>                              // required before wiring_private.h
#include <wiring_private.h>
static const char MKR1000_LED       = 6;
// Serial2 pin and pad definitions (in Arduino files Variant.h & Variant.cpp)
#define PIN_SERIAL2_RX       (1ul)                // Pin description number for PIO_SERCOM on D1
#define PIN_SERIAL2_TX       (0ul)                // Pin description number for PIO_SERCOM on D0
#define PAD_SERIAL2_TX       (UART_TX_PAD_0)      // SERCOM pad 0 TX
#define PAD_SERIAL2_RX       (SERCOM_RX_PAD_1)    // SERCOM pad 1 RX
// Serial3 pin and pad definitions (in Arduino files Variant.h & Variant.cpp)
#define PIN_SERIAL3_RX       (5ul)                // Pin description number for PIO_SERCOM on D5
#define PIN_SERIAL3_TX       (4ul)                // Pin description number for PIO_SERCOM on D4
#define PAD_SERIAL3_TX       (UART_TX_PAD_2)      // SERCOM pad 2 TX
#define PAD_SERIAL3_RX       (SERCOM_RX_PAD_3)    // SERCOM pad 3 RX
// Instantiate the extra Serial classes
Uart Serial2(&sercom3, PIN_SERIAL2_RX, PIN_SERIAL2_TX, PAD_SERIAL2_RX, PAD_SERIAL2_TX);
Uart Serial3(&sercom4, PIN_SERIAL3_RX, PIN_SERIAL3_TX, PAD_SERIAL3_RX, PAD_SERIAL3_TX);
void SERCOM3_Handler()    // Interrupt handler for SERCOM3
{
Serial2.IrqHandler();
}
void SERCOM4_Handler()    // Interrupt handler for SERCOM4
{
Serial3.IrqHandler();
}
Creating a sketch of getting data (pressing buttons) from the Nextion display and sending data from the Arduino (barcode and quantity) to the Nextion display.
#include <Arduino.h>
#include <wiring_private.h>

// Serial2 pin and pad definitions (in Arduino files Variant.h & Variant.cpp)
#define PIN_SERIAL2_RX       (1ul)                // Pin description number for PIO_SERCOM on D1
#define PIN_SERIAL2_TX       (0ul)                // Pin description number for PIO_SERCOM on D0
#define PAD_SERIAL2_TX       (UART_TX_PAD_0)      // SERCOM pad 0 TX
#define PAD_SERIAL2_RX       (SERCOM_RX_PAD_1)    // SERCOM pad 1 RX


Uart Serial2(&sercom3, PIN_SERIAL2_RX, PIN_SERIAL2_TX, PAD_SERIAL2_RX, PAD_SERIAL2_TX);

//Nextion myNextion(Serial2, 9600);
// данные, пришедшие из последовательного порта
String inputString1 = "";
String inputString2 = "";
// строка пришла
boolean stringComplete1 = false;
int countstr1=0;
boolean stringComplete2 = false;
int countstr2=0;
// для поиска окончания
unsigned long millisendstr1=0;
unsigned long millisendstr2=0;

String message;

int counter=0;

void SERCOM3_Handler()    // Interrupt handler for SERCOM3
{
Serial2.IrqHandler();
}


void setup() {
  //
  Serial.begin(9600);
  pinPeripheral(0, PIO_SERCOM);   // Assign pins 0 & 1 SERCOM functionality
  pinPeripheral(1, PIO_SERCOM);
  Serial2.begin(9600);               // Begin Serial2
  Serial1.begin(9600);               // Begin Serial1

  // резервирование 50 bytes для inputString:
  inputString3.reserve(50);
  inputString2.reserve(50);
  // Nextion
  Serial2.print("t0.txt=\"wait ...\"");
  Serial2.write(0xff);
  Serial2.write(0xff);
  Serial2.write(0xff);
  delay(10);
  counter=0;
  Serial2.print("n0.val=");
  Serial2.print(counter);
  Serial2.print("");
  Serial2.write(0xff);
  Serial2.write(0xff);
  Serial2.write(0xff);
  delay(10);
}

void loop() {
  //
  serialScanerEvent1();
  if (stringComplete1) {
    Serial.println(inputString1);
    Serial2.print("t0.txt=\"");
    Serial2.print(inputString1);
    Serial2.print("\"");
    Serial2.write(0xff);
    Serial2.write(0xff);
    Serial2.write(0xff);
    // очистить строку
    inputString1 = "";
    stringComplete1 = false;
    countstr3=0;
   }
  serialNextionEvent2();
  if (stringComplete2) {
    Serial.println(inputString2);
    parse_message(inputString2);
    // очистить строку
    inputString2 = "";
    stringComplete2 = false;
    countstr2=0;
   }

}

void serialScanerEvent1() {
  //
  if (Serial3.available()>0) {
    // get the new byte:
    char inChar = (char)Serial1.read();
    // add it to the inputString:
    inputString3 += inChar;
    countstr1++;
    millisendstr1=millis();
  }
  else {
    if(millis()-millisendstr1>1000 && countstr1>0) {
       stringComplete1=true;
    }
  }
}

void serialNextionEvent2() {
  //
  if (Serial2.available()>0) {
    // get the new byte:
    char inChar = (char)Serial2.read();
    // add it to the inputString:
    inputString2 += String(inChar,HEX);
    countstr2++;
    inputString2 += " ";
    countstr2++;
    millisendstr2=millis();
  }
  else {
    if(millis()-millisendstr2>200 && countstr2>0) {
       stringComplete2=true;
    }
  }
}
Setting the quantity of the product when buttons are clicked.
void parse_message(String msg)
  {
  //Serial.println(msg); //...print it out
  // reset count
  if (msg == "65 0 b 0 ff ff ff ")
    {
    counter=0;
    Serial2.print("n0.val=");
    Serial2.print(counter);
    Serial2.print("");
    Serial2.write(0xff);
    Serial2.write(0xff);
    Serial2.write(0xff);
    delay(10);
    }
  // send
  else if (msg == "65 0 c 0 ff ff ff ")
    {
    Serial2.print("t0.txt=\"send ...\"");
    Serial2.write(0xff);
    Serial2.write(0xff);
    Serial2.write(0xff);
    delay(10);
    // **** send data to server
    delay(5000);
    Serial2.flush();
    //
    Serial2.print("t0.txt=\"wait ...\"");
    Serial2.write(0xff);
    Serial2.write(0xff);
    Serial2.write(0xff);
    delay(10);
    counter=0;
    Serial2.print("n0.val=");
    Serial2.print(counter);
    Serial2.print("");
    Serial2.write(0xff);
    Serial2.write(0xff);
    Serial2.write(0xff);
    delay(10);
    }
  // 0
  else if (msg == "65 0 1 0 ff ff ff ")
    {
    add_count(0);
    delay(10);
    }
  // 1
  else if (msg == "65 0 2 0 ff ff ff ")
    {
    add_count(1);
    delay(10);
    }
  // 2
  else if (msg == "65 0 3 0 ff ff ff ")
    {
    add_count(2);
    delay(10);
    }
  // 3
  else if (msg == "65 0 4 0 ff ff ff ")
    {
    add_count(3);
    delay(10);
    }
  // 4
  else if (msg == "65 0 5 0 ff ff ff ")
    {
    add_count(4);
    delay(10);
    }
  // 5
  else if (msg == "65 0 6 0 ff ff ff ")
    {
    add_count(5);
    delay(10);
    }
  // 6
  else if (msg == "65 0 7 0 ff ff ff ")
    {
    add_count(6);
    delay(10);
    }
  // 7
  else if (msg == "65 0 8 0 ff ff ff ")
    {
    add_count(7);
    delay(10);
    }
  // 8
  else if (msg == "65 0 9 0 ff ff ff ")
    {
    add_count(8);
    delay(10);
    }
  // 9
  else if (msg == "65 0 a 0 ff ff ff ")
    {
    add_count(9);
    delay(10);
    }
  else ;
  }

void add_count(int n) {
  if(counter<100) {
     counter=counter*10+n;
     Serial2.print("n0.val=");
     Serial2.print(counter);
     Serial2.print("");
     Serial2.write(0xff);
     Serial2.write(0xff);
     Serial2.write(0xff);
     delay(10);
  }
}To connect the Arduino MKR1000 to a Wi-Fi network, we will use the WiFi101 library, which we will install using the library Manager (Sketch Include library Manager Libraries).
Download a sketch of connecting the Arduino MK R 1000 Wi-Fi Board to the necessary access point. Upload an example from the connectWithWPA.ino library to the Board by entering the data for your WiFi hotspot in the tab:
#define SECRET_SID "*********k"
#define SECRET_PASS "********"
After downloading the sketch, open the serial port monitor, where you can watch the process of connecting the Arduino MKR1000 Wi-Fi Board to the access point.
If the connection is successful, go ahead.
Step 4. Sending data to the server.Let's write function send_data_to_server () - sending data (barcode and product quantity)to the server by clicking OK.
void send_temp_to_server() {
   client.stop();
   if (client.connect(server, 80)) {
      //// sending data to the server
      // forming a string
      // uid per line
      String str="/firm/get_barcode.php?barcode=";
      str+=String(cardUID[i],HEX);
      str+="&count="+String(temp);
      Serial.print("str=");Serial.println(str);
      client.println("GET "+str+" HTTP/1.1");
      client.println("Host: ************.ru");
      client.println("User-Agent: ArduinoWiFi/1.1");
      client.println("Connection: close");
      client.println();
      Serial.println(response);
      delay(10); }
   else {
      // no connection
      Serial.println("connection failed");
   }
}
Creating a database on hosting (MySQL) and two tables in it:
- tovar - products and their barcodes;
- count - the results of the inventory
Creating a php script on the server to get data sent by the barcode scanner.
The contents of the script get_barcode.php
<?php

//Параметры MySQL
$location="localhost";
$user="*****************";
$pass="**************";
$db_name="*********************";

// connect db
if(! $db=mysqli_connect($location,$user,$pass,$db_name))
 {echo "connect error";}
else
 {;}


$query1=" INSERT INTO count SET
          barcode='".$_GET['barcode']."',
          count='".$_GET['count']."',
          date='".date('Y-m-d H:i:s')."' ";
if(mysqli_query($db,$query1)){
   echo "#yes";
}
else {
   echo "#no";
}


?>
And scan results


_3u05Tpwasz.png?auto=compress%2Cformat&w=40&h=40&fit=fillmax&bg=fff&dpr=2)
Comments
Please log in or sign up to comment.