


Hardware components | ||||||
_ztBMuBhMHo.jpg?auto=compress%2Cformat&w=48&h=48&fit=fill&bg=ffffff) |
| × | 1 | |||
In this workshop, we'll create an interactive LED chase effect using Arduino. By adding a potentiometer, you'll be able to change the speed of the lights while the code is running. This project is a great way to understand how potentiometers work and how they can be used to control various aspects of your Arduino projects.
Required ComponentsThis book will help you gain more knowledge about Arduino: Beginning Arduino
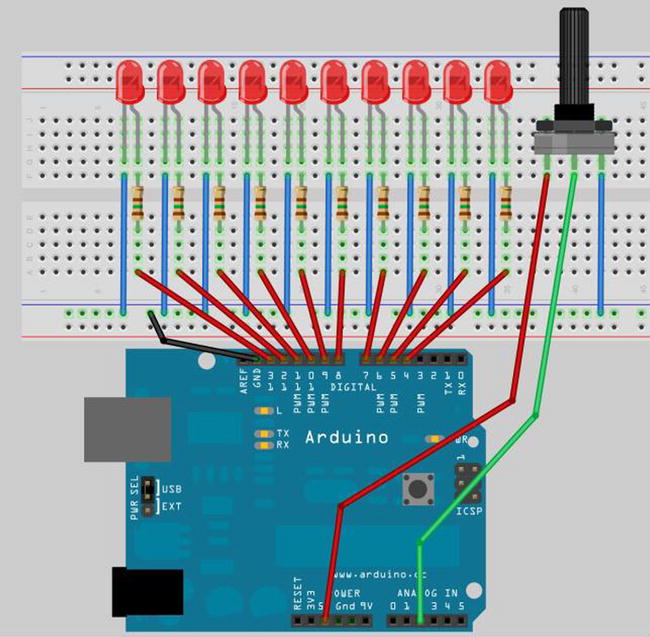
Circuit DiagramBefore starting, ensure your Arduino is powered off by unplugging it from the USB cable. Add a potentiometer to the circuit as shown below:
- Left leg: Connect to 5V on the Arduino.
- Middle leg: Connect to Analog Pin 2.
- Right leg: Connect to ground.
(optional caption)
How the Potentiometer WorksA potentiometer is a variable resistor with three legs. By connecting all three legs and applying a voltage across it, the potentiometer acts as a voltage divider. This means it can provide a variable voltage output between 0 and 5V from the center pin. In this circuit, we use the potentiometer to adjust the delay rate of the LED chase effect by reading the voltage on Analog Pin 2.
Code for LED Chase Effect with Potentiometercpp
Copy code
byte ledPin[] = {4, 5, 6, 7, 8, 9, 10, 11, 12, 13}; // Create array for LED pins
int ledDelay; // Delay between changes
int direction = 1;
int currentLED = 0;
unsigned long changeTime;
int potPin = 2; // Select the input pin for the potentiometer
void setup() {
for (int x = 0; x < 10; x++) { // Set all pins to output
pinMode(ledPin[x], OUTPUT);
}
changeTime = millis();
}
void loop() {
ledDelay = analogRead(potPin); // Read the value from the potentiometer
if ((millis() - changeTime) > ledDelay) { // If it has been ledDelay ms since last change
changeLED();
changeTime = millis();
}
}
void changeLED() {
for (int x = 0; x < 10; x++) { // Turn off all LEDs
digitalWrite(ledPin[x], LOW);
}
digitalWrite(ledPin[currentLED], HIGH); // Turn on the current LED
currentLED += direction; // Increment by the direction value
// Change direction if we reach the end
if (currentLED == 9) {direction = -1;}
if (currentLED == 0) {direction = 1;}
}
Upload the code to your Arduino. You should now see the lit LED appear to bounce back and forth between each end of the string of lights. By turning the knob of the potentiometer, you can change the delay value and speed up or slow down the effect.
Explanation of the CodeVariable Declarations:
cpp
Copy code
byte ledPin[] = {4, 5, 6, 7, 8, 9, 10, 11, 12, 13};
int ledDelay;
int direction = 1;
int currentLED = 0;
unsigned long changeTime;
int potPin = 2;
These variables control the LED pins, the delay between changes, the direction of the LED chase, the current LED, the time of the last change, and the potentiometer pin.
Setup Function:
cpp
Copy code
void setup() {
  for (int x = 0; x < 10; x++) {
    pinMode(ledPin[x], OUTPUT);
  }
  changeTime = millis();
}
In the setup function, we initialize the LED pins as outputs and set the initial change time.
Main Loop:
cpp
Copy code
void loop() {
  ledDelay = analogRead(potPin); // Read the value from the potentiometer
  if ((millis() - changeTime) > ledDelay) { // If it has been ledDelay ms since the last change
    changeLED();
    changeTime = millis();
  }
}
In the main loop, we read the potentiometer value to adjust the delay and check if the required time has passed to change the LED.
Change LED Function:
cpp
Copy code
void changeLED() {
  for (int x = 0; x < 10; x++) { // Turn off all LEDs
    digitalWrite(ledPin[x], LOW);
  }
  digitalWrite(ledPin[currentLED], HIGH); // Turn on the current LED
  currentLED += direction; // Increment by the direction value

  // Change direction if we reach the end
  if (currentLED == 9) {direction = -1;}
  if (currentLED == 0) {direction = 1;}
}
This function turns off all LEDs, turns on the current LED, and adjusts the direction of the chase effect if the end is reached.
By following this guide, you can create an interactive LED chase effect that allows you to adjust the speed using a potentiometer. This project is a great way to learn about potentiometers and how they can be used to control various aspects of your Arduino projects.

Comments
Please log in or sign up to comment.