In this tutorial, we will explore how to interface the MCP3008 analog-to-digital converter (ADC) with a Raspberry Pi to read analog values. This is essential because the Raspberry Pi lacks native support for analog inputs, unlike microcontrollers such as Arduino, AVR, or PIC.
Why We Need MCP3008The Raspberry Pi is a digital-only computer, meaning it cannot directly read analog signals. Analog inputs are necessary for interfacing with many sensors that output analog signals. The MCP3008 chip acts as a bridge between the digital Raspberry Pi and analog sensors, providing 8 analog inputs that the Raspberry Pi can access using just 4 digital pins. This makes the MCP3008 an ideal solution for connecting sensors like photocells, FSRs, potentiometers, thermistors, and more to the Raspberry Pi.
Raspberry Pi Cookbook
This book will help you gain more knowledge about Raspberry Pi software and hardware solutions.
- Raspberry Pi Cookbook
This book will help you gain more knowledge about Raspberry Pi software and hardware solutions.
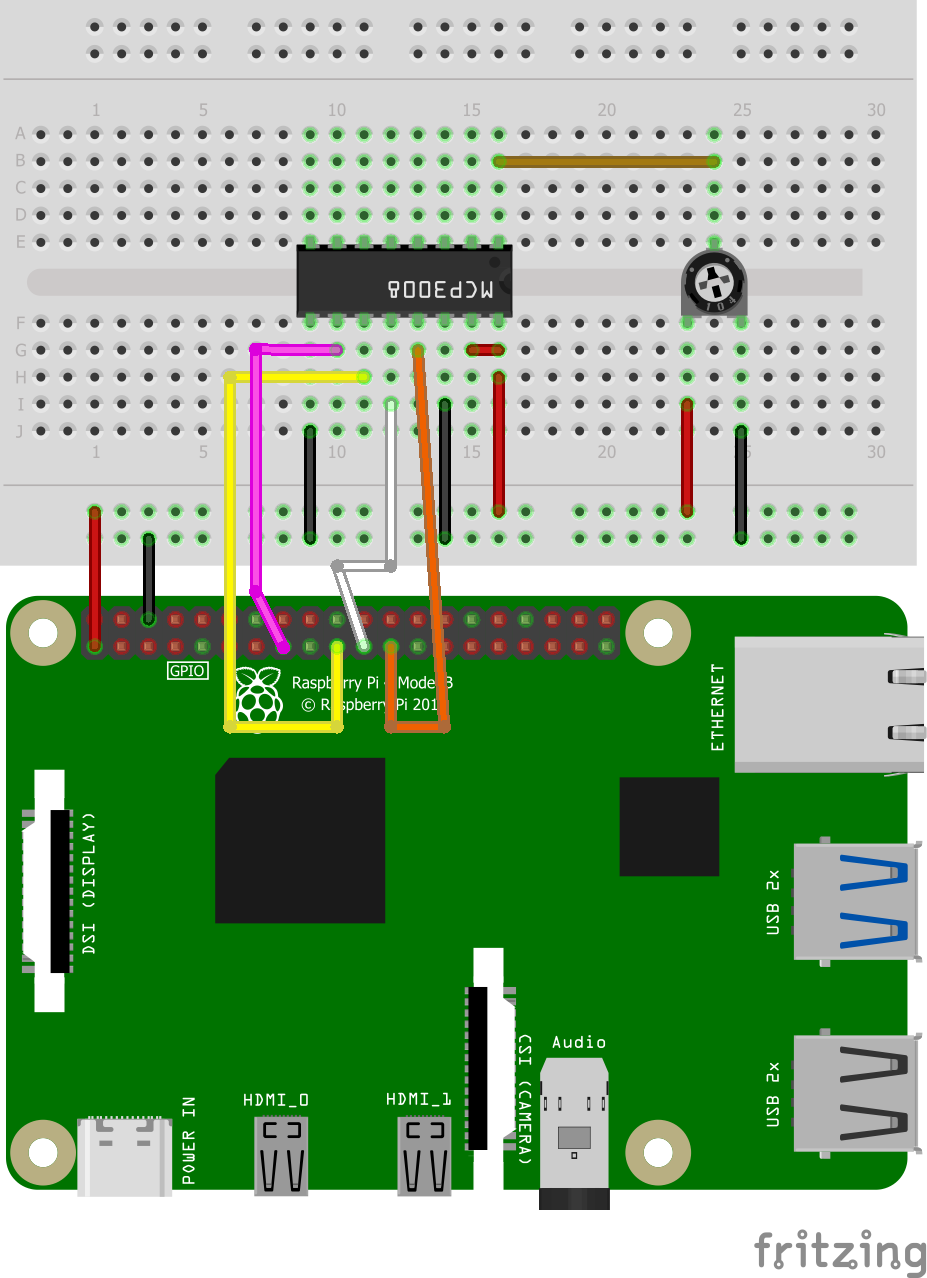
Shows the arrangement of components on the breadboard
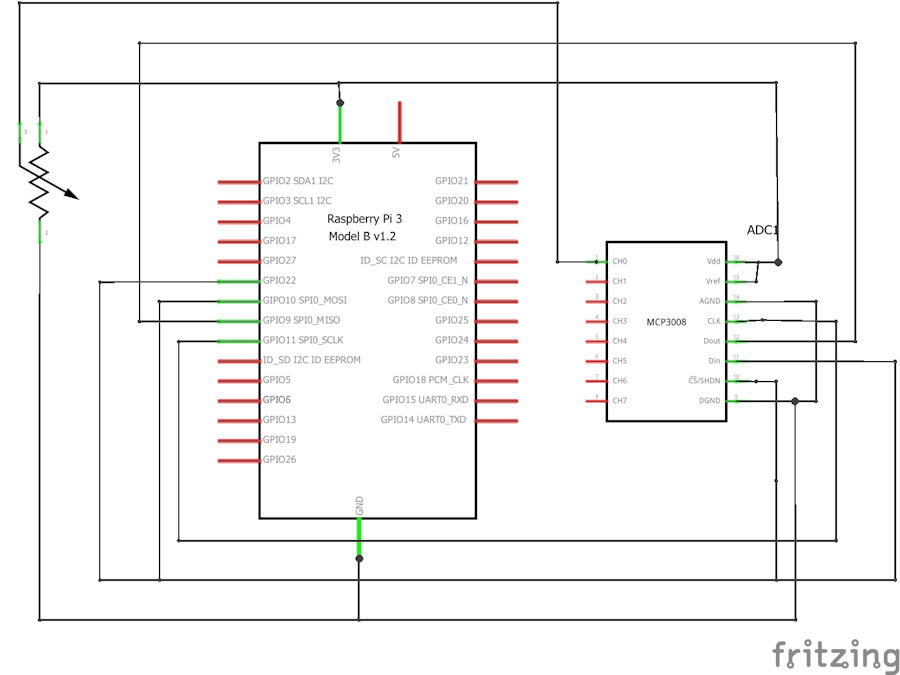
Powering the MCP3008
- MCP3008 Pin to Raspberry Pi Pin
- VDD to 3.3V
- VREF to 3.3V
- AGND to GND
- DGND to GND
- Powering the MCP3008
MCP3008 Pin to Raspberry Pi Pin
VDD to 3.3V
VREF to 3.3V
AGND to GND
DGND to GND
SPI Connections
- MCP3008 Pin to Raspberry Pi Pin
- CLK to SCLK
- DOUT to MISO
- DIN to MOSI
- CS to GPIO Pin 22
- SPI Connections
MCP3008 Pin to Raspberry Pi Pin
CLK to SCLK
DOUT to MISO
DIN to MOSI
CS to GPIO Pin 22
Potentiometer Connections
- Potentiometer Pin to Connection
- Pin 1 (left) to 3.3V
- Pin 2 (middle) to MCP3008 CH0 (analog input #0)
- Pin 3 (right) to GND
- Potentiometer Connections
Potentiometer Pin to Connection
Pin 1 (left) to 3.3V
Pin 2 (middle) to MCP3008 CH0 (analog input #0)
Pin 3 (right) to GND
This setup will allow the MCP3008 to interface with the Raspberry Pi and receive analog data from the potentiometer.
Code for MCP3008 with Raspberry PiBefore running the program, ensure that SPI is enabled on your Raspberry Pi and that the SPI Python library is installed.
Enabling SPITo enable SPI, open the Raspberry Pi configuration tool with
sudo raspi-config
Navigate to Interfacing Options > SPI and enable it.
Install the SPI Python library with:
bash
Copy code
sudo apt-get install python3-spidev
Create a Python script (mcp3008.py) and paste the following code:
import spidev
import time

# Create SPI object
spi = spidev.SpiDev()
spi.open(0, 0)

def analog_read(channel):
    r = spi.xfer2([1, (8 + channel) << 4, 0])
    adc_out = ((r[1] & 3) << 8) + r[2]
    return adc_out

while True:
    reading = analog_read(0)
    voltage = reading * 3.3 / 1024
    print("Reading=%d\tVoltage=%f" % (reading, voltage))
    time.sleep(1)
Run the program with:
bash
Copy code
python3 mcp3008.py
Example output:
Reading=0    Voltage=0.000000
Reading=126  Voltage=0.406055
The core functionality of the program is contained within the analog_read function. This function accepts a parameter (ranging from 0 to 7) that specifies which of the eight analog inputs on the MCP3008 should be read. The bit control sets up a request for the appropriate channel and then sends the bits to the MCP3008, which reads the resultant data.
The MCP3008 features 10-bit ADCs, so when you take a reading, it provides a value between 0 and 1023. The sample program converts this into a voltage reading by multiplying the reading by the voltage range (3.3V) and then dividing it by 1024.
ConclusionBy following this tutorial, you can successfully interface the MCP3008 ADC with your Raspberry Pi, allowing it to read analog inputs. This setup is useful for a variety of applications where analog sensor data needs to be processed by the Raspberry Pi.


Comments
Please log in or sign up to comment.