


You went to do Raspberry Pi Email send with the IFTTT project. Today I show you How to send an email with IFTTT Using Raspberry Pi step by step in the complete process. and in this Project, we show an example that sends an email when the CPU temperature of your Raspberry Pi exceeds a threshold.
≡ Components Required Raspberry Pi Email send IFTTT :Here is a list of the hardware we suggest for this tutorial on utilizing IFTTT on the Raspberry Pi.
4. Power Supply
This book will help you to gain more knowledge of Raspberry pi Software and Hardware Problems and Solutions
Raspberry Pi CookbookIn this section, we’ll be showing you how to creates an account with IFTTT: for this project.
1. You need to create an account with IFTTT before you’ll be able to begin utilizing it, so visit www.ifttt.com and sign up.
2. Now you have to need Click to create in red highlight Option
3. On this page, we got to start by selecting the trigger for our IFTTT activity. so now clicking the “+This” content, as appeared within the screenshot below
4. We are planning to show you how to make utilize the webhook service. so That Start by searching “webhook” within the search box and. we got to click the “Webhooks” button like the screenshot below
.
7. Let’s now select the “That” activity for the IFTTT trigger screenshot below.
8. The following step is to choose the service we need to utilize for our actions. For this tutorial, we are going be making utilize of the “Email” service.
This service sends an Email to the IFTTT app when our event is triggered. There are different other services, but Email is one of the easiest to setup
. We got to look up “Email” within the look box. When the “Email” service pops up, click its screenshot below.
9. Now we have to be select an action provided by this service. In this case, we need to send a basic Email to the IFTTT app screenshot below,
10. now click Create an action No need any change now screenshot below
11. Now, click the “Finish” button screenshot below
12. Now-Again Back on the webhooks page, click the “Documentation” Option within the best right-hand corner of the screen. Clicking this will take us to the screen were ready to find the API keys we require screenshot below.
13.you You can see Your API key On this page, copy down the API key Below you’ll be able to see the URL where we’ll send our webhook calls to. This URL is located underneath the “To trigger an Event” title.
That’s it—the recipe is now live, and once the Raspberry Pi is prepared to send web requests to it, it’ll start emailing.
≡ Preparing your Raspberry Pi for this project:In this section, we’ll be showing you how to Raspberry Pi for this project. if you First-time run project you have to need to update your raspberry pi You’ll do this by running the following commands.
sudo apt update
sudo apt upgrade
Now you have to need library install for this project You’ll do this by running the following commands.
pip install urllib3
Or
sudo apt-get install urllib2The Python program to send the web request
import time, os, urllib, urllib2
MAX_TEMP = 37.0
MIN_T_BETWEEN_WARNINGS = 60 # Minutes
EVENT = 'raspberry'
BASE_URL = 'https://maker.ifttt.com/trigger/'
KEY = 'hLTwmMC3A5J9KnUXwoITVfHEJ2d5eVpvcNsqi85OhDA'
def send_notification(temp):
data = urllib.urlencode({'value1' : str(temp)})
url = BASE_URL + EVENT + '/with/key/' + KEY
response = urllib2.urlopen(url=url, data=data)
print(response.read())
def cpu_temp():
dev = os.popen('/opt/vc/bin/vcgencmd measure_temp')
cpu_temp = dev.read()[5:-3]
return float(cpu_temp)
while True:
temp = cpu_temp()
print("CPU Temp (C): " + str(temp))
if temp > MAX_TEMP:
print("CPU TOO HOT!")
send_notification(temp)
print("No more notifications for: " + str(MIN_T_BETWEEN_WARNINGS) +
" mins")
time.sleep(MIN_T_BETWEEN_WARNINGS * 60)
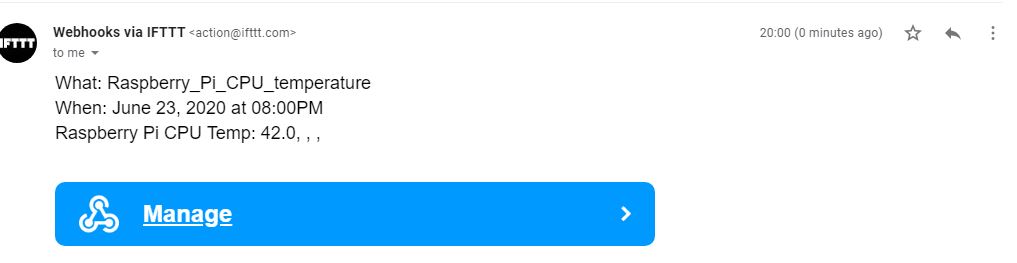
time.sleep(1)Before running the program, you’ll have to get an get to the key for the Maker Action channel by selecting Channels, and after that searching for Maker. Paste the key into email.py on the line that begins KEY= and then run the program using the screenshot below:
Notice how the values have been substituted into the email screenshot below


Comments
Please log in or sign up to comment.