This or any other shields that fit UNO are necessary if you want to build the physical device (if you just like to build the prototype a breadboard will suffice)
(optional) only if you want to create the actual device, if you build on a breadboard it won't be necessary
Laser cutter (generic)
(optional) only if you want to create the actual device, if you build on a breadboard it won't be necessary
Cardboard, markers, scissors, cutter
to design your display
Wood or plastic board
(optional) To build the case with the laser cutter
Story
What is a sC00p-4-b1l1tY index?
We were having a dinner night as we had done many times, when one of us, referring to a recent acquaintance said: "I wonder whether it would be a good idea to have sex with that person...".
The scopability challenge (later renamed sC00p-4-b1l1tY) was set. Was there such a thing? Could a machine say whether it is a good idea to get laid? We thought so.
The first version
At first we were under the impression that responding to that question was only a matter of numbers, so we came up with a formula that took a lot of factors into account
An early version of the sC00p-4-b1l1tY index
The formula brought together attraction (fi), empathy (sigma), sexual abstinence (alpha), long-term relationship projections (ro), nagging probability (Pet), and some random factor (G): with a result of more than 70%, getting laid with the target subject would be increasingly recommendable.
We tested it in a number of occasions, and we decided we wanted more: where was the magic? What about that instant connection between two people? How could we take that into our algorithm?
The physical device
Well, Arduino made it possible!
We have created a physical device that two subjects can hold and, following some simple instructions, use to find if they should eventually conjugate.
We had run many prototyping sessions, to determine what components should be included and how they should interact with users,
A prototype of the physical device
Once the prototype was completed we built a nice laser-cut case and soldered all the components onto a proto-shield.
You can see the final result in the following pictures and video.
The final version of the device
The inside
You can assemble this project the way you like, but if you want to take a look at what we did, here are some pics:
Components soldered on an Arduino UNO Shield, note the mercury tilt switch at the bottom
The rear of the front panel
The open box
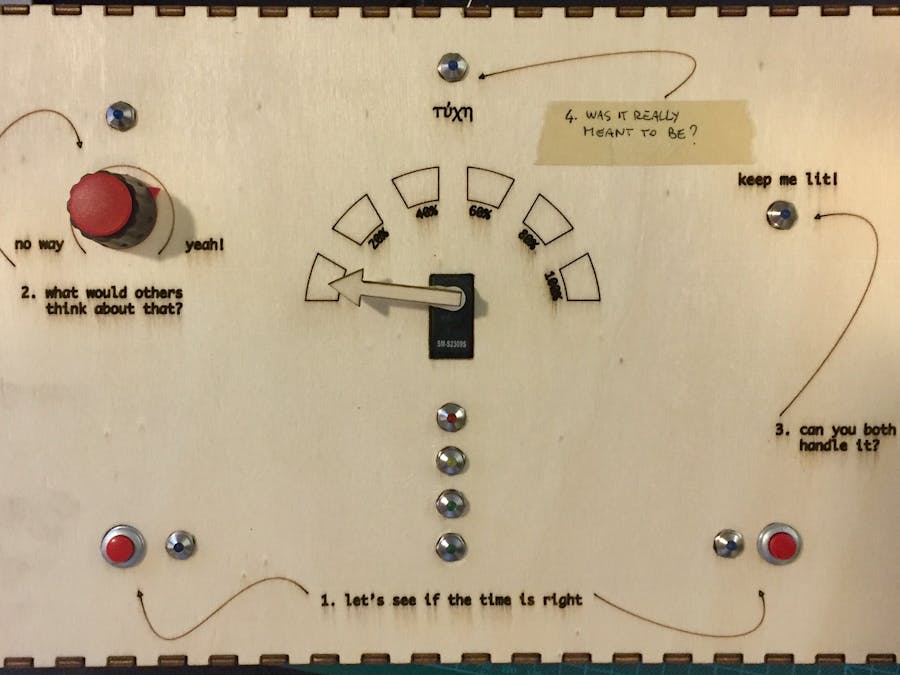
How does it work
When thinking about hitting on someone, there are four main questions that people ask themselves. Our device tries to answer them (in its own particular way):
Is it the right time? Subjects are supposed to press one button each, keep them pressed as long as they like and then try to release them simultaneously. The system measures the time difference of the button release and grades their timing.
What would others think? Subjects must ask a third person to turn a knob clockwise, to express the appropriateness of their carnal conjunction towards society. A fully turned knob means maximum appropriateness.
Can you both handle it? Subjects are supposed to keep the device still and aligned for a few seconds. A tilt sensor counts how many times the device is tilted and grades their inne balance.
Is this really meant to be? Greeks used to call it tuxh, the will of the Gods that affects all human beings. In our case is a random number that symbolises what cannot be predicted.
After each phase, the four LEDs give a basic idea of how each step was graded, and when they are all completed the servo motor will point the arrow to the final grade, or sC00p-4-b1l1tY index. With a result of 70% or more... be fruitful and multiply!
This is an illustrator file of the box, which you can use to feed a laser printer, or just print and stick to a thick cardboard and cut yourself out with a cutter. Or you can just cut out the top square and glue it onto any box :)
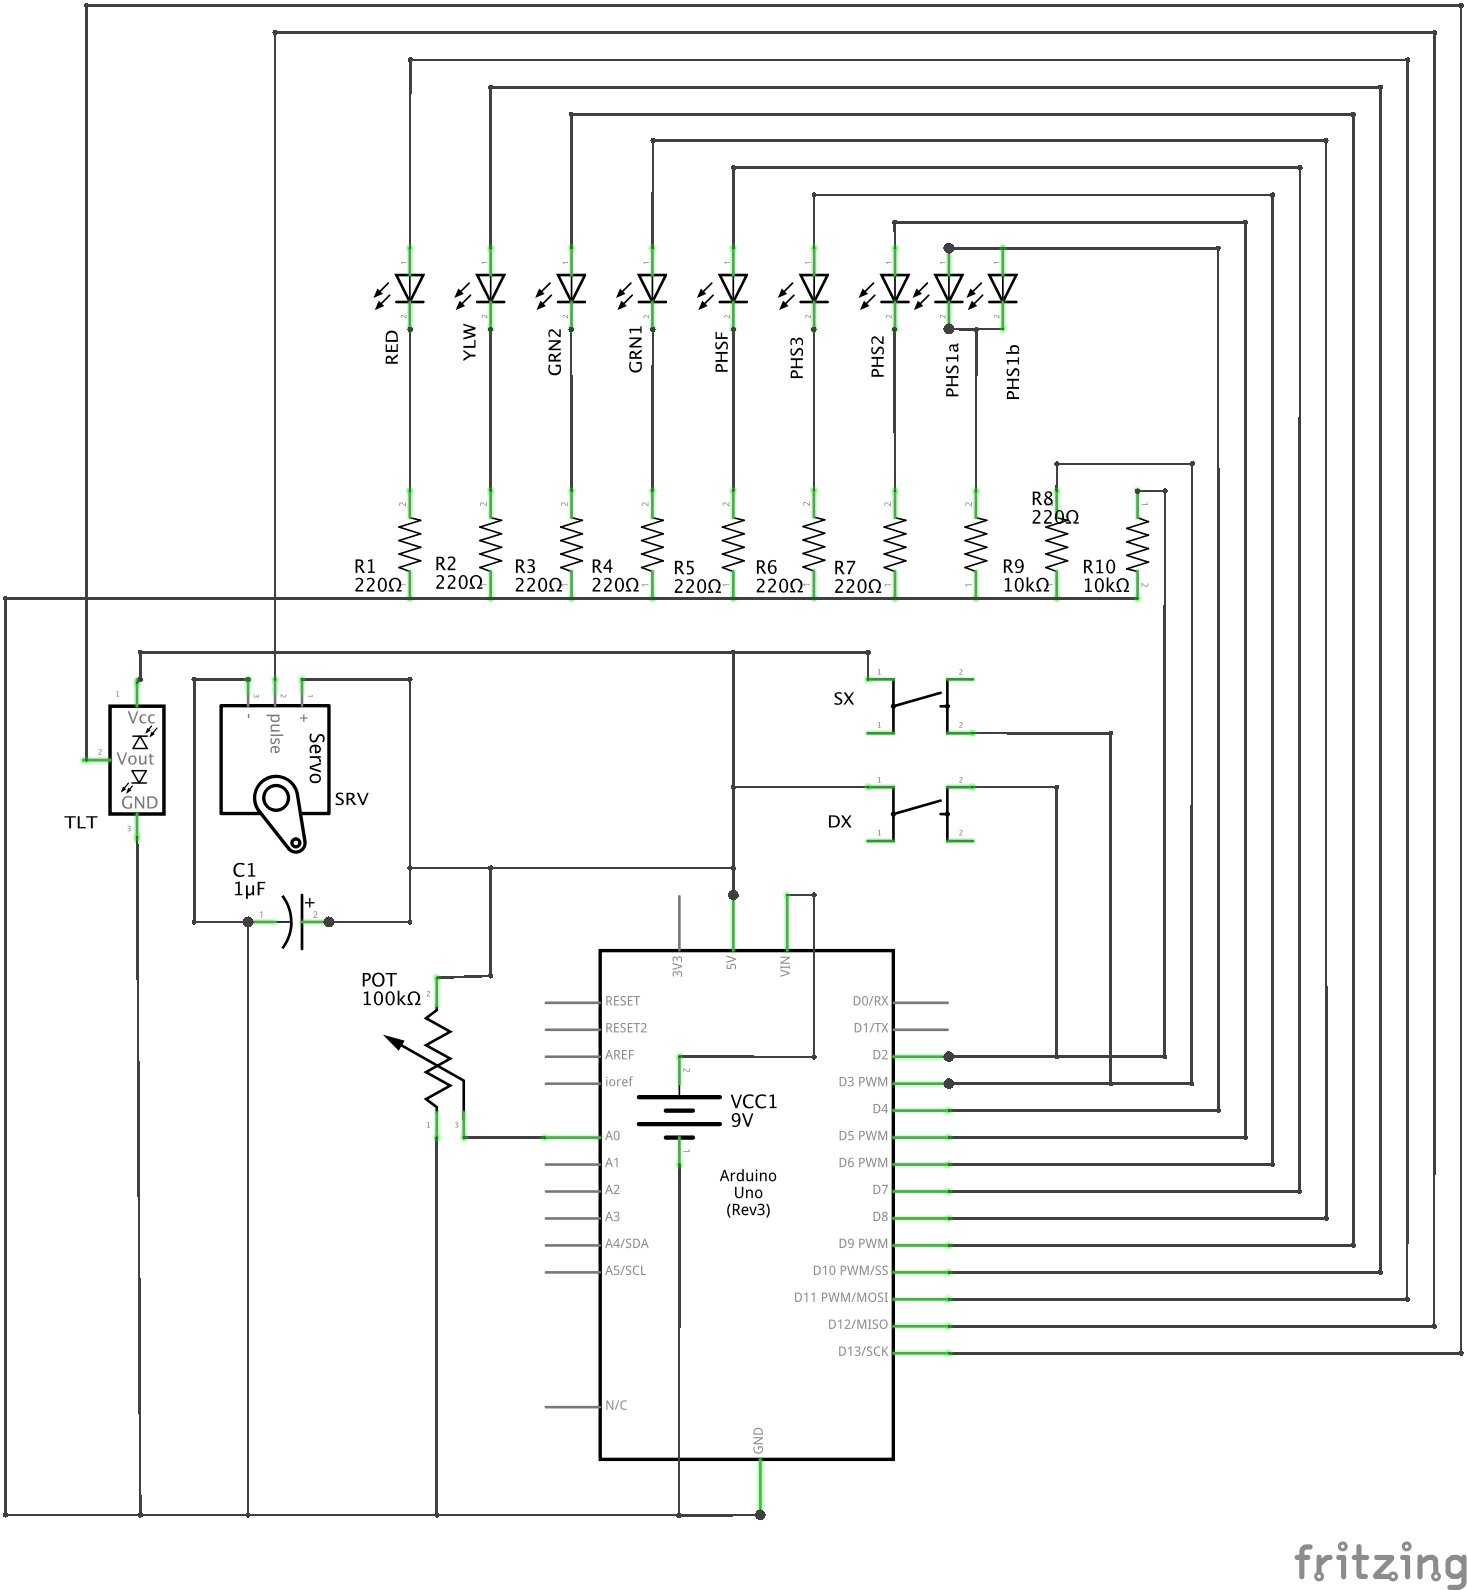
Schematics
Schematics
these are the project's schematics. You can replicate in on Arduino/Genuino UNO standard Breadboard (a bit tight but possible) or use a larger breadboard.
Code
The Code
Here is a complete code to the device. It's commented in details so you should find your way around it (write me if you don't).


_ztBMuBhMHo.jpg?auto=compress%2Cformat&w=48&h=48&fit=fill&bg=ffffff)


_3u05Tpwasz.png?auto=compress%2Cformat&w=40&h=40&fit=fillmax&bg=fff&dpr=2)
Comments
Please log in or sign up to comment.