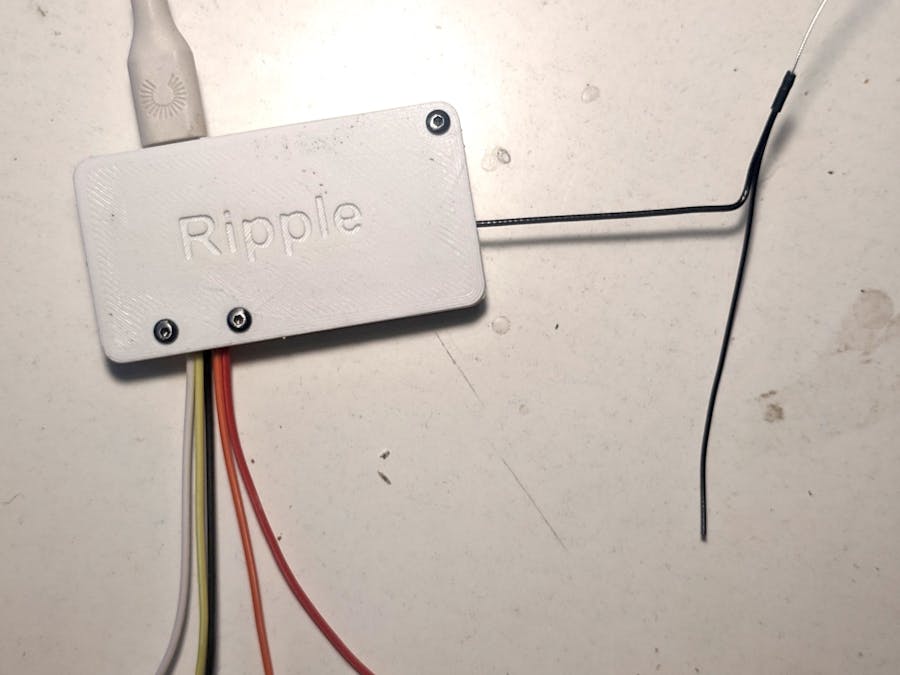
Being able to remotely monitor something, like the temperature in a greenhouse, or get alerts on some event, like a fire breaking out or a trip sensor, is incredibly useful and an ideal use-case for LoRa mesh networks.
I've now developed a firmware for a general purpose mesh sensor. All you do is connect it to some USB power source, and plug in a sensor module with either an analog and/or digital output, and you're in business.
DemonstrationHere is a simple test with the Ripple sensor node (on the left) with a flame sensor attached. The Android handset is running Ripple Commander and has a Ripple USB-OTG connected LoRa radio.
You can see the status change from green OK to the pink ALERT state.
The Commander node also gets a text alert and will keep beeping until acknowledged.
The Commander app can monitor up to 250 sensor nodes!
The ConnectorsThe node is powered by any USB-C power source, and has standard female connectors for plugging in the sensor module. The wires are:
- Black - Ground
- Orange - 3.3V. (use this OR the 5V, depending on what sensor needs)
- Red - 5V
- Yellow - to sensor's Analog output
- White - to sensor's Digital output
NOTE: be careful to only use sensor modules which use 3V logic level on the IO pins!
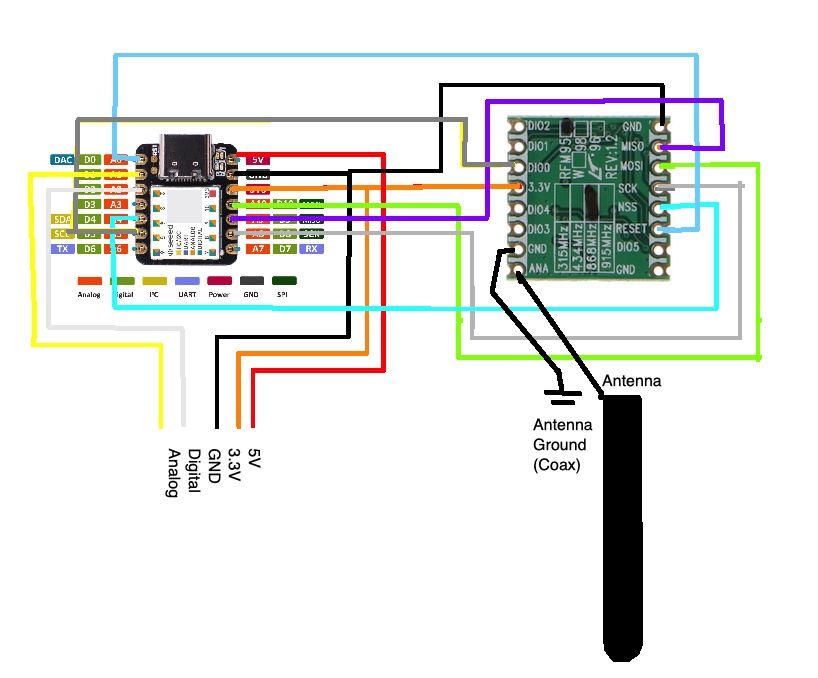
Wiring the Sensor radio moduleAll you need to do is connect the Xiao board to the RFM95 radio module, and attach a 900MHz antenna. Refer to the wiring diagram below:
The firmware is downloadable from the Ripple GitHub site here: https://github.com/spleenware/ripple#sensor-node---433-to-915mhz-configurable--only-usb-otg-supported
The GitHub readme has instructions.
With the Xiao board connected via USB cable, you can test that the firmware was flashed OK by opening the Serial Monitor in the Arduino IDE (set to 9600 baud). Enter 'q' (without quotes) in the send line, and press enter. The serial monitor should reply with text starting with "Q:..."
Configuring the sensorThe Commander app provides very flexible configuration for the sensor nodes, allowing for practically any kind of sensor and use case.
The app has two launcher icons. The 'Device Provision' one is just for when you are setting up your mesh network (repeaters, sensors, gateway, etc). The sensor nodes just need to be assigned a unique Id (between 2 and 254), and have their encryption keys generated. Just click on the 'NEW' menu on the toolbar, and enter the Id and name for the sensor, select device role 'Sensor', then click SAVE. The sensor should now be in the main list.
For sensor nodes, there are extra configuration parameters to be setup. Tap on the 'edit' (pencil) icon, and then tap on the '...' button in the next screen to see the Sensor Config screen:
This is for setting up the sensor, how it should report its status, and how to generate alert messages. Once the config is complete, tap on the SAVE menu in the top toolbar.
Tap on the 'chip' icon to the right, to go the 'Programmer' screen. Connect the Xiao board via USB-OTG cable to the Android, then tap on the 'PROGRAM' button. If all goes well, then there should be a message saying 'Done', and that you can now disconnect.
Exit back to the Android launcher, then tap on the main 'Ripple Commander' launcher icon. This is the main UI of the app, where you can chat with other 'pager' users in the network (who use the Ripple Messenger app), plus monitor your special nodes, like repeaters and the sensor nodes. Tap on a sensor node in the list, and you should see the device status screen:
Initially the sensor node will be in the 'STANDBY' mode. Tap the 'ON' radio button to switch it to active mode. While active, you should see the 'Sensor value:' change as per the config. For example, if you checked the 'On Change' transmit option, and the sensor value has changed, then the new value will be transmitted. Also, if you checked the 'Heartbeat' option, then the sensor value will be transmitted at the interval you specify.
Note that the alerts represent a state which are 'reset' either manually or automatically after an elapsed time. The screen shown above offers a "Reset Alert" button for manually resetting the alert status.
The alert messages generated will make the the home node board buzzer sound, and the message will be in the 'History' tab.
The 'home' deviceYou also need to setup a Ripple device and connect over USB-OTG cable (OR via Bluetooth) to the Android running the Commander app. This is the 'home' node (and will assume ID 1).
You need to flash one of the 'Messenger' (or Repeater) firmware binaries to this device. For the TTGO V2 board (which I recommend), you would flash this firmware: https://github.com/spleenware/ripple#messenger---433-to-915mhz-configurable--bluetooth-classic
Support
If you find this project useful and want to support the development, I now have a Buy Me A Coffee page here:
https://www.buymeacoffee.com/ripplebiz
FeedbackI continue to work on this project because it really engages me and interests me. I hope it can prove to be useful to the wider community. Feel free to message me here if you have questions.
Enjoy!
Regards,
Scott Powell


Comments
Please log in or sign up to comment.