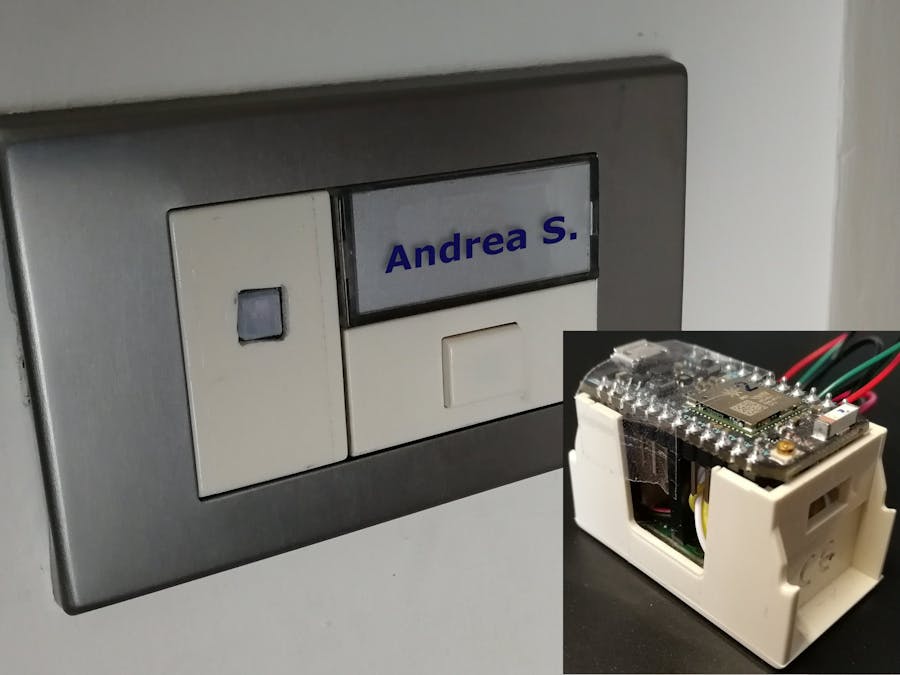
I exploited the standard doorbell typically present out of each apartment to enclose a hidden proximity sensor. While it is normal that people or pets will pass by the door (without the need to trigger any alarm), when a person stays close to the door for more than the typical time (to open it with the key), an alarm is triggered. Other PIR sensors will trigger lots of false alarms, each time someone or something passes by (or rings the bell). An accurate detection of the presence close to the door is necessary to enable more effective alarm systems. In addition, the flat shape and small size of the Kemet sensor makes it nearly impossible to spot!
How to build itFirst we need to connect somehow the Kemet sensor, I used a Mini Micro JST 1.0mm SH 5-Pin Connector Plug. The wires can then be soldered or connected to the Particle Photon pins. The Photon looks to be a perfect companion for the Kemet sensor, it's small, cheap and requires only a microUSB power supply and will provide the WiFi connection to send the triggers to the network.
Next step is preparing the socket case to enclose the sensor plus Photon board. We will unmount the doorbell button socket and remove the empty cover on the left.
We will need to make a small aperture on the cover, I used a hot nail to make a hole and then filed to make a little square. Then we can insert the PIR sensor and glue it there or use some tape to keep it in place.
And here is how it will look from the front:
I put a transparent tape here, but I could use a white one to completely hide the sensor. And here below there's the sensor connected to the Particle Photon and mounted in a test socket cover.
This is good for making lots of tests in a comfortable environment (rather than out of the apartment door).
Now it's time to install the new slot with the sensor and the Photon into the real door bell button and remount the socket cover into place:
We need to fit the Photon into the same "slot", as the others are occupied by the button and name tag. Again, some tape will help to keep everything together. The orange box installed into the wall will provide sufficient space for the Photon and connector.
The USB cable needs to be connected to USB adapter (in the socket itself or through an extension cable).
And here is the final appearance!
I will use a white marker or some white tape to completely hide the sensor aperture beside the door bell button, but it is already quite unnoticeable, as you can see below in the big picture.
As you can see the doorbell is very close to the door lock, so anyone trying to tamper with it will activate the PIR sensor for quite a long time, finally triggering an alarm and notification!
The Particle codeLet's give a look to the easy code required here (less than 90 lines!). Since we need to detect only a persistant presence, we don't want to trigger alarms for each PIR detection. So we will count at least 15 triggers before doing anything. A 5 seconds timer will slowly decrease the counter, so that a short presence will be "forgotten" after a few seconds. On the contrary, a continuous presence will generate lots of triggers and thus reach the threshold, finally activating a presence detection alarm!
There are a few parameters that can be tweaked to obtain the best detection results:
- number of triggers required to make a detection
- timer duration to adjust the count decrease rate
- count reduction rate after a detection
When we have a detection a couple of things are done:
- blink the integrated (or an external) LED, useful for debugging/tweaking
- ring a little integrated buzzer (optional)
- publish a "motionDetected" Particle event
What is a Particle event?
I use Particle (cloud) events to trigger external actions. For example, it could be received by another Photon connected to (another) buzzer and/or lighting signal.In my case I preferred to connect it to an IFTTT applet which will trigger a notification on my smartphone, wherever I am! You will simply need to download the IFTTT app on your smartphone and configure the Particle account to allow IFTTT to receive the events.
Here is how I set up the IFTTT applet:
And finally here is a real notification appearing on my smartphone:
That's it!Have fun and experiment! :-)


Comments
Please log in or sign up to comment.