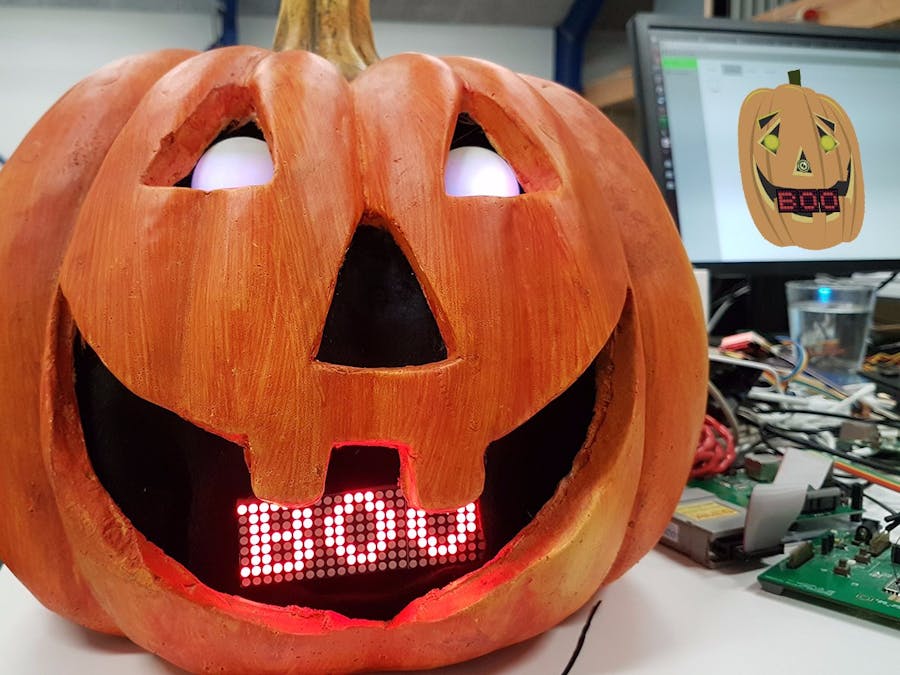
We love halloween and we love halloween props. But peeps, it’s 2017. Your halloween props need a web app, and yeah, of course you’re going to do it yourself!
Our humble Pumpkin Pi project is an easy-to-replicate, bona-fide halloween prop (with a complete web app) but it’s more than just that. It’s the potential to bring new life to your hardware.
Full disclosure: this project started out in the workplace as a sober demonstrator, but it soon spilled out into halloween madness. The Pumpkin Pi in fact brought us into beta territory, rather far away from the solid underpinning of our corporate clients. Actually, to be honest, we’re in a rather early alpha and have some stability issues - and we’re looking for your feedback.
We sincerely hope you will enjoy. Once you’ve baked this Pumpkin Pi, you will see that you can keep innovating to make your own variations. You can make it a perennial favorite that just gets better through the years.
The Overall FlowThis project is divided into 3 phases.
- Phase 1: The Prep We’ll setup and test the components one by one and wind up with a birds-nest on a breadboard. The ingredients: brain, eyes, nose, mouth, vocal cords and tongue.
- Phase 2: The Breath of Life We’ll register with Wappsto and use the ‘IoT Rapid Prototyping’ wapp (‘wapp’ means web app with background automations) to describe our Pumpkin, generating Python code templates and SSL certificates for our hardware. We’ll then connect the hardware to the maker-friendly Seluxit IoT Platform and from there to Wappsto. Finally, we’ll make a user-interface wapp in Wappsto. All this for free without time limits, though very generous usage limits, measured as traffic, will apply.
- Phase 3: The Assembly We’ll gut the pumpkin and assemble our components inside. We’re using a ceramic pumpkin. It’s less messy.
In this phase, we’ll take all the components one-by-one and get them up and running with our Pi.
1.1) Raspberry Pi Brains
Here are the requirements for our Pi:
- Ethernet or WiFi
- Minijack
- CSI-2 (camera bus)
- GPIOs (SPI, I2C, 1-wire)
We’ve built using a Pi 3 Model B.
We’ve prepped the Pi with Raspbian (Raspbian Stretch with Desktop) and used Win32DiskImager to prep our SD card. After expanding the file system, we then went into Raspbian and enabled the camera, and under advanced options then gave our Pumpkin Pi a name, and also enabled SPI, I2C, audio (force jack), 1-wire and GPIO.
1.2) LED Ping-Pong-Ball Eyes
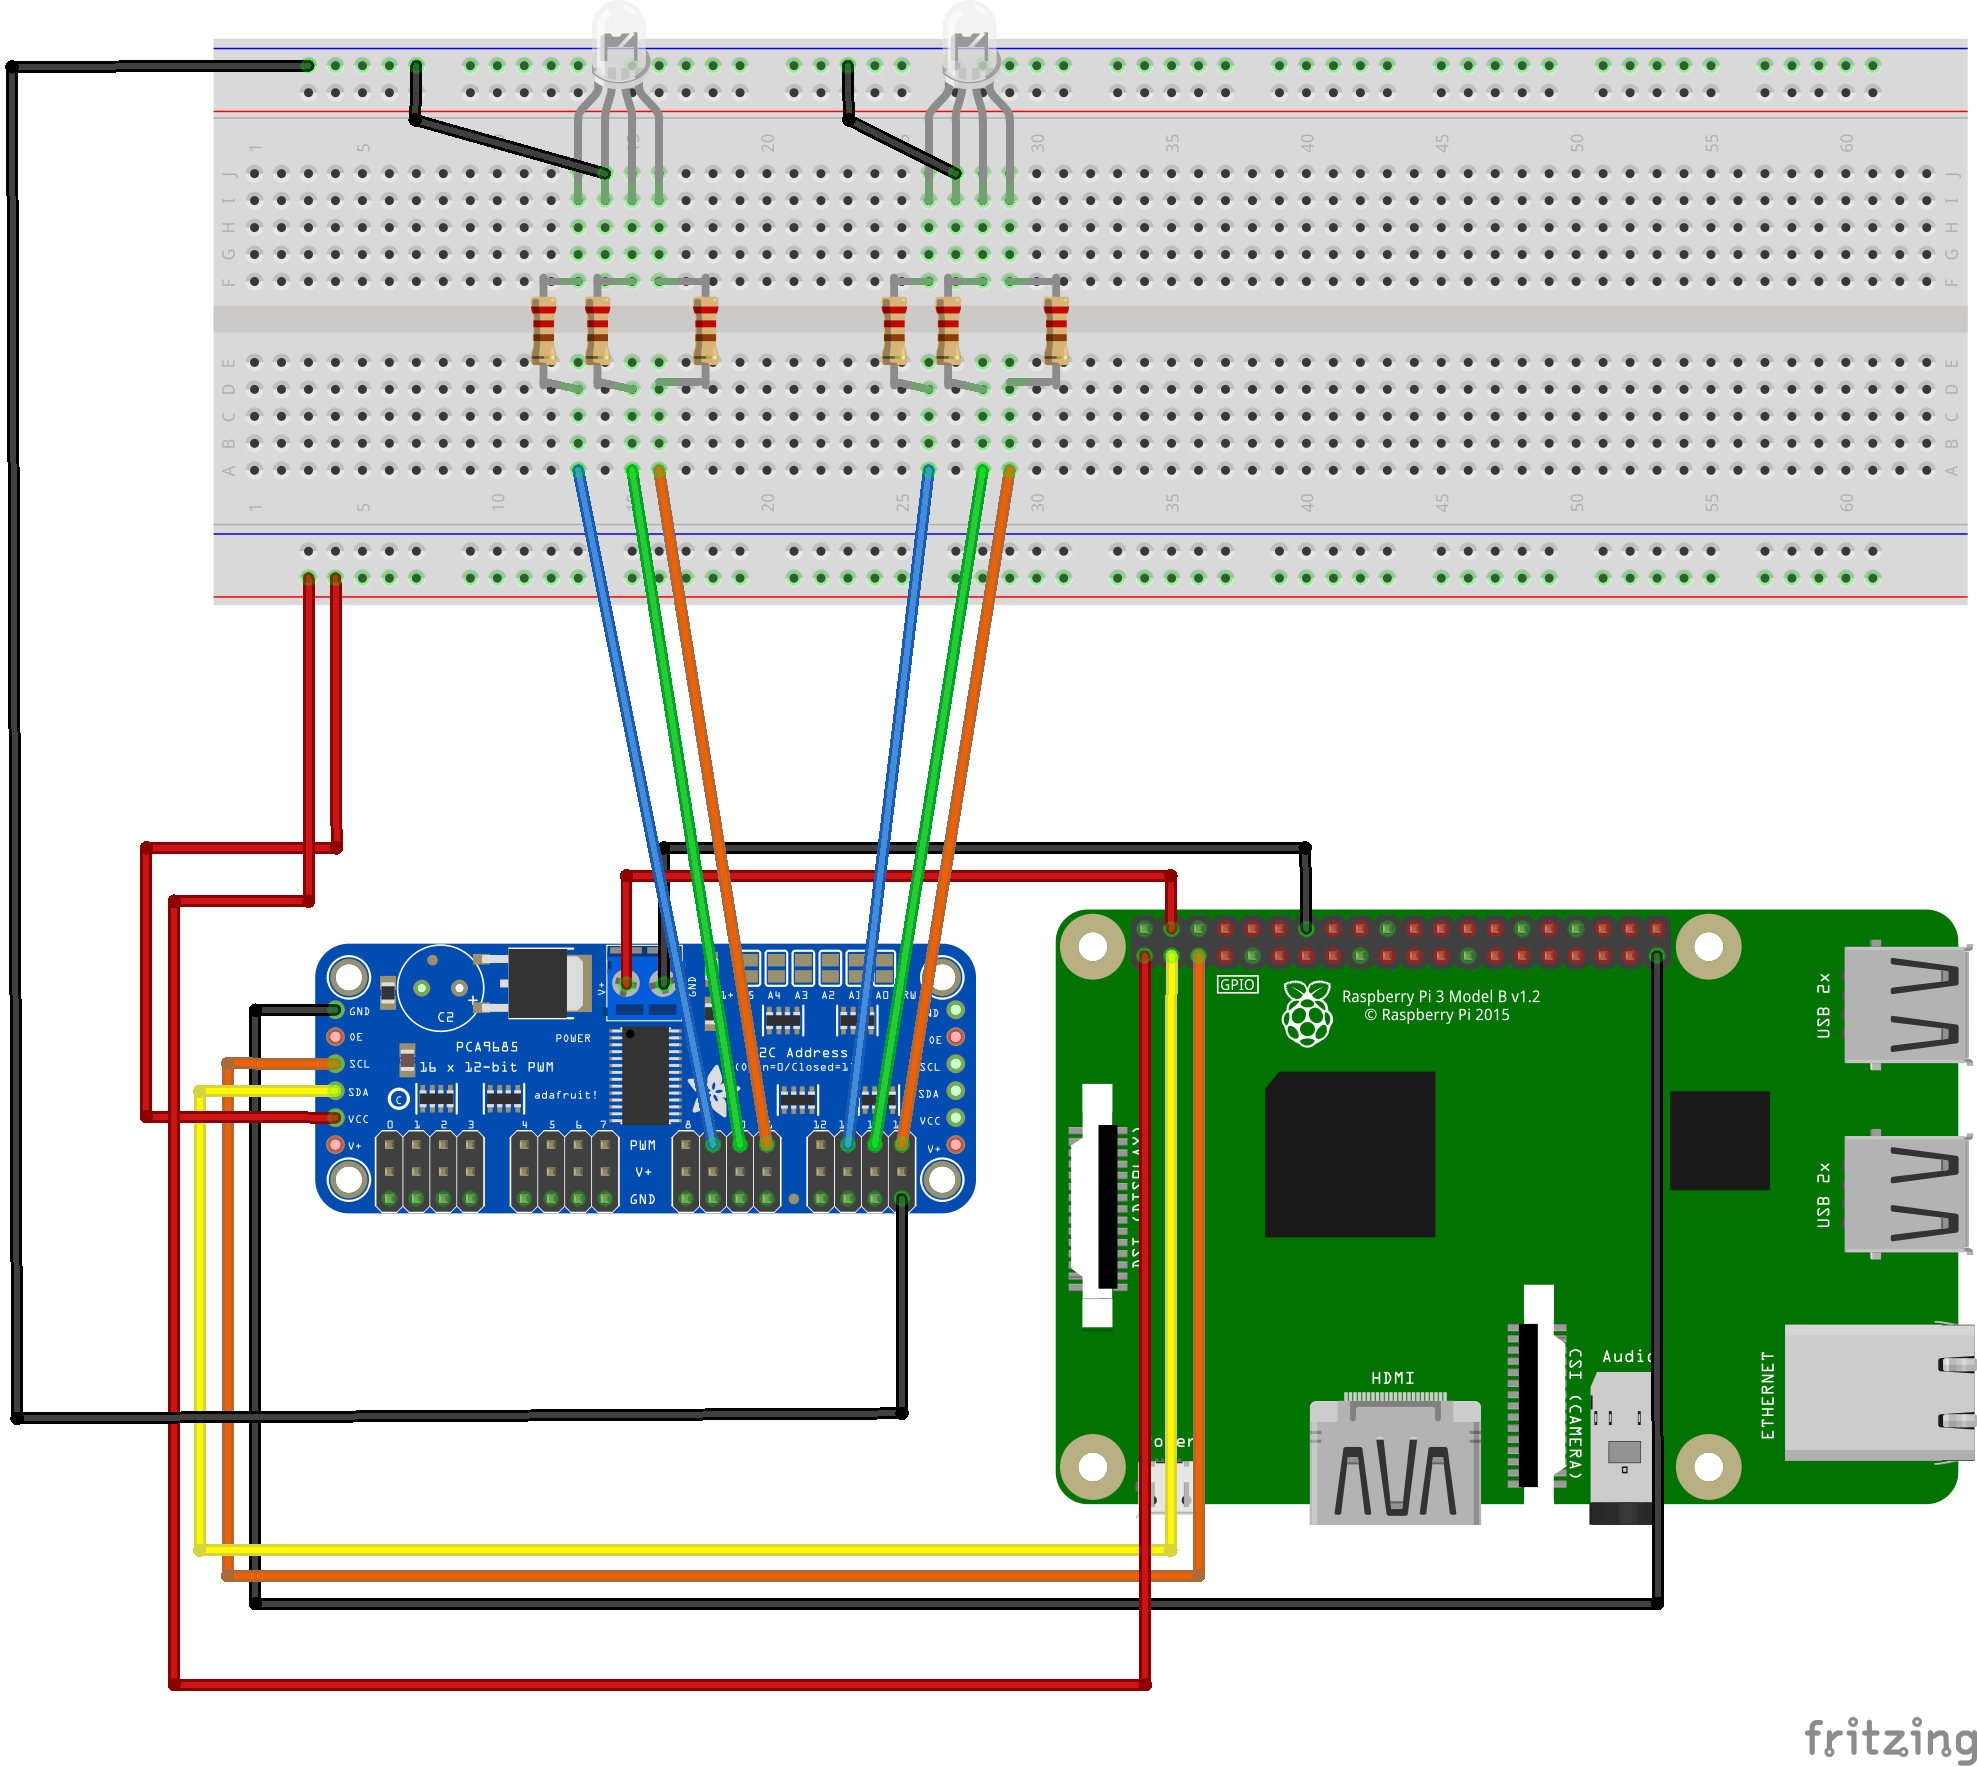
We’re using a PWM for this setup. Why? Well, it was in the fridge. But it works well, and it’s worthwhile because it will be handy with future embellishments involving servo-motors and what not.
First, let’s hook up the hardware. Note that you should choose appropriate resistors. We didn’t fret too much about the math ourselves.
Then let’s setup and test the software.
For the PWM, check out this page on Adafruit to setup and test. Note that if you have Raspbian like we do and did the initial prep, some of this will be redundant.
For the LED, check out this page on Adafruit to setup and test. Note here that you will have to adjust the code in simpletest.py to refer to the pin you’ve used on the PWM.
1.3) Pi-Camera Nose
This step is very straight forward. Just connect and test. Check out this video to review the basics.
1.4) LED-Matrix Mouth
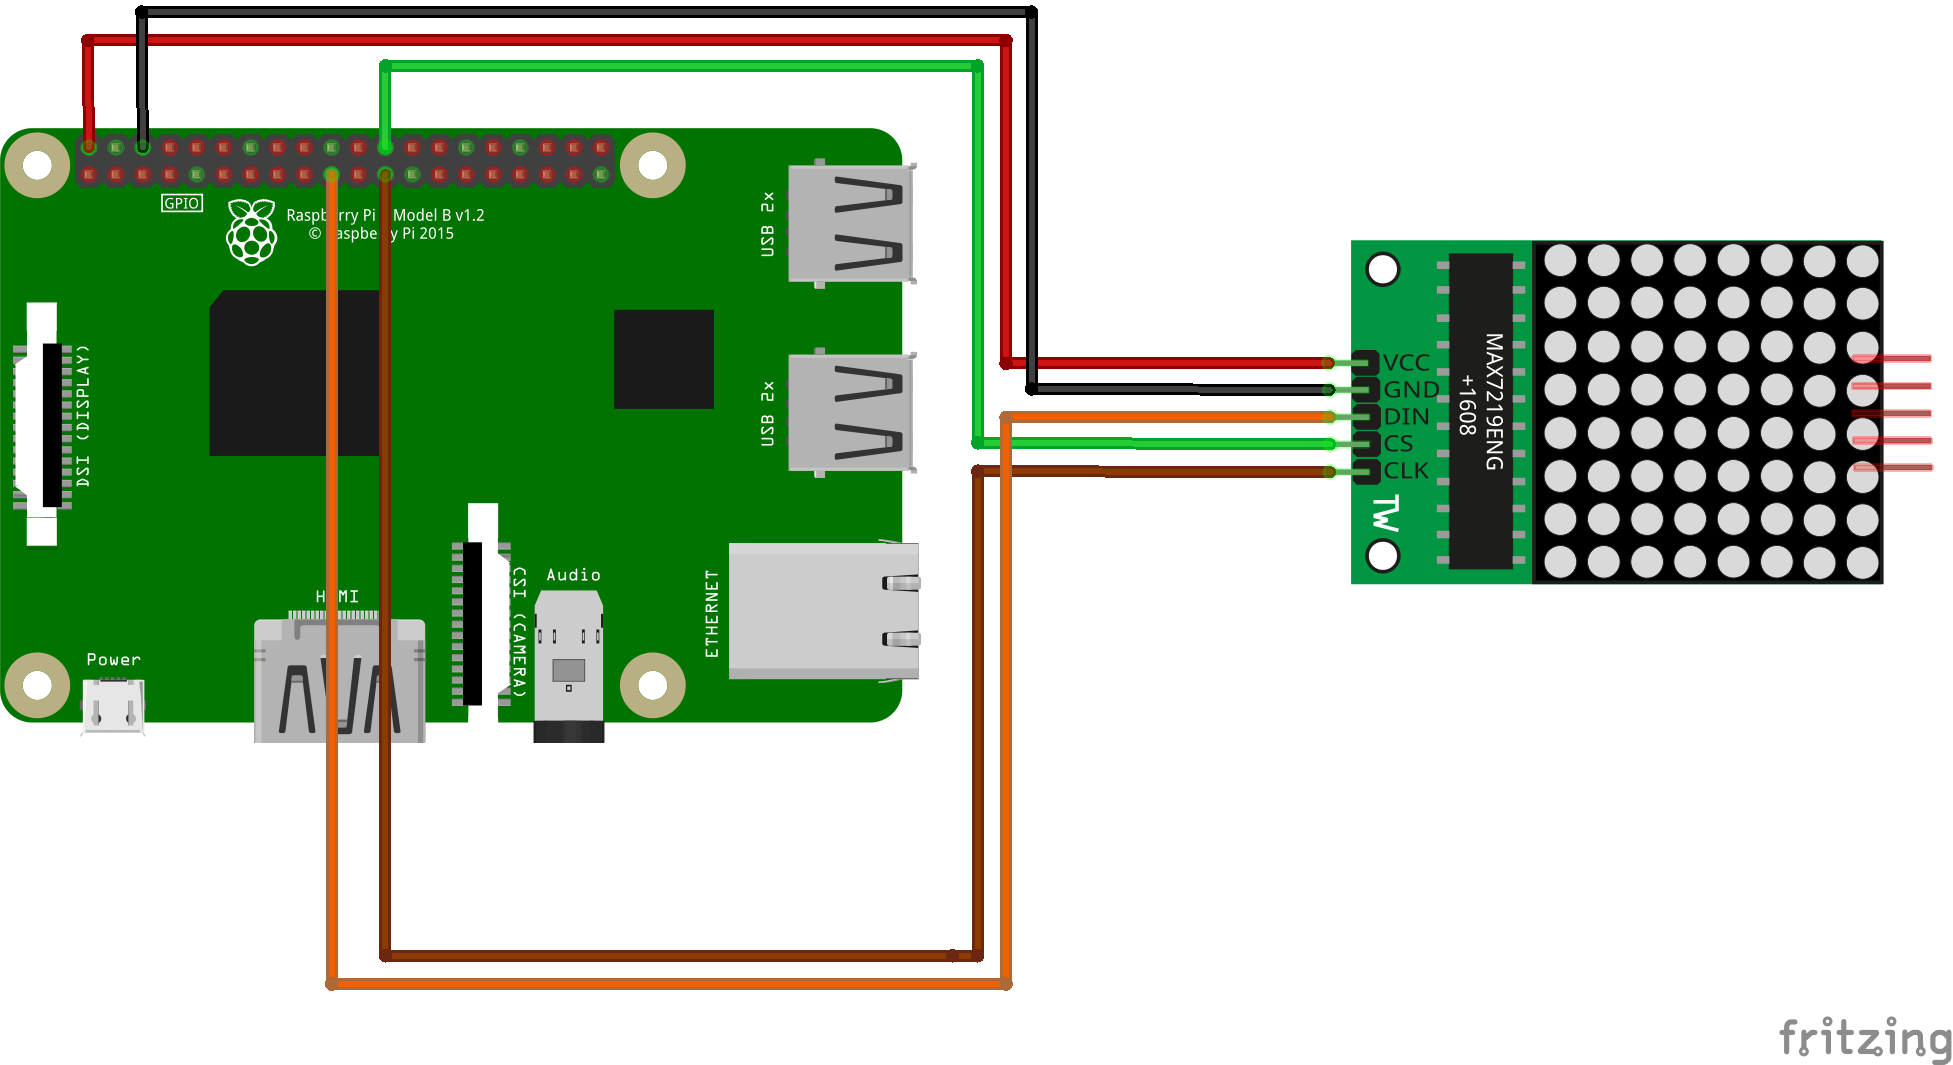
Here’s the setup for the hardware.
For setting up and testing the software, take a look at their documentation. Please use pip3 to install (the github installation is no good for our purposes, as they’ve made changes to the API). Also note that as we’ll be using Python3, so you’ll want to run the code for installation with the Python3 variation.
1.5) Mini-Speaker Vocal Cords
This is also very straight forward. Just plug in your speaker to the minijack (power to the Pi’s USB), drag over an audio file, and use omxplayer to make sure everything is as it should be.
1.6) Digital-Thermometer Tongue
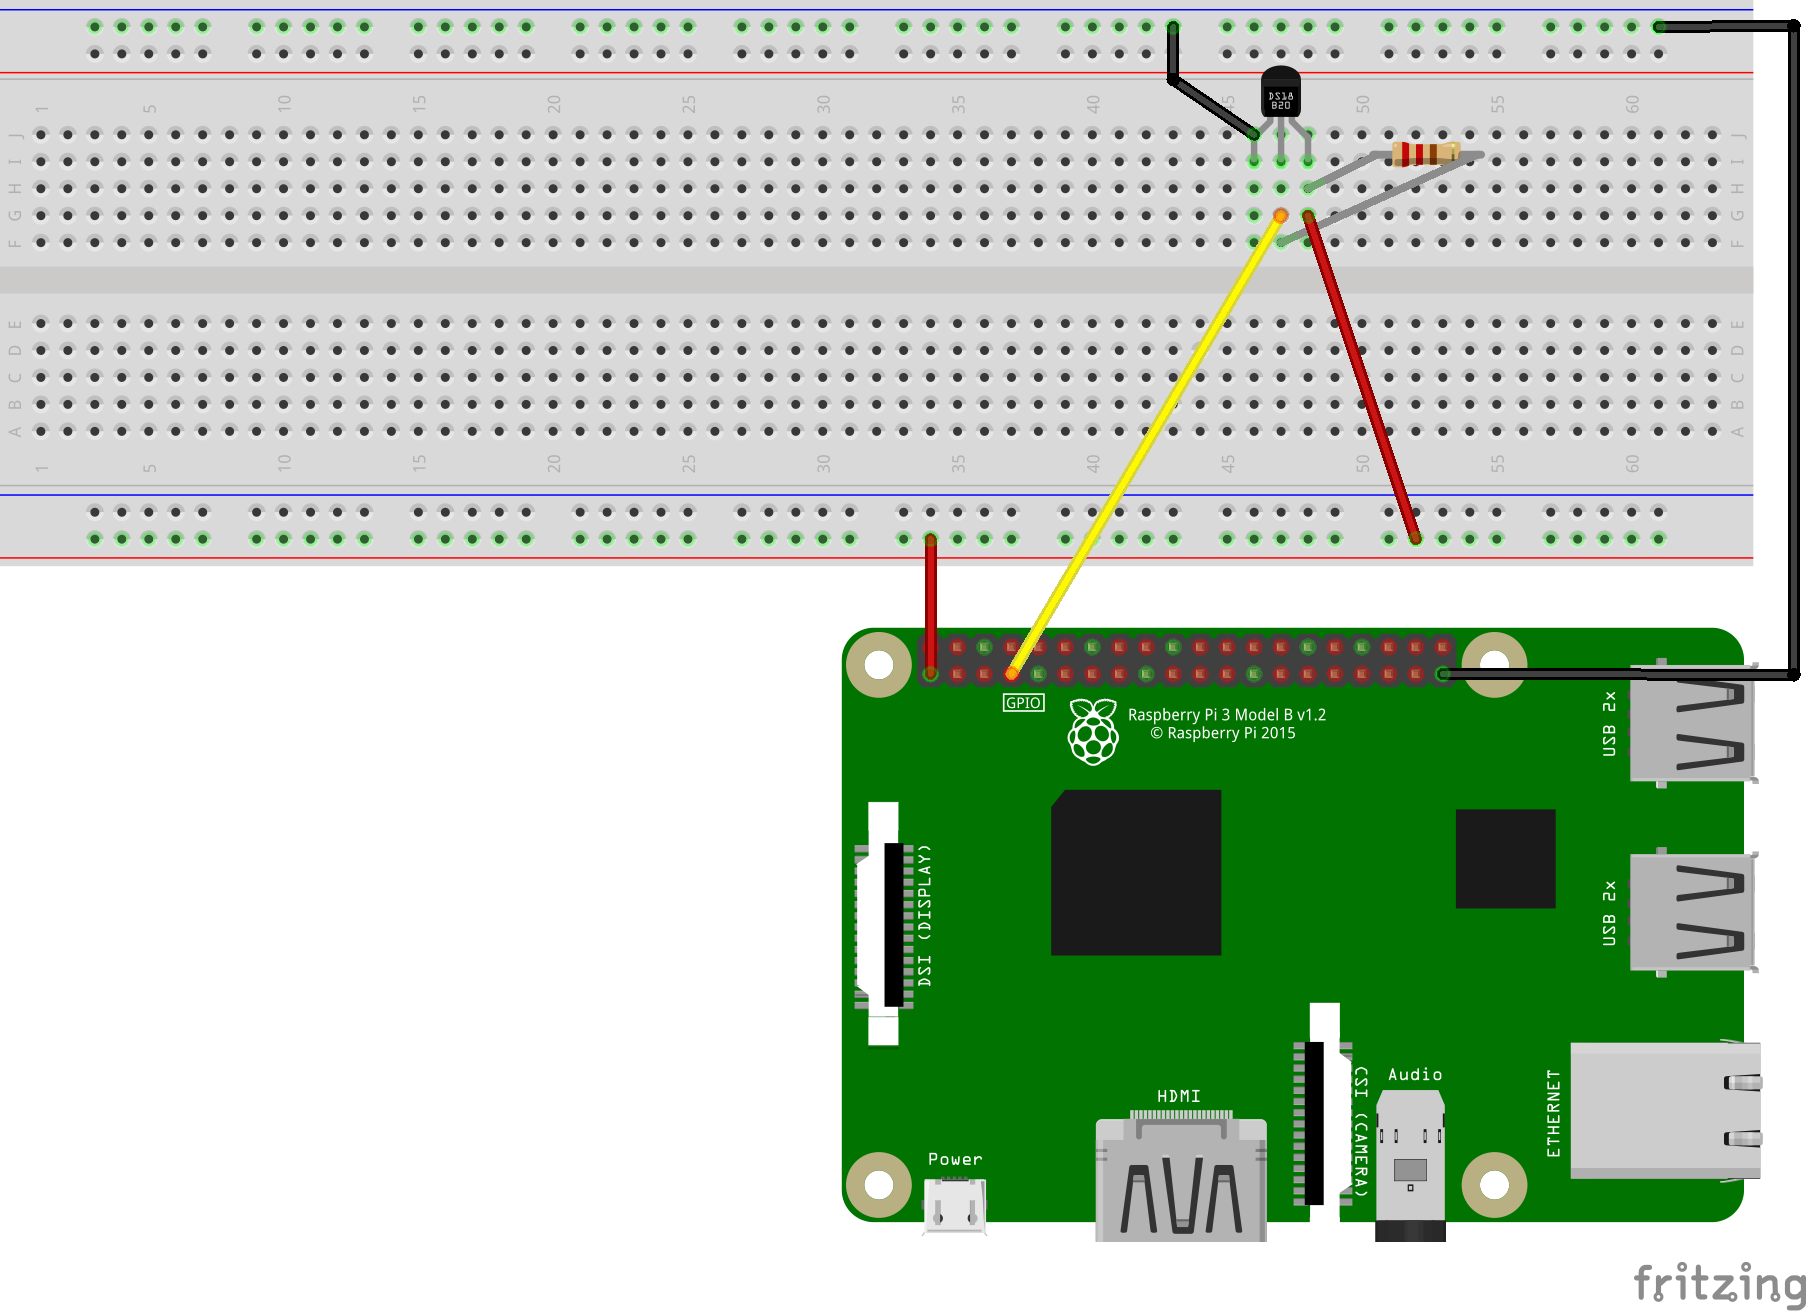
Here’s the setup. The right resistor here is a 4.7K.
For the setup and testing of the software, check out this Adafruit article. Again, some of the steps may be redundant if you’ve already prepped the Pi with Raspbian as we did.
Phase 2: The Breath of LifeIn this phase, we’ll bring our pumpkin to life (mwah ha ha ha ha).
The object is to get the hardware setup to work on a web app.
For this we’ll use what we call an “IoT rapid-prototyping” approach, meaning that we’ll describe the device in an online tool, generate Python code templates and SSL certificates for the device (based on a unified data model expressed in JSON) and use that same data model to connect the device to the Seluxit IoT Platform and through to Wappsto, where we’ll implement our UI. It’s a parallel process then, so we can work on the device and UI separately, because we’ve defined a common data model.
NB: the software we use here is ‘freemium’, which means that you can make and run a Pumpkin Pi for free with no time limits. If you want to run a whole fleet of pumpkins, however, you will at some point reach the usage threshold.
For now, you have access with no barriers in this beta phase. Just call us if you need a fleet of pumpkins.
2.1) Register a Wappsto account
Do this at wappsto.com. This is where all the action happens.
2.2) Install some wapps
In the Wappsto Store, install the wapps ‘IoT Rapid Prototyping’, ‘IoT Network Manager’, and ‘App Creator’.
Wapps? That’s what we call web apps, and their support for on-server background tasks, that you create in Wappsto.
2.3) Define your Data model
What you need to know is that the data model being used here is a hierarchy: Network > Device > Value > State. A network can have several devices that can in turn have several values.
The Network in our case is analogous to the Raspberry Pi (you might think of this as a kind of gateway device), and the component parts are devices. So a Pumpkin (network) has, for example, a set of eyes (device) which have a red value (value) and their value will be set to a value between 0 and 255 (which we call the value’s state).
So let’s get to it.
Run the ‘IoT Rapid Prototyping’ wapp. Click ‘create network’ and give it a name, for example ‘Pumpkin Pi’ or ‘Raspberry Pi Brains’, then click on your network.
You’ll see now that your network has zero devices. We’ll change that. Click ‘add device’ and then add devices for the eyes, nose, mouth and tongue (the vocal cords wind up being an extension of the brain, if you will).
Here is a list of all the devices and the values that should be created under them. Anywhere where there is a required value that you have no idea what it is and don’t care, just add some dummy value like ‘asdf’ or ‘1’. Otherwise, the important settings that apply to the values are indicated in the list.
Mouth (device)
- Text (value) - r/w, string, max:100
Eyes
- Red r/w, number, 0 > 255, step:1
- Green r/w, number, 0 > 255, step:1
- Blue r/w, number, 0 > 255, step:1
- Brightness r/w, number, 0 > 100, step:1
- Pulse r/w, number, 0 > 2000, step:1
Nose
- Image r, blob, length:100000
- X r/w, number, 0 > 2592, step:1
- Y r/w, number, 0 > 1944, step:1
Tongue
- temperature r, -40 > 150, step:0.001
2.4) Generate, install and complete your device software
Once you have your model, you are ready to click the ‘generate code’ button at the top by the Network. What happens than is that we generate UUIDs and a place on the IoT Platform for you, you’ll get a zip file delivered to you with Python code templates, the underlying JSON structure, and SSL certificates.
Move that code and certificates onto your Pi now, and then let’s complete the code.
The intention is that you then write your own code for how your specific device should actually behave. For the Pumpkin Pi, we’ve done that for you, so feel free to use these files on github and bring them on over to your Pi.
There are 2 substeps to merge that code with the generated code templates.
Substep 2.4.1) add to peripherals.py
We need to add a few lines of code in “peripherals.py” which was an autogenerated file.
What we need to do here is import the controller files we provide for you on github and then instantiate the classes and define the set and get methods.
So, for example, take the LED-matrix mouth. There is a file from the github example files called ‘matrix_control.py’, so at the top of ‘peripherals.py’ you would need to insert this line:
import matrix_control
Then for instantiating the classes using their constructors, you would add the line:
self.matrix = matrix_control.MatrixControl(sendQueue)
So it will look like this:
import camera_control
import led_control
import matrix_control
import pumpkin_audio
import temperature_reader
class Peripherals:
   def __init__(self, sendQueue):
       print("Peripherals initialization")
       self.matrix = matrix_control.MatrixControl(sendQueue)
       self.led = led_control.LedControl(sendQueue)
       self.audio = pumpkin_audio.PumpkinAudio(sendQueue)
       self.temperature = temperature_reader.TemperatureSensor(sendQueue)
       self.camera = camera_control.CameraControl(sendQueue)
   def set_value_mouth__text(self, value):
       self.matrix.setText(value)
…
   def get_value_mouth__text(self):
       return self.matrix.getText()
There’s a folder called ‘finishedExamples’ which has a finished example.
Substep 2.4.2) modify temperature_reader.py
Now we have to modify a few lines (marked with placeholder text ‘TODO’) in the temperature_reader.py example file we provide in github.
At the top of the file, you’ll need to replace the id of your DS18B20 thermometer with your actual id. You can find that by looking at the contents of this folder on your Pi.
ls /sys/bus/w1/devices.
Then we need to replace the ‘TODO’ placeholder text further down with the names of our thermometer-tongue device, value, and state. Refer to the autogenerated file uuid_defines.py to get your bearings. You’ll recognize the names you’ve given yourself. Here’s what our change looks like, and note here too, that we have included a finished example file for you on github in the ‘finished examples’ folder.
report = send_data.SendData(send_data.SEND_REPORT, data=str(self.celcius), network_id=my_ids.NETWORK_ID, device_id=my_ids.TONGUE__DEVICE_ID, value_id=my_ids.TONGUE__TEMPERATURE__VALUE_ID, state_id=my_ids.TONGUE__TEMPERATURE__STATE_REPORT_ID)
Substep 2.4.3) modify camera_control.py
Finally we need to replace the TODO placeholders in camera_control.py with the names you have given for your nose (camera) device, value and state. In our example, our code looks like this.
sendData.device_id = my_ids.NOSE__DEVICE_ID
sendData.value_id = my_ids.NOSE__IMAGE__VALUE_ID
sendData.state_id = my_ids.NOSE__IMAGE__STATE_REPORT_ID
That’s all you have to do here, so we didn’t bother with a finished example file for this particular step. You could again refer to the uuid_defines.py for reference to the names you’ve given.
Substep 2.4.4) test device code
Inside the folder with your Pumpkin Pi files, run the main.py file. If you pinch your thermometer now, you should see a message indicating that the value gets sent.
sudo python3 main.py
2.5) Connect the device to Wappsto
Open the wapp ‘IoT Network Manager’ and login with your Seluxit IoT Platform account. Then follow the on-page instructions to connect your device to Wappsto. At this point, you will be able to interact with the Pumpkin Pi in the ‘Networks & Data’ area. Go ahead and give that a try.
2.6) Download the UI from Github and create a new wapp in Wappsto
Even though you may notice a pumpkin app already created in Wappsto, you are going to want to recreate your own from our starting point. So go to github.com/seluxit, find the code for the Pumpkin Pi UI wapp. Download it. Unzip it.
Then, create a new wapp in Wappsto using ‘App Creator’ application. In foreground, upload the files you’ll find in the folder called ‘foreground’.
2.7) Modify pumpkinConfig.js with your network, device and value names
The pumpkinConfig.js needs to have the names that you have in the network that you’ve created. Open this file up, update the names and click save.
You’ll then notice in the preview pane that the application is requesting access to a network, and if the names match, you should see your network. From here, click on ‘allow’ and continue.
2.8) Check out the functionality
Now you should be able to control the pumpkin innards with the app. You could do this directly in the preview pane, but you should then also be able to go to the tab open with your overview of installed apps.
Get your spoons and knives out (or go for fake and avoid the mess, like we did). In this phase, we’ll stuff the new guts into the hollow Pumpkin.
Because every pumpkin head is different, we can only give you inspiration. If you are new to soldering, now’s as good a time as any to learn. You could check out this video.
Here are a collage of our setup. Note that we (confusingly, but resourcefully) used an old PCB we had lying around to mount our mouth on.
Would we do anything differently with the assembly if we had to do it all over again? Yes. Like we said, every pumpkin head is different.
Here’s some more inspiration. We’ve 3D printed this more sophisticated holder.
So the Pumpkin Pi can tell you the temperature of its own environment, but can it tell you the temperature in Kalamazoo? Can it even tell you the future?
Well, yes. I mean, you have an Internet of Things thing here, and Wappsto is a tool to make mashups between different things and services. So you could integrate a weather forecast service into the Pumpkin Pi wapp, or create your very own, novel Pumpkin Pi wapp. Create a new twitter account for the Pumpkin Pi, tweet your room temperature to the world. Have your pumpkin respond when it gets retweeted.
Twitter, weather, you name it. The cool thing is that you can use other peoples’ ‘converter’ wapps in your own wapps (converting various things and services APIs into the Wappsto data model), and share your own converter and mashup wapps yourself.
So yeah, you can expand on the pumpkin’s arsenal of gadgets, like a servo-motor to run make some teeth, or maybe replacing the eyes with a LED matrix that can be controlled by an ESP32-driven joystick (all work in progress for us).
But the great thing is that you can then add these hardware expansions to your data model and get a hold of it in the UI, where you can interact with any API the Internet can throw at you, and create all of your logic in JavaScript.
The end? Nah.
In fact please contact us for help, feedback, and to hit us back with some inspiration.


_1x_bGT19vVAby.png?auto=compress%2Cformat&w=40&h=40&fit=fillmax&bg=fff&dpr=2)
Comments
Please log in or sign up to comment.