

Software apps and online services | ||||||
| ||||||
| ||||||
 |
| |||||
This article is the second part of my little IoT project. If you are interested in please check here.
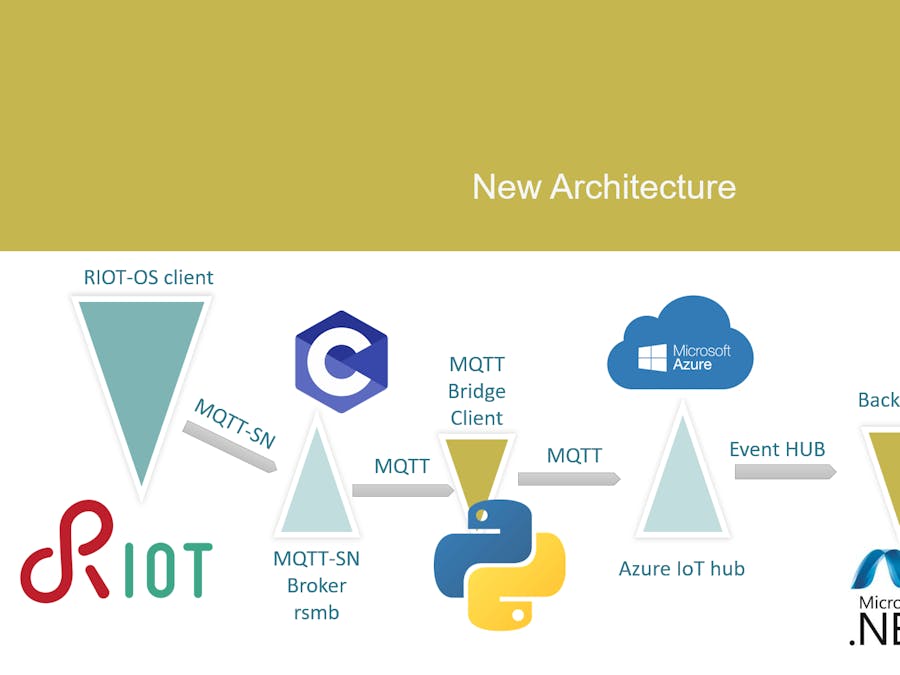
In this article I will show you how to replace the C# MQTTclient directly sending values to the Azure built-in MQTT broker with real devices sending values via the lighter weight MQTT-SN protocol. Azure does not support MQTT-SN directly, so we need an architecture made as below.
Each station will run the RIOT-OS operative system and publish values to the MQTT-SN broker on a certain topic. Another client will subscribe to the same topics of the same broker and wait for messages. Once the message arrives will send to the Azure IoT hub.
To let both old C# client and the new one work, the messages must have the same form. One more thing I do not want to make any change to the backend, on azure or the dashboard.
Assuming you followed the last tutorial and you already have the Azure IoT hub properly tuned, let's see how to let those new architecture work.
First of all, clone the repository with the RIOT-OS client. In order to show you how it works my client will just generate new random values, but I also want to later show you how to read real values from real boards if your board has any sensor.
git clone https://github.com/stefanofoti/iot-assignment-1Change the makefile, on the RIOTBASE line put the path to your RIOT base directory and then have a look to the used modules.
Get a MQTT-SN broker. I suggest you to use rsmb. It is lightweight and minimal, and you can get the latest version here.
git clone https://github.com/eclipse/mosquitto.rsmbMove to the rsmb/src directory and compile it in this way:
makeCreate a new config file. We need just to specify the port where it will be running.
>> nano config.conf

# add some debug output
trace_output protocol
# listen for MQTT-SN traffic on UDP port 1885
listener 1885 INADDR_ANY mqtts
ipv6 true
# listen to MQTT connections on tcp port 1886
listener 1886 INADDR_ANY
ipv6 true
Start at least two instances of the RIOT-OS client. In order to start it, move to the RIOT-OS client directory and compile it:
make all termJust connect to the broker and then start sending values via MQTT-SN by typing:
con YOUR_BROKER_ADDRESS YOUR_BROKER_PORT
start YOUR_TOPIC
It's easy to replace those configuration steps with a configuration file in further developments.
Surf to the dashboard, wou will see the values!
How to collect values from real sensors? If you have real hardware you can use it. Otherwise you can make your experiments on a testbed platform, like iot-lab.info. Let's now try to deploy this experiment on real hardware. I want to use some iot-lab M3 nodes for my stations. Instead of generating random values, we should read real values with RIOT-OS on our real hardware. How to read those values? It is very simple, very few steps. Each M3 node on iot-lab can read pressure and temperature. Let's see how.
Include the lps331ap header files:
#include "lps331ap.h"
#include "lps331ap_params.h"
Create a new sensor and initialize it. If the initialization phase should fail, lps331ap_init will return 1.
lps331ap_t dev;
puts("Initializing LPS331AP sensor");
if (lps331ap_init(&dev, &lps331ap_params[0]) == 0) {
    puts("[OK]\n");
}
else {
    puts("[Failed]");
return 1;
}
Read pressure and temperature as below
int pres = lps331ap_read_pres(&dev);
int temp = lps331ap_read_temp(&dev);
You will get a row value. Convert to Bar and Celsius and use it as you want.
int pres_abs = pres / 1000;
pres -= pres_abs * 1000;
int temp_abs = temp / 1000;
temp -= temp_abs * 1000;
printf("Pressure value: %2i.%03i bar - Temperature: %2i.%03i °C\n", pres_abs, pres, temp_abs, temp);
In further developments I will not only collect real values but also send via MQTT-SN from iot-lab devices; it just takes a little bit of IP configuration.


Comments
Please log in or sign up to comment.