Shashwat Raj
Published © GPL3+

How to make stopwatch with arduino

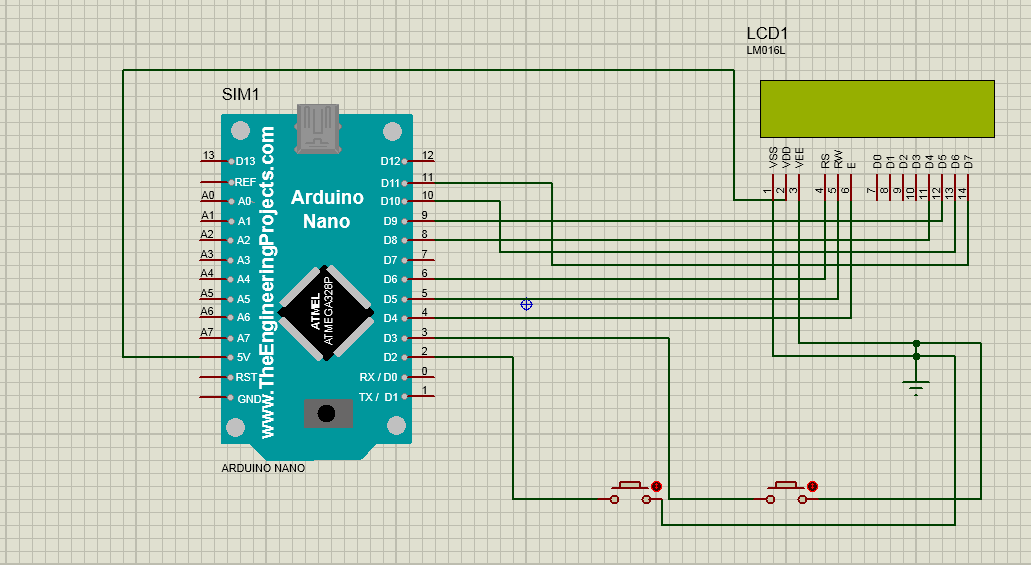
In this tutorial, I will show you how to make stopwatch using arduino nano, push buttons, 16*2 lcd display, breadboard and jumper wires.

IntermediateFull instructions provided6,972
How to make stopwatch with arduino

Things used in this project

Hardware components

Arduino Nano R3
Arduino Nano R3
×1
Pushbutton switch 12mm
SparkFun Pushbutton switch 12mm
×2
Breadboard (generic)
×1
Jumper wires (generic)
×1
Alphanumeric LCD, 16 x 2
×1

Software apps and online services

Arduino IDE
Arduino IDE

Hand tools and fabrication machines

Wire Stripper & Cutter, 18-10 AWG / 0.75-4mm² Capacity Wires

Story

Read more

Schematics

Circuit Diagram

Code

Arduino code

Arduino
 /*
 * Arduino Code for Stopwatch using arduino nano or arduino uno.
 * coded by Shashwat Raj.
 * Arduino Project Hub ID :- shashwatraj98765
 */

#include <LiquidCrystal.h>
#include <Bounce2.h>
LiquidCrystal lcd(6,5,4,8,9,10,11);

const byte ledPin = 13;

const byte startButton = 2;
Bounce startDebouncer1 = Bounce(); 

const byte resetButton = 3;
Bounce resetDebouncer2 = Bounce();  

void setup() 
{  
  pinMode(startButton, INPUT_PULLUP);
  startDebouncer1.attach(startButton);
  startDebouncer1.interval(5); 
    
  pinMode(resetButton, INPUT_PULLUP);
  resetDebouncer2.attach(resetButton);
  resetDebouncer2.interval(5); 
  
  lcd.begin(16, 2);
  lcd.setCursor(0, 0);
  lcd.print("  StopWatch");
  lcd.setCursor(0, 1);
  lcd.print("  Shashwat__Raj");
  delay(7000);
  lcd.clear();  
  lcd.setCursor(0, 0);
  lcd.print("Press 1st-Stat/Stp"); 
  lcd.setCursor(0, 1);
  lcd.print("Press 2nd-Reset");

}


bool startState = LOW;
bool resetState = LOW;

unsigned long startMillis;
unsigned long currentMillis;
unsigned long elapsedMillis;

void loop() {
  // Update the Bounce instances :
  startDebouncer1.update();

   if ( startDebouncer1.fell() ) {     // Call code if button transitions from HIGH to LOW
     startState = !startState;         // Toggle start button state
     startMillis = millis();
   }

  if (startState)
  {
    currentMillis = millis();
    elapsedMillis = (currentMillis - startMillis);
    
    lcd.setCursor(0, 0);
    lcd.print("SW (hh:mm:ss:ms)");
    lcd.setCursor(0, 1);
    lcd.print("                ");
    
    unsigned long durMS = (elapsedMillis%1000);       //Milliseconds
    unsigned long durSS = (elapsedMillis/1000)%60;    //Seconds
    unsigned long durMM = (elapsedMillis/(60000))%60; //Minutes
    unsigned long durHH = (elapsedMillis/(3600000));  //Hours
    durHH = durHH % 24; 
 
    String durMilliSec = timeMillis(durHH, durMM, durSS,durMS);
    lcd.setCursor(0, 1);
    lcd.print(durMilliSec);
    
    delay(150);
  }
  
  resetDebouncer2.update();

  if (resetDebouncer2.fell())
  {
    resetState = HIGH;
  }

  if (resetState)
  {
    // clear screen for the next loop:
    lcd.clear();
    
    lcd.setCursor(0, 0);
    lcd.print("Press 1st-Strt/Stp");
    
    lcd.setCursor(0, 1);
    lcd.print("Press 2nd-Reset");

    delay(100);
    
    resetState = LOW;
  }
     
}

String timeMillis(unsigned long Hourtime,unsigned long Mintime,unsigned long Sectime,unsigned long MStime)
{
  String dataTemp = "";

  if (Hourtime < 10)
  {
    dataTemp = dataTemp + "0" + String(Hourtime)+ "h:";
  }
  else{
    dataTemp = dataTemp + String(Hourtime)+ "h:";
  }
  
  if (Mintime < 10)
  {
    dataTemp = dataTemp + "0" + String(Mintime)+ "m:";
  }
  else{
    dataTemp = dataTemp + String(Mintime)+ "m:";
  }
  
  if (Sectime < 10)
  {
    dataTemp = dataTemp + "0" + String(Sectime)+ "s:";
  }
  else{
    dataTemp = dataTemp + String(Sectime)+ "s:";
  }
  
  dataTemp = dataTemp + String(MStime);

  return dataTemp;
}

Credits

Shashwat Raj

Shashwat Raj

7 projects • 12 followers
My name is Shashwat Raj. I love doing projects with arduino and Raspberry Pi. You want to view more please subscribe to my YouTube Channel.

Comments