The growing pandemic COVID-19, the Novel Coronavirus is the biggest threat in this World. WHO estimates that $3 trillion are required to treat an outbreak. I thought of a device that people with basic knowledge of electronics and programming can prepare by themselves when the hour strikes this need. As the virus spread through two main ways, Through respiratory droplets produced when an infected person coughs, sneezesor talks“. Between people who are in close contact with one another (within about 6 feet). Which can be prevented by wearing Safety Googles and Mask. It can also be avoided by Social Distancing. The virus could spread by touching an object or surface with virus present from an infected person, and then touching the mouth, nose or eyes.
According to a study, a person touches his face nearly 24 times in an Hour. So, there are almost 575 chances that you might infect in a day just for touching your face. All this happens subconsciously. My solution makes you stop. This System aims to automatically alert you when you are about to touch your face and prevent you from getting infected from COVID-19.
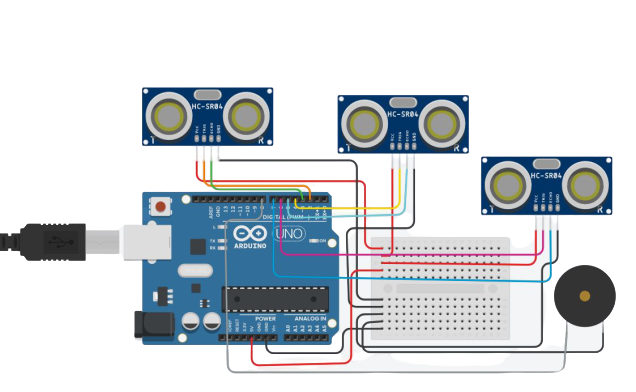
INTRODUCTIONMy basic requirement was to stop a person fromtouching his face, especially his eyes, nose, ears and mouth regardless of their habits. Because this was the only method from preventing him from getting infected. The device which I have developed can be attached to your cap with the help of Mountable Clipboard Clips with Rubber Feet. The Sensors in the device detects the position of your hand, If it is near to your face it will alert you by a Beep Signal. I have simplified my solution to such an extent that any student can prepare on their own as we cannot depend on manufacturers to meet our needs during this hour. I have also modified my design to an Arduino based solution. Arduino Community is huge and there are thousands of YouTube tutorials that will teach the basics of Arduino. All the Instructions are mention here that will help in making ready this Design.
ULTRASONIC PRINCIPLEUltrasonic sensors emit short, high-frequency sound pulses at regular intervals. These propagate in the air at the velocity of sound. If they strike an object, then they are reflected back as echo signals to the sensor, which itself computes the distance to the target based on the time-span between emitting the signal and receiving the echo.
I have named my device as SHARABHA-|||.Sharabha is an Incarnation of Lord Shiva which is not commonly known. This is considered as the most powerful appearance taken by Shiva to protect the universe. The Sharaba form of Shiva was the structural blend of human, animal and bird with gigantic as well as blistering look. It had so many hands, claws and legs, and almost resembled a huge dragon. The heads of sensors emerging out of the resemble the 8 legs of Sharabha. I hope even Sharabha-|||protect you from COVID-19 as LordSharabha protected the Universe.


_nLRLcPCQVv.png)


Comments
Please log in or sign up to comment.