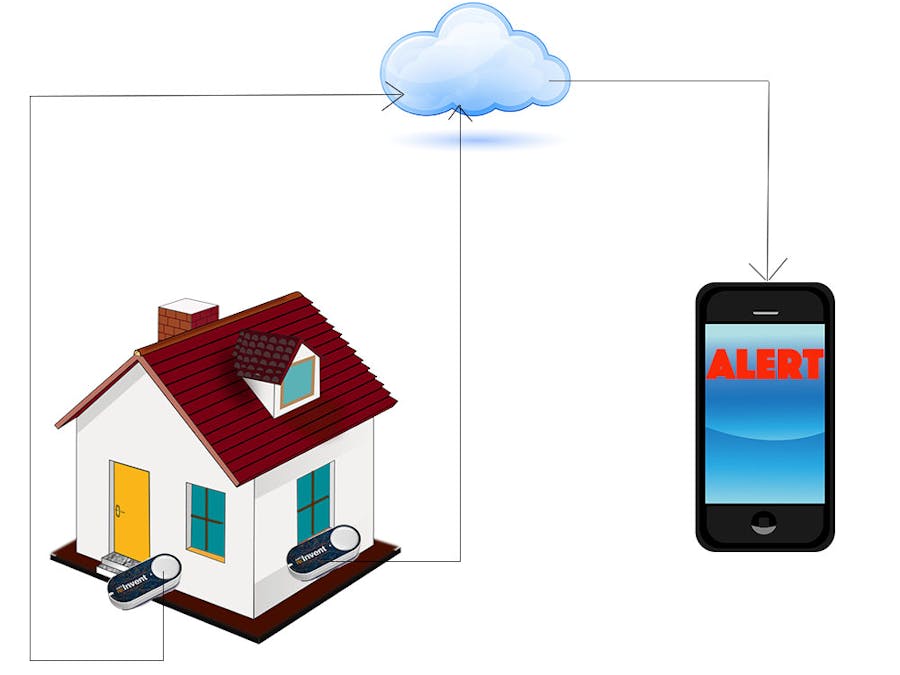
The idea of this project is to build a burglar alarm which is connected to cloud and notifies you when someone tries to enter the house, when you are out on vacation.
I am using AWS IoT button here for this project. This button is not available to purchase yet. It was distributed by AWS at Re:Invent 2015.
This project uses AWS IoT button as a switch. The AWS IoT button is a wifi connected button (as shown in the image). This button can be installed at various entry points (side of the door, window etc.) and when pressed, it will call AWS service (details provided later), which then sends SMS to the mobile phone, alerting user that someone has entered the home.
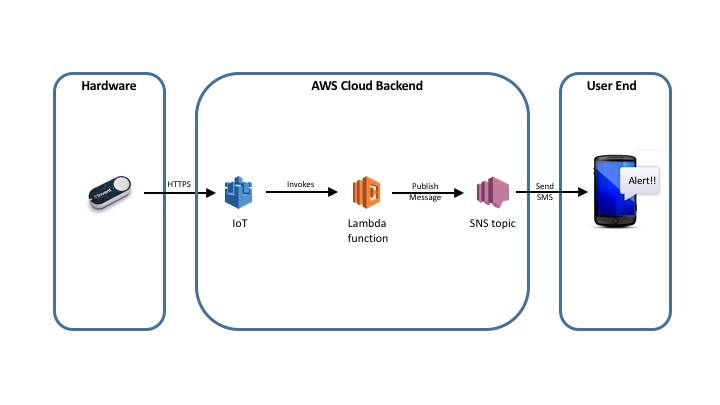
Following diagram shows the overall architecture of how the system will work end-to-end, starting from pressing of a button (at the door or a window) to calling AWS services and at the end receiving a text message on the phone.
First thing we need to do is, connect the IoT button to the home WiFi so that when the button is installed at the side of the door or under the window pane and pressed, it will be able to connect to AWS service over internet.
Following are the steps to connect an IoT button (taken right out of the box) to the home WiFi:
- Press and hold the button for 15 seconds, until it shows a blue blinking light.
- Use your phone/computer to connect to the "Amazon ConfigureMe - XXXX" Wi-Fi network. The XXXX will be the last 4 digits of your button's serial number.
- In a browser, (Safari not supported) navigate to http://192.168.0.1
- Select the network you want the button to connect to and enter its password.
To activate the AWS IoT button to your account, click on the link and sign into your AWS Management Console (administrator privileges required). Watch the Activation Wizard Video (upto 0:21 seconds) to see how to use the wizard to activate a button.
- Input your Device Serial Number (DSN on the back of the device) and activation code that you received on a piece of card with the AWS IoT Button. (Note that only one AWS IoT Button can be associated with an AWS account and the code is valid only for one AWS IoT Button activation)
- Press "Activate AWS IoT Button" and you will see a success message and the following screen.
Congratulations! you have successfully activated your AWS IoT button to your AWS Account.
So far we have created following resources in our AWS Account: -
- A thing called "iotbuttonGxxxxxxxxxxxx"
- A certificate for this thing
- A policy called "iot-button-policy" which allows your AWS IoT button to send messages.
Now we will setup IoT button to send text message to our cell phone.
In the video, it shows how you can setup to receive email when the IoT button is pressed. Instead of email, we want to setup text messaging. To do that, follow the below steps: -
Step 1: On the success screen from "Part 2", click "Send me a text message" link, and you will see following screen.
Step 2: Enter your mobile no. including country and area code, in "Mobile Number" text box, on which you want to receive a text message, and press "Send Confirmation" button. It will send a text message to your phone asking for confirmation. Reply "YES" to the received message, and your subscription will be confirmed and you are ready to receive messages from AWS IoT button.
Step 3: Next, you need to select a role from the drop-down "Role name", which will authorize AWS IoT service to send messages to SNS topic on your behalf. If you don't have any role populated in the dropdown, you can create a new role by clicking the link "Create a new role" next to the dropdown. This will open the IAM create role screen in the new tab, where you can create a new role and click save. Once, you have a create a role, you will see the new role populated in the dropdown. Select the new role you just created and press "Create Rule" button.
Congratulations! You have successfully subscribed your phone to receive text messages, every time the IoT button is pressed. To test it, press your IoT button and receive a text message on your phone with the following content:
The text message we received in step 3 doesn't make much sense. It provides the information about the button, but for our project we may have multiple buttons and we want to know which button is pressed or which door or window is opened. For that, we have to customize the text message which is sent on button press. To do that, we will use AWS Lambda service. We will create a lambda function, which will be invoked when the button is pressed. This lambda function then, will send a custom message to the SNS topic and in turn a text message is sent to our phone which is subscribed to that SNS topic.
Following are the steps to do that:-
Step 1: Login to your AWS Management console, and click "Lambda" from services catalog page.
Step 2: Click "Create a Lambda function" button, and on the "Select blueprint" page, click "skip" button on the lower right-hand side, to go to "Configure function" page.
Step 3: Give a name to your function, say "sendTextMessage". Provide a description (optional), select a Runtime for your function (wee will use NodeJS as a Runtime) and paste your code in the code section. Code for Lambda function is provided later on this page.
Step 4: Under "Lambda function handler and role" section, leave the "Handler" name as "index.handler".
Step 5: You need to select a Role from the "Role" dropdown to allow this lambda function to execute and publish message to your SNS topic. We will create a new role for this using following steps:-
- Select "* basic execution role" from the dropdown, which will open a new page to create a role.
- Select "Create a new IAM role" from the "IAM Role" dropdown.
- Provide a Role Name, say "lambda_execution_role".
- Click "View Policy Document". It will show the policy associated with this role.
- Click "Edit" to edit the policy and paste the policy code provided later in this page.
- Click "Allow".
Step 6: Select the newly created role in the "Role" dropdown.
Step 7: Click "Next" and then click "Create function".
Congratulations! You have successfully created a lambda function which will send a custom message, when your IoT button is pressed. You can put any message you want to send in the code, in "params" variable, under "Subject".
Now, we have our lambda function which when invoked will send a custom text message. Next, we have to configure our rule (in AWS IoT service) to invoke this lambda function, on button press. To do that, follow below steps: -
Step 8: Go to service catalog on AWS management console and click "AWS IoT". You will see all the resources created so far - 1 things, 1 rule, 1 certificate and 1 policy. (In the image below you see 2 rules instead of 1, as I was testing with another rule).
Step 9: Click the rule named "aws_iot_button_rule_xxxxxxxxx" and a panel will pop-up on the right-hand side. This is the rule which gets created automatically when you register your AWS IoT button to your AWS account and setup text messaging to your phone.
Step 10: Click "Edit Action" -> "Add new action".
Step 11: From the "Choose an action" dropdown select "Insert this message into a code function and execute (lambda)".
Step 12: Select the lambda function you just created named "sendTextMessage" from the "Function name" dropdown, and click "Add Action".
Step 13: Now, you have 2 actions in the rule. We will delete the "SNS Action". Click "SNS Action", and click "Delete" button.
All done! Now if you click your IoT button, you will get a custom text message (whatever you put it in the code under "Subject").
Congratulations! You have completed this project.
Next time when you go on vacation and nobody is at your home, place this button under the doormat or side of the door. When someone opens the door (hopefully this never happens), you will get a text message and you may ask your friend to go and look at your home. Or you can subscribe your friend's phone no., who is in town and look after your home while you are out.


Comments
Please log in or sign up to comment.