


Hardware components | ||||||
 |
| × | 1 | |||
 |
| × | 1 | |||
| × | 1 | ||||
 |
| × | 1 | |||
 |
| × | 1 | |||
Software apps and online services | ||||||
 |
| |||||
Hand tools and fabrication machines | ||||||
 |
| |||||
This project uses the ESP8226 to get data from a web page and display it using two LEDs. The data collected in this example is the US AQI air pollution number for my local city. I originally used the Air Visual API to get the data but for some reason it didn’t consistently return the data for my city. I think this has something to do with my ISP. You can sign up for the API on the AirVisual site for free and then the device will get your local data. It returns a string full of data so you’ll have to do some string magic to get the required air pollution value. The sketch for this is contained below
I found the Doremon toy in my local supermarket and thought I could replace the eyes with LEDs and control them. This is quite easy to do and using an account at Thingsspeak.com I grabbed the data from a web page. I had to use the Makuna Neopixel library to control the LEDs as this was the only one that correctly controlled the LEDs LINK https://github.com/Makuna/NeoPixelBus the installation instructions are on the github page. I also used the Netmanager library so that I could use any local WiFi LINK https://github.com/tzapu/WiFiManager
The device displays the data for 10 seconds and then goes into deep sleep mode until the button is pressed and it wakes up and gets the current data. If you have moved the device to another location then you’ll have to put in the new SSID and password thru the wifi network manager panel. If you have a smart phone this is easy, look for the ESP WiFi channel on your Wifi connections, a panel will show all the loacal ones, pick the SSID you want to use and pop in the password. The device will then do its business, grab the relevant data and display a color corresponding to the air quality.
Construction
I used an old soldering iron to burn the eyes out of the toy and a hole for the button. I then used hot glue to hold the LEDs in place.
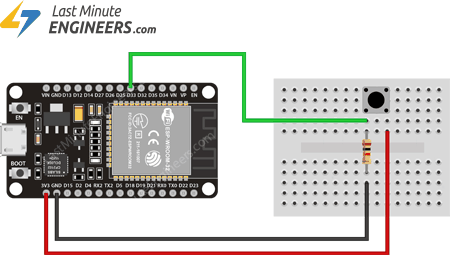
The WeMos battery module plugs on top of the WeMos device. You’ll need to solder a wire from the reset pin onto the 10K Ohm resistor on the leg of the resistor that attaches to one side of the button. 5V is supplied to the other leg. The other side of the button is connected to ground. The LEDs run on 5V so connect the 5V input on the LED to the 5V on the WeMos, connect the ground to ground on the LED and the signal pin on the Led to pin 3 on the WeMos. Make sure you solder the two LEDs so that the 5v, ground and signal are connected.
Next make sure you have the following libraries installed in the Arduino IDE
ESP8226 https://github.com/esp8266/Arduino,
NetWork Manager https://github.com/tzapu/WiFiManager,
NeoPixel by Manuka https://github.com/Makuna/NeoPixelBus
Ticker library https://github.com/sstaub/Ticker
Jsonlibrary by Justin Shaw
https://www.arduino.cc/reference/en/libraries/jsonlib/
You will need to have an account at Thingspeak.com and create an GET call using the API. You will have to look at the site you want to pull the data from using the developer tools in your browser. Select the place on the page and you should see a corresponding number in the developer tools, copy the Xpath and paste this into the parse string section of the API app section.
You will need to add the URL of the site your getting the data from as well. Make sure the method is set to GET and save. You can test the generated URL in you browser, just copy the URL on the right hand side of the ThingHTTP page under the help area. The Thingspeak URL is put in the Thingspeak sketch at line 89
You can also use the Air Visual API if that works on your ISP.
Air Visual URL used is http://api.airvisual.com/v2/nearest_city?key=yourKey
put the working address in the sketch for Air Visual at line.
Load up your sketch to the ESP and check it is working by looking at the serial monitor.
Put all the electronics in the toy. When you press the button for the first time you will have to log the device into your network, it will then login, the eyes will go red, white and then display the air pollution color.
That is it, done.


Comments