When I saw The Fate of the furious I got very fascinated by it. I mean I was curious to know how Cipher just taps on the screen and takes control over thousands of vehicles in real-time and causing them to drive themselves in a vehicular flood down the streets of NYC. We can do most of the work without even moving from our chair and by just giving the order. I decided that one day I too will build something like her. So I started learning things from here and there and then I learnt IOT and I was happy after taking my first step towards success. I have completed the training and now I have started building some mini projects. This is one of my maneuver which I have made using bolt which I would like to share with you.
- So, well here is a short video of how it may look like.
Video
Enlivened much..?
Let's begin......!
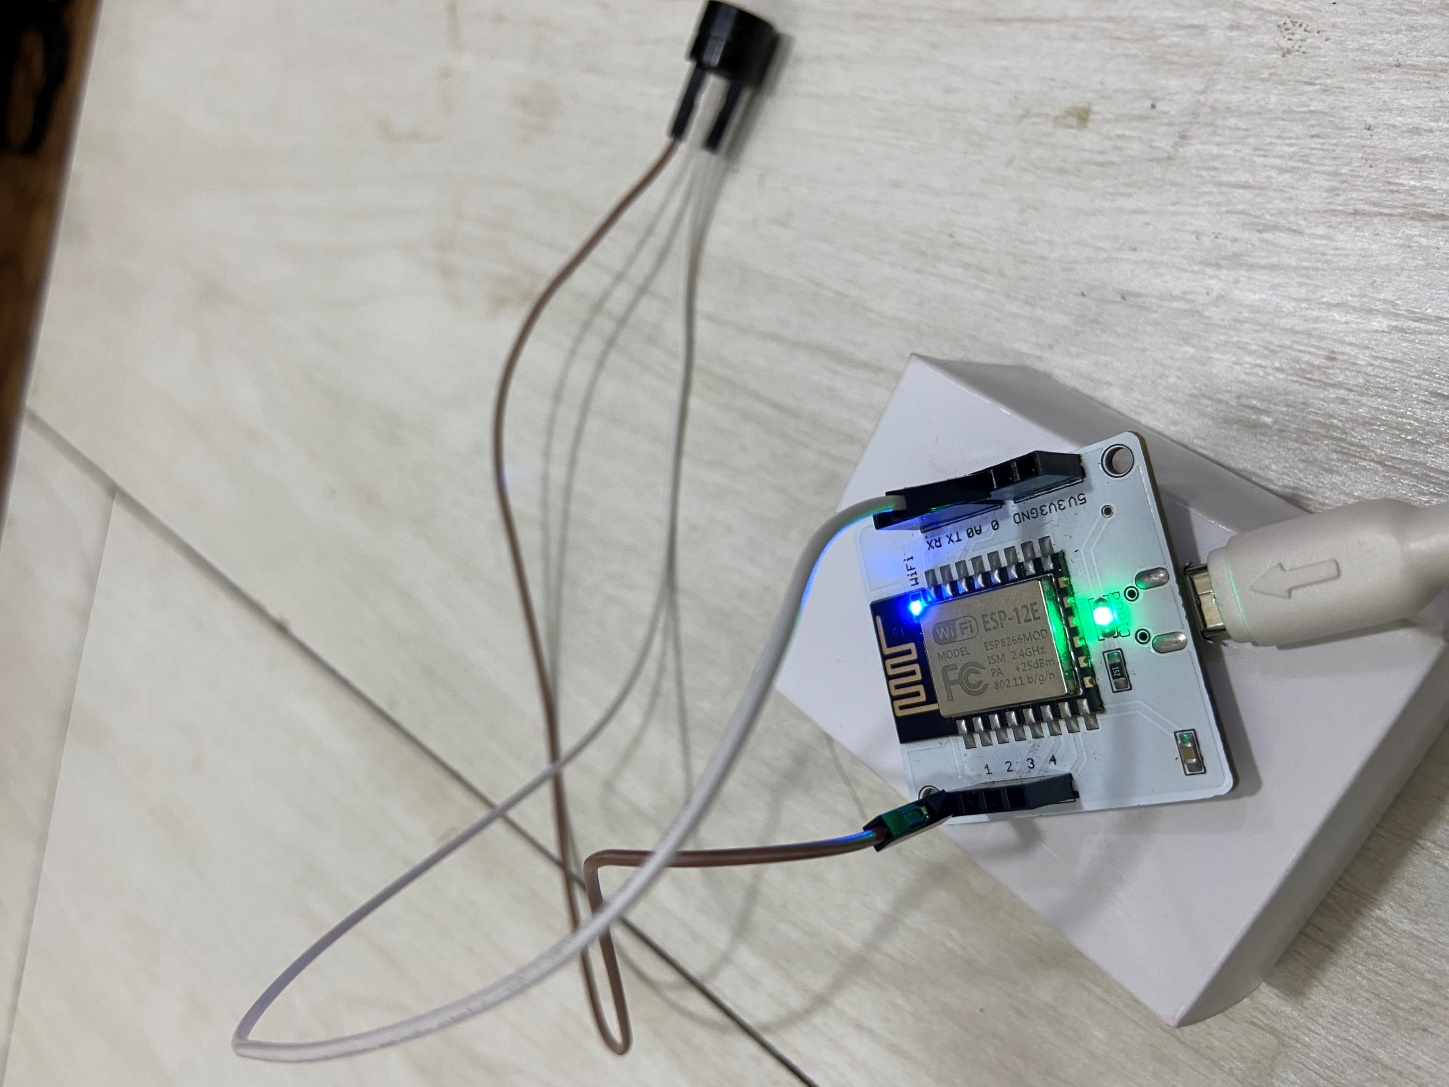
Step 1: Hardware ConfigurationPlug the shorter hand (i.e Negative terminal) of the buzzer to the ground(GND) of bolt and longer hand (i.e. Positive terminal) of the buzzer to any one of the GPIO(1, 2, 3, 4) pin using male to female wire.Power on the bolt module by connecting it to any power source using a usb cable(i have connected the bolt module to a laptop via usb cable) as shown in image below.
When you connect to the power supply the blue LED of the bolt module is on. And when the bolt establishes a connection(internet) then the green LED of the bolt module is on.
Login to https://cloud.boltiot.com.
To generated the API key click on API tab then click on generate API key and make sure to enable it.Copy and paste it somewhere safely.
Your API key may look like this :- 0aad6c66-dac3-459e-8b69-8ae5d6201a24.
You will be able to find your Bolt ID easily on the dashboard it may look like it :- BOLT81234567 copy it too.
Step 3: Creating Your Control URLWe will be using analogWrite command in this if you want to see the documentation for this command you can visit: https://docs.boltiot.com/docs/write-analog-output-pwm
The structure of the command is like this:
https://cloud.boltiot.com/remote/API_KEY/analogWrite?pin=PIN_NUMBER&value=0-1023&deviceName=DEVICE_ID
NOTE: You will have to put your bolt API key which you have generated in the previous step in place of API_KEY, in place of PIN_NUMBER you will have to write the GPIO pin number in which you have connected the positive terminal of your buzzer, in value you will have to provide any one value which will decide the frequency of the sound of buzzer ranging from 0-1023 where 0 means buzzer off no sound and 1023 is the maximum frequency at which it can buzz and finally in place of DEVICE_ID you will have to put device id of your bolt wifi module which you got in the previous step.
Final URL may look like this :-
You can even click on your URL by changing value each time in your URL and the buzzer will buzz each time in accordance with the value which you have provided.
Note:- API Key and deviceName must contain your API Key and Device_ID(BOLT_ID) generated in Step 2.
Step 4: Setting Your IFTTT AccountGo to ifttt.com by clicking this URL :- https://ifttt.com. Create your account on it and then click on create new applet or use this URL :- https://ifttt.com/create
Login using your Gmail account. Make sure you use same account which you'll be using on your mobile to interact with Google Assistant.
Click on '+This' to create the trigger.
Choose Google Assistant -> Say Specific Phrase.
1 / 2
Type the phrase you want to trigger the action. Make sure to specify the trigger command in different ways for example I used.
a) Turn on the buzzer.
b) Make it buzz.
c) Switch the sound on.
Or anything else you like then click on Create Trigger.
Now click on '+That'.
Select Webhooks and then Make a web request.
1 / 2
Enter the API URL you got in the previous Step. Make sure that you change the API Key and device name.
Method will be GET.
Content type will be Application/json.
This how your screen may look like:
Click on 'Create Action' and then Click on 'Finish'.
Step 5: Turn Off the Buzzer and Make It Buzz on a Different FrequencyNow that you have learned how to set the buzzer on you can be quite creative repeat the step 4 again and in the make changes in the value of URL tbo any number between 0-1023.
NOTE: If you will set the value to 0 the buzzer will turn off also if you will write any number more than 1023 the buzzer will not buzz.
Try out different frequencies and play with it.
That's It! You're Done!Now wake your Android phone by saying "OK Google" and say the phrase you had set while creating the trigger to see the magic happen.
I Hope you like it.
Thank you.


Comments
Please log in or sign up to comment.