Basically, this project addresses a blind-deaf communication problem.
The blind person’s only way of communication would be through talking and hearing, while the deaf person can only type and see, so let’s use that!
Blind to deaf:
- Talk → Text → Show
Deaf to blind:
- Type → Text → Voice
Now let’s translate that into hardware.
Step 1: Hardware Setup- Arduino Uno or any
- LCD (for this tutorial I am using the 16*2 one)
- Smart phone
- Potentiometer (10k will do)
To be able to use 1Sheeld, you first need to download 1Sheeld library and add it to your Arduino. Also, you need to download 1Sheeld app to your mobile phone and install it. You can get that from 1Sheeld site: https://1sheeld.com/downloads/
Follow this tutorial for how to plug 1Sheeld to Arduino and how to upload the code: https://1sheeld.com/tutorials/getting-started/
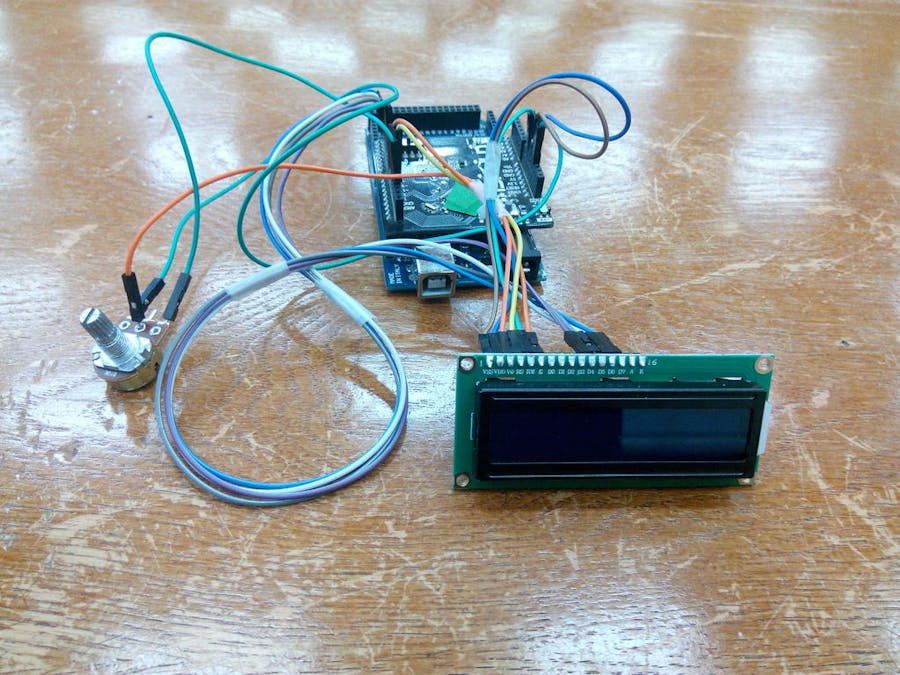
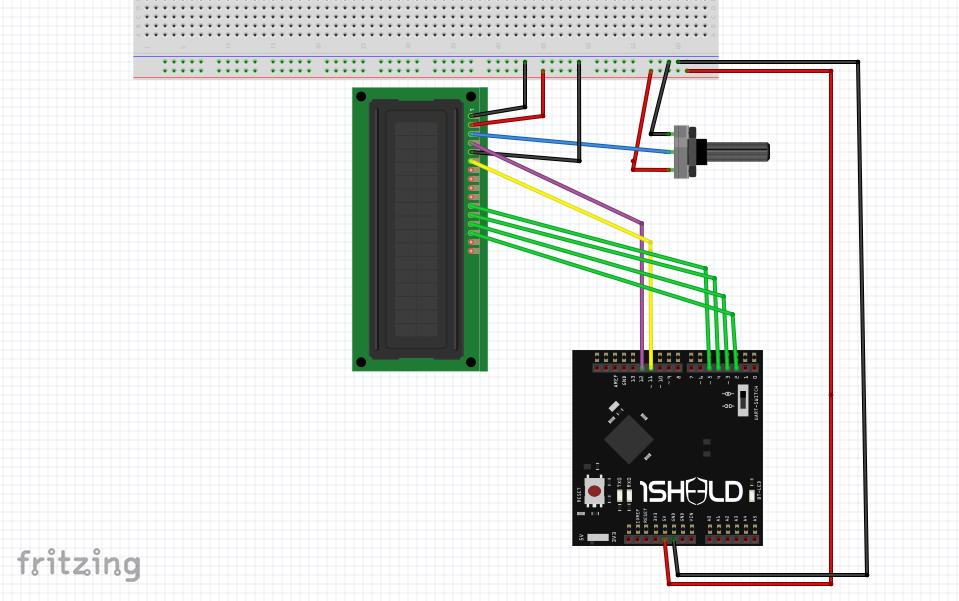
Now I know the circuit might look a little messy but it's a simple LCD circuit:
- LCD RS pin → digital pin 12
- LCD Enable pin → digital pin 11
- LCD D4 pin → digital pin 5
- LCD D5 pin → digital pin 4
- LCD D6 pin → digital pin 3
- LCD D7 pin → digital pin 2
- LCD R/W pin → ground
- LCD VSS pin → ground
- LCD VCC pin → 5V
- 10K resistor ends → +5V and ground
- wiper → LCD VO pin (pin 3)
Now the communication goes as follows:
Blind to Deaf
- Voice Recognition → Text → LCD
Deaf to Blind
- Keyboard → Text → Text-to-Speech
Basically, voice recognition will convert voice into text which will then be sent to an LCD, so the deaf person can see it. Text-to-speech will take text from the keyboard and convert it into voice, so the blind person can hear it.
You need to choose the Voice Recognition, Keyboard, Text-to-Speech and SMS shields from the 1Sheeld app on your mobile phone. Using the SMS shield, we will be able to send messages to a far away contact. Here is a video to demonstrate how it works:
Now that you have a good idea about what we’re trying to do, let’s talk code.
Step 3: Software#define CUSTOM_SETTINGS
#define INCLUDE_VOICE_RECOGNIZER_SHIELD
#define INCLUDE_TEXT_TO_SPEECH_SHIELD
#define INCLUDE_KEYBOARD_SHIELD
#define INCLUDE_SMS_SHIELD
#define INCLUDE_TERMINAL_SHIELD
#define INCLUDE_VIBRATION_SHIELD
#include
#include
LiquidCrystal lcd(12, 11, 5, 4, 3, 2);
String msg;
int sent = 0;
int i = 0;
String phoneNum = ""; //write phone number here
int patternOne[6] = {1000, 2000, 1000, 2000, 1000, 2000};
int patternOneSize = 6;
void setup() {
OneSheeld.begin();
VoiceRecognition.start();
lcd.begin(16, 2);
}
Basically, just adding the libraries we will be using and initializing some variables we will be using later. Keep in mind that we are going to use a vibration sensor and the variables patternOne and patterOneSize are related to it. We will also be using the SMS shield in order to communicate long distance, that’s why we added the variable “phoneNum” which will hold the phone number you will be sending the SMS to.
 //Blind to Deaf
 if (VoiceRecognition.isNewCommandReceived()) {
 String msg1 = VoiceRecognition.getLastCommand();
 //far contact if user said "sms" first
 if (msg1.substring(0, 3) == "sms") {
 String msg1f = msg1.substring(3);
 SMS.send (phoneNum, msg1f);
 TextToSpeech.say("sms sent");
 delay(4000);
 }
 //close contact
 else {
 if (msg1.length() > 16) {
 lcd.clear();
 lcd.setCursor(0, 0);
 for (int i = 0; i <= 16; i++) {
 lcd.print(msg1[i]);
 }
 lcd.setCursor(0, 1);
 for (int j = 16 ; j <= msg1.length()-1 ; j++) {
 lcd.print(msg1[j]);
 }
 }
 else {
 lcd.clear();
 lcd.print(msg1);
 }
 }
You can see in this part that I added 2 cases, far contact and close contact. For far away contacts, the blind person needs to say “SMS” first. Otherwise, it will just be shown on the LCD. Also, there are 2 cases for the LCD itself as it needs to be told to go to the second row when the message is longer than 16 characters, as it can only print 16 characters per row.
void MsgBuild (char pC)
{
 i++;
 if (sent < 2) {
 if (pC == 'S') {
 sent += 1;
 msg += pC;
 }
 else {
 sent = 0;
 msg += pC;
 }
 }
 else if (sent = 3) {
 i = i - 3;
 msg.remove(i);
 msg.toLowerCase();
}
Now this part is a little tricky so bear with me for a while. This function will be called in case the keyboard is used. What this function basically does is 2 things: first, it takes every single character you enter using the keyboard and uses it to build the message that will be sent later; second, it checks if you want to send the message now. I realized that I can’t use the Enter button in the shield keyboard properly, so instead I used this code to send the message: if I clicked the “s” button 3 times in row. Of course, you can change it to any other button. And as before, for a far away contact, type SMS first.
The rest of the code is self explanatory. So, I hope you like it and if you have any questions, please comment below.


_ztBMuBhMHo.jpg?auto=compress%2Cformat&w=48&h=48&fit=fill&bg=ffffff)


Comments
Please log in or sign up to comment.