A friend of mine asked me to build a Breathing Light for him. What is a breathing light? It is a lamp that dims by a predefined breathing program. By looking at the lamp and synchronizing your breath with it, you can calm yourself and practice many kinds of meditation.
An example of a breathing program would be 3x5x8:
- Inhale for 3 seconds (light fades in).
- Hold your breath for 5 seconds.
- Exhale for 8 seconds (light fades out).
- Hold the breath again for 5 seconds and then start again.
I've been told that the program should be configurable, so it could be 10x3x10, 7x4x1, etc.
I thought that the most convenient way to achieve that would be by taking advantage of the ESP8266 WiFi abilities and turning it into an access point with an HTML form for configuring the light color and the program.
By connecting the board to an RGB LED we would be able to control the light and turn it off by setting the RGB values to zero.
So let's take a deep breath and get to work!
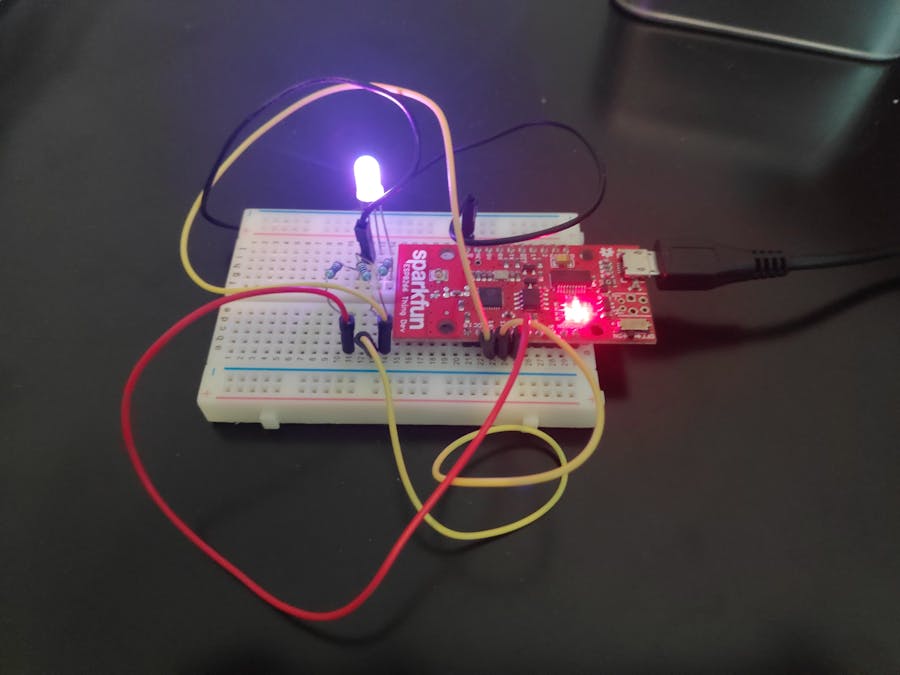
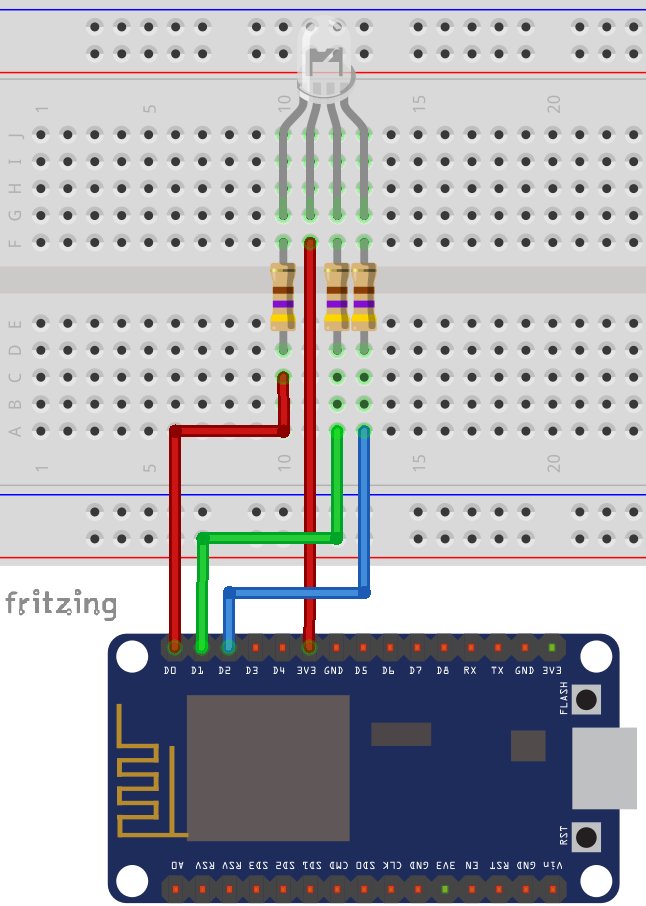
Enclosure & Components:The three inputs of the LED should be connected to three different digital outputs. Three resistors should be used accordingly. The single led’s output should be plugged into the ESP8226 GND.
Code:Load libraries:
#include <Arduino.h>
#include <ESP8266WiFi.h>
#include <WiFiClient.h>
#include <ESP8266WebServer.h>#include <Arduino.h>
#include <ESP8266WiFi.h>
#include <WiFiClient.h>
Set the SSID name:
#ifndef APSSID
#define APSSID "BreathingLight"
#endif
const char *ssid = APSSID;
Start the Access Point server:
ESP8266WebServer server(80);Set the ESP8266 PIN numbers we are using:
const int R_PIN = 13;
const int G_PIN = 16;
const int B_PIN = 12;
Set empty RGB values for the “no-light” scenarios (fade in/out):
const int R_NONE = 0;
const int G_NONE = 0;
const int B_NONE = 0;
Initiate default times (in seconds):
int fadeIn = 1;
int fadeDisabled = 3;
int fadeOut = 1;
Set the color change interval (in milliseconds) for fading in and out scenarios:
const int INTERVAL = 100;Initiate colors configuration which is set on the Access Point’s HTML page:
int rConfiguration = R_NONE;
int gConfiguration = G_NONE;
int bConfiguration = B_NONE;
Initiate the changing color values:
int rValue = rConfiguration;
int gValue = gConfiguration;
int bValue = bConfiguration;
Next, we are going to define two HTML pages: Configuration and success, and display them once the user enters the relevant URL and handles the configuration form submission:
const char index_html[] PROGMEM = R"rawliteral(
<!DOCTYPE HTML><html>
    <head>
        <title>Breathing Light | Configuration</title>
        <meta name="viewport" content="width=device-width, initial-scale=1">
    </head>
    <body>
        <form action="/save">
            <h3>Breathing Light - Configuration</h3>
            <p>
                <label for="color-r">Color</label>
                <!-- <input type="color" name="color" onchange="convertToRgb()"> -->
                <!-- COLORS -->
                R: <input type="number" name="color-r" value="0">
                G: <input type="number" name="color-g" value="0">
                B: <input type="number" name="color-b" value="0">
            </p>
            <p>
                <label for="inhale">Inhale</label>
                <input type="number" name="inhale" value="0"> Seconds
            </p>
            <p>
                <label for="break">Break</label>
                <input type="number" name="break" value="0"> Seconds
            </p>
            <p>
                <label for="exhale">Exhale</label>
                <input type="number" name="exhale" value="0"> Seconds
            </p>
            <input type="submit" value="Save">
        </form>
        <style>
            input[type="number"] {
                width: 50px;
            }
        </style>
        <script>
            function convertToRgb(){
                const color = document.getElementsByName('color')[0].value;
                document.getElementsByName('color-r')[0].value = color.slice(1,3);
                document.getElementsByName('color-g')[0].value = color.slice(3,5);
                document.getElementsByName('color-b')[0].value = color.slice(5,7);
            }
        </script>
    </body>
</html>)rawliteral";

const char success_html[] PROGMEM = R"rawliteral(
<!DOCTYPE HTML><html>
    <head>
        <title>Breathing Light | Configuration</title>
        <meta name="viewport" content="width=device-width, initial-scale=1">
    </head>
    <body>
        <h5>Saved succussfully!</h5><a href='/'>Back</a>
    </body>
</html>)rawliteral";

void setup()
{
    …
    server.on("/", handleRoot);
    server.on ("/save", handleSave);
    …
}

void handleSave() {
    rConfiguration = server.arg("color-r").toInt();
    gConfiguration = server.arg("color-g").toInt();
    bConfiguration = server.arg("color-b").toInt();
    fadeIn = server.arg("inhale").toInt();
    fadeDisabled = server.arg("break").toInt();
    fadeOut = server.arg("exhale").toInt();
    Serial.println("saved configuration: r: " + String(rConfiguration) + " g:" + String(gConfiguration) + " b:" + String(bConfiguration) + " fade in:" + String(fadeIn) + " fade out:" + String(fadeIn) + " disabled:" + String(fadeDisabled));
    server.send(200, "text/html", success_html);
}
This is what the pages look like:
Next, we are going to allow changing the LED values and fade them in and out:
void setLed(int r, int g, int b)
{
    analogWrite(R_PIN, r);
    analogWrite(G_PIN, g);
    analogWrite(B_PIN, b);
}
void fade(bool IN, int rTarget, int gTarget, int bTarget)
{
    float steps = ((IN ? fadeIn : fadeOut) * 1000) / INTERVAL;
    Serial.println("steps:" + String(steps));
    float rStep = rConfiguration / steps;
    float gStep = gConfiguration / steps;
    float bStep = bConfiguration / steps;
    Serial.println("color steps: r: " + String(rStep) + " g:" + String(gStep) + " b:" + String(bStep));
    for (float i = 0; i < steps; i++)
    {
        if (IN) {
            rValue += rStep;
            gValue += gStep;
            bValue += bStep;
        } else {
            rValue -= rStep;
            gValue -= gStep;
            bValue -= bStep;
        }
        setLed(rValue, gValue, bValue);
        delay(INTERVAL);
    }
}
The rest of the setup looks like this:
void setup()
{
    Serial.begin(115200);
    delay(1000);
    Serial.begin(115200);
    Serial.println();
    Serial.print("Configuring access point...");
    /* You can remove the password parameter if you want the AP to be open. */
    WiFi.softAP(ssid);
    IPAddress myIP = WiFi.softAPIP();
    Serial.print("AP IP address: ");
    Serial.println(myIP);
    server.on("/", handleRoot);
    server.on ("/save", handleSave);
    server.begin();
    Serial.println("HTTP server started");
    pinMode(R_PIN, OUTPUT);
    pinMode(G_PIN, OUTPUT);
    pinMode(B_PIN, OUTPUT);
    setLed(rConfiguration, gConfiguration, bConfiguration);
}
The built-in loop function will be in charge of fading the light in or out and turning it off completely during the pause period. It will also handle client requests:
void loop()
{
    server.handleClient();
    Serial.println("---" + String(millis() / 1000) + " fading in: r: " + String(rConfiguration) + " g:" + String(gConfiguration) + " b:" + String(bConfiguration));
    fade(true, rConfiguration, gConfiguration, bConfiguration);
    Serial.println("---" + String(millis() / 1000) + " pausing");
    delay(fadeDisabled * 1000);
    Serial.println("---" + String(millis() / 1000) + " fading out: r: " + String(R_NONE) + " g:" + String(G_NONE) + " b:" + String(B_NONE));
    fade(false, R_NONE, G_NONE, B_NONE);
    Serial.println("---" + String(millis() / 1000) + " pausing");
    delay(fadeDisabled * 1000);
}To amplify the light, I used a ping pong ball. I drilled a hole that fits the LED’s size and tried not to make it too wide to leave enough space for glue between the ball and the surface.
I used a metal chocolate box as a surface. Again I drilled a small hole to fit the LED. I also drilled a hole for the USB cable. This time the hole was too small so I used a cutter to expand it. As you can see in the picture, it didn’t go well and ended up with very sharp edges. I decided to solder a wire to these edges and make them safe.
After gluing the ball to the upper side of the box, and the breadboard to the bottom, it’s time to set the intervals and turn on the light!
Final Result:


_3u05Tpwasz.png?auto=compress%2Cformat&w=40&h=40&fit=fillmax&bg=fff&dpr=2)
Comments
Please log in or sign up to comment.