A smart integration of Amazon Alexa services with Raspberry Pi 3 and Arduino UNO.
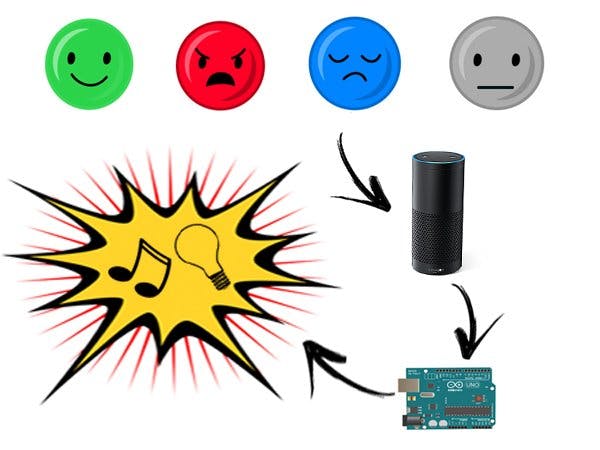
The purpose of the project is to build a device that is able to play music and light up your room according to your current mood.
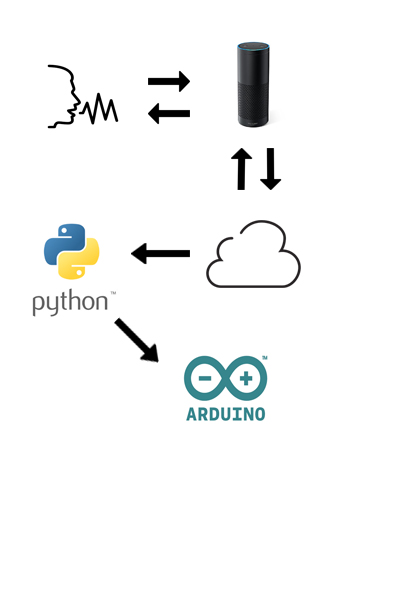
In order to achieve this, we turned a Raspberry into an Alexa Echo using Alexa Voice Service kit and we built a custom skill with Alexa Skills Kit in order to understand the user's mood.
After this, we developed a python server that is linked to our custom skill via endpoint and is running on the Raspberry. This server handles the conversation and gathers useful informations to calculate the user's mood.
Done this, the raspberry is ready to play the chosen song and to send a signal to Arduino that will finally light up the room.
In the following chapters we are going to show you how we did it!
1. Alexa Skills Kit
The first step is to build the custom skill for Alexa in order to manage the mood comprehension. So, we move to https://www.developer.amazon.com and then:
Goto Alexa --> Alexa skill kit --> Add new skill.
After this, we land to the following page:
The first thing to do is to select the "Skill Type" "Custom Interaction Model", then we choose a name for the custom skill and the select the invocation name; this part is important because what we write here will be what we'll have to say in order to invoke our skill.
To build the interaction model we use the skill builder. In this section we are going to define the four moods that Alexa can understand:
- 1. Angriness
- 2. Happiness
- 3. Neutral
- 4. Sadness
These moods are declared as intents, and every intent has a list of utterances that represent the corresponding mood. Below you can see screenshots about every intent we developed:
Once we've finished to declare the four intents we save the model and we build it with the two related buttons:
In the "Configuration" section we create the endpoint to which the requests made to Alexa have to be sent in order to be processed. Since we decided to use the Respberry as server, we need to select HTTPS as "Service Endpoint Type" and, in the "Default" field we set the url. We obtain this url using ngrok (in the next section we will explain how we did it).
The last section to fill is the "SSL Certificate": since we use ngrok we have to choose the second box ("My development endpoint is a sub-domani that has a wildcard certificate from a certificate authority").
Now that the custom skill is ready to be used, we go for the Raspberry setup.
2. Raspberry configuration
Alexa Echo is not available in Italy, so we used the Alexa Voice Service. We installed it in the Raspberry turning it in a sort of homemade Echo.
To do this, we followed this step-by-step tutorial:
https://github.com/alexa/alexa-avs-sample-app/wiki/Raspberry-Pi
Now that AVS has been installed we need to develop the server that processes the informations received from the custom skill.
We decide to use Python as programming language and Flask as web framework. We also use flask_ask (specific Python library for Alexa) in order to easily handle every intent declared in the custom skill.
from flask import Flask
from flask_ask import Ask, statement,question
from flask import request
To turn the Raspberry into a music player we need to use the VLC library. To correctly import it, we followed this tutorial:
https://blog.computerbacon.com/playing-audio-in-python-with-libvlc.html
To communicate with Arduino we use the serial library: in this way we can create a serial channel between Arduino and Raspberry.
import serial
import vlc
The server listens on localhost:5000 but, in order to connect the custom skill with our local web server, we have to expose it using ngrok ( https://ngrok.com/ ): this will result in a URL that has to be inserted in the endpoint field mentioned above during the custom skill creation.
app = Flask(__name__)
ask = Ask(app, '/')
.
.
.
if __name__ == '__main__':
    app.run(host='localhost', port = 5000, debug = True)
When someone invokes the custom skill, the server intercepts the "Launch" event and returns a welcome message followed by the first question chosen to understand the user's mood:
"How are you?"
 @ask.launch
def handler():
 global counter
 global player

 if player.is_playing():
     return statement("Humour dj is already playing a song, wait!")
 else:
     return question("Hi! Welcome to the Alexa Humour DJ ! I can play a song for you based on your current mood. First of all, how are you?")
The answer to this question is classified from the custom skill in one of the moods mentioned above (angriness, happiness, neutral, sadness).
After that, Alexa sends an event containing the classification result to the server. This information leads the conversation to the second question:
"How was your day?"
@ask.intent('Happy')
def happy():
 global counter
 global state
 counter += 1
 if counter == 1:
        state["Happy"]+= 1
        return question("And now, tell me, how was your day?")
 elif counter == 2:
        counter = 0
        state["Happy"]+= 1
        chooseSong()
Again, the user's answer will be classified and the server will handle the event fired from the custom skill.
Now that every information has been gathered, we can calculate the result, play some music and send an event to Arduino in order to light up the room!
 def chooseSong():
 global state
 global ser
 global player
 if state["Happy"] == 2 or ( state["Happy"] ==1 and state["Angry"]==1  ) or (state["Happy"] ==1 and state["Sad"]==1 ):
        player = vlc.MediaPlayer("/home/pi/Desktop/Happy/PharrellWilliams-Happy.mp3")
        player.play()
        Arduino.write(b'H')
 if state["Neutral"] == 2 or (state["Happy"] ==1 and state["Neutral"]==1  ):
        player = vlc.MediaPlayer("/home/pi/Desktop/Neutral/Riders_on_the_Storm.mp3")
        player.play()
        Arduino.write(b'N')
 if state["Angry"] == 2 or (state["Angry"]==1 and state["Sad"]==1  ) or (state["Angr   y"]==1 and state["Neutral"]==1 ):
        player = vlc.MediaPlayer("/home/pi/Desktop/Angry/Enter_Sandman.mp3")
        player.play()
        Arduino.write(b'A')
 if state["Sad"] == 2 or (state["Sad"]==1 and state["Neutral"]==1 ):
        player = vlc.MediaPlayer("/home/pi/Desktop/Sad/Wish_You_Were_Here.mp3")
        player.play()
        Arduino.write(b'S')
 state = {"Happy": 0, "Neutral": 0,"Angry": 0, "Sad" : 0}
The logic that we decided to use to calculate the mood is the following one:
Happiness > Angriness > Sadness > Neutral > Happiness
The entire script with comments has been uploaded in the "Code" section.
3. Arduino
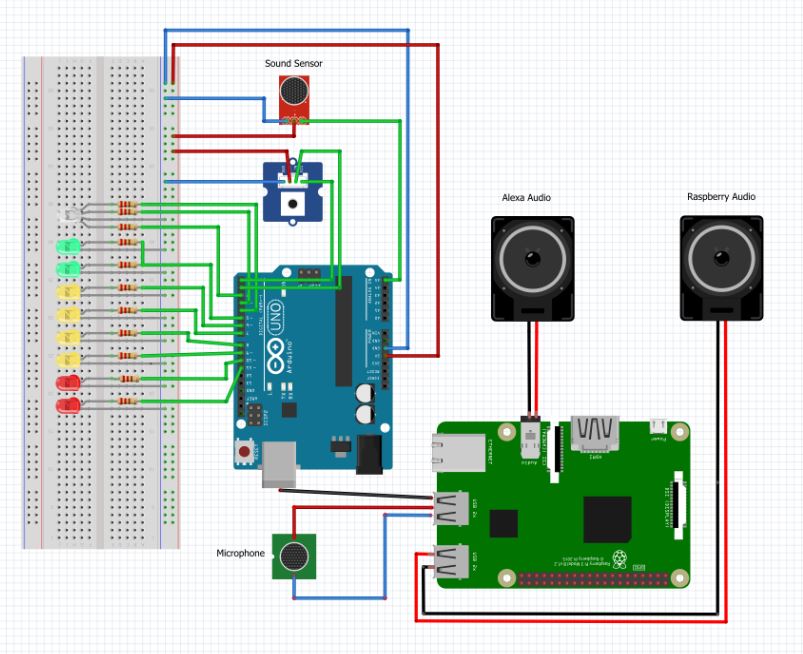
Arduino manages two type of lighting:
- the first one is relating to the house lights and we decided to simulate it using a led strip directly connected to a breadbord
- the second one is relating to a 3D printed box that contains some leds that light up following the music rythm
Developing the first one is very simple: in the sketch running on Arduino, you just have to catch the message sent by the Raspberry and turn on the LED stripe using the color related to the mood.
//save the message received from the raspberry in the mood variable
mood=Serial.read();
switch (mood){
 case 'A': //angry
 {
//set the color Red for Angriness
leds1.setColorRGB(0,255,0,0);
 break;
 }
 case 'S': //sadness
 {
 //set the color Blue for Sadness
 leds1.setColorRGB(0,0,0,255);
 break;
 }
case 'N': //neutral
{
 //set the color White for Neutral
 leds1.setColorRGB(0,255,255,255);
 break;
}
 case 'H': //happiness
 {
//set the color Green for happiness
leds1.setColorRGB(0,0,255,0);
break;
 }
default:
Serial.flush();
}
We decided to use a touch sensor to turn off Arduino ( leds and sound sensor )!
The second part is a bit tricky: in order to implement that, we used a the KY-038 Sound Sensor that listens to the music played by the Raspberry, understands the rythm and coordinates the LEDs in order to turn them on along with the music.
We used 8 LEDs: when the sensor hears a weak sound, only two LEDs turn on; when the sound is strong, the whole set of LEDs light up.
valore_A0 = analogRead(pin_A0);
 Serial.println(valore_A0);
 //Low sounds
 if(valore_A0 <= 160){
   digitalWrite(pin_led_A, LOW);
   digitalWrite(pin_led_B, LOW);
   digitalWrite(pin_led_C, LOW);
   digitalWrite(pin_led_D, LOW);
   digitalWrite(pin_led_E, LOW);
   digitalWrite(pin_led_F, LOW);
   digitalWrite(pin_led_G, LOW);
 }
 if (valore_A0 > 160 && valore_A0 < 162)
 {
   digitalWrite(pin_led_A, HIGH);
   digitalWrite(pin_led_B, LOW);
   digitalWrite(pin_led_C, LOW);
   digitalWrite(pin_led_D, LOW);
   digitalWrite(pin_led_E, LOW);
   digitalWrite(pin_led_F, LOW);
   digitalWrite(pin_led_G, LOW);
 }
 //Middle sounds
 if (valore_A0 >= 162 && valore_A0 < 165)
 {
   digitalWrite(pin_led_A, HIGH);
   digitalWrite(pin_led_B, HIGH);
   digitalWrite(pin_led_C, LOW);
   digitalWrite(pin_led_D, LOW);
   digitalWrite(pin_led_E, LOW);
   digitalWrite(pin_led_F, LOW);
   digitalWrite(pin_led_G, LOW);
 }
 if (valore_A0 >= 165 && valore_A0 <170)
 {
   digitalWrite(pin_led_A, HIGH);
   digitalWrite(pin_led_B, HIGH);
   digitalWrite(pin_led_C, HIGH);
   digitalWrite(pin_led_D, LOW);
   digitalWrite(pin_led_E, LOW);
   digitalWrite(pin_led_F, LOW);
   digitalWrite(pin_led_G, LOW);
 }
 if (valore_A0 >= 170 && valore_A0 < 180)
 {
   digitalWrite(pin_led_A, HIGH);
   digitalWrite(pin_led_B, HIGH);
   digitalWrite(pin_led_C, HIGH);
   digitalWrite(pin_led_D, HIGH);
   digitalWrite(pin_led_E, LOW);
   digitalWrite(pin_led_F, LOW);
   digitalWrite(pin_led_G, LOW);
 }
 if (valore_A0 >= 180 && valore_A0 < 190)
 {
   digitalWrite(pin_led_A, HIGH);
   digitalWrite(pin_led_B, HIGH);
   digitalWrite(pin_led_C, HIGH);
   digitalWrite(pin_led_D, HIGH);
   digitalWrite(pin_led_E, HIGH);
   digitalWrite(pin_led_F, LOW);
   digitalWrite(pin_led_G, LOW);
 }
 if (valore_A0 >= 190 && valore_A0 < 220)
 {
   digitalWrite(pin_led_A, HIGH);
   digitalWrite(pin_led_B, HIGH);
   digitalWrite(pin_led_C, HIGH);
   digitalWrite(pin_led_D, HIGH);
   digitalWrite(pin_led_E, HIGH);
   digitalWrite(pin_led_F, HIGH);
   digitalWrite(pin_led_G, LOW);
 }
  //High sounds
  if (valore_A0 >= 270)
 {
    digitalWrite(pin_led_A, HIGH);
   digitalWrite(pin_led_B, HIGH);
   digitalWrite(pin_led_C, HIGH);
   digitalWrite(pin_led_D, HIGH);
   digitalWrite(pin_led_E, HIGH);
   digitalWrite(pin_led_F, HIGH);
   digitalWrite(pin_led_G, HIGH);
 }
 delay(50);
We decided to print a case with a 3D printer to build a little "home" the LEDs.
Below you'll find a video that show our completely working project. Hope you'll enjoy it!


_ztBMuBhMHo.jpg?auto=compress%2Cformat&w=48&h=48&fit=fill&bg=ffffff)


Comments
Please log in or sign up to comment.