- Description
The project contains a lot of activities presenting the main capabilities of Raspberry Pi which can be used just like an ordinary desktop, but due to the GPIO Pins, can also be used in building embedded systems.
All website need a server to run. Therefore, my project runs on a server builded using Flask Framework for Python. I used Flask because it is a new technology that I wanted to learn and because it is a Python framework, which ensures a easier operability with Python libraries that are used for interfacing with the GPIO pins.
The main activities provided by the website are:
Acasa : contains the list of Raspberry Pi specifications and it also lists the main activities in the project.
Website Hosting : contains the Raspberry Pi capability of hosting an web server. There is a link who redirects to a website hosted on the Raspberry Pi.
Performante sistem in timp real : presents the perfect operability with the Linux OS, by displaying some system real-time parameters read with the vcgencmd command line utility.
Monitor Ambiental : contains a description of a number of environmental parameters, such as outdoor temperature and humidity, taken with an API from the internet, and the indoor temperature and humidity, informations read from a DHT11 sensor.
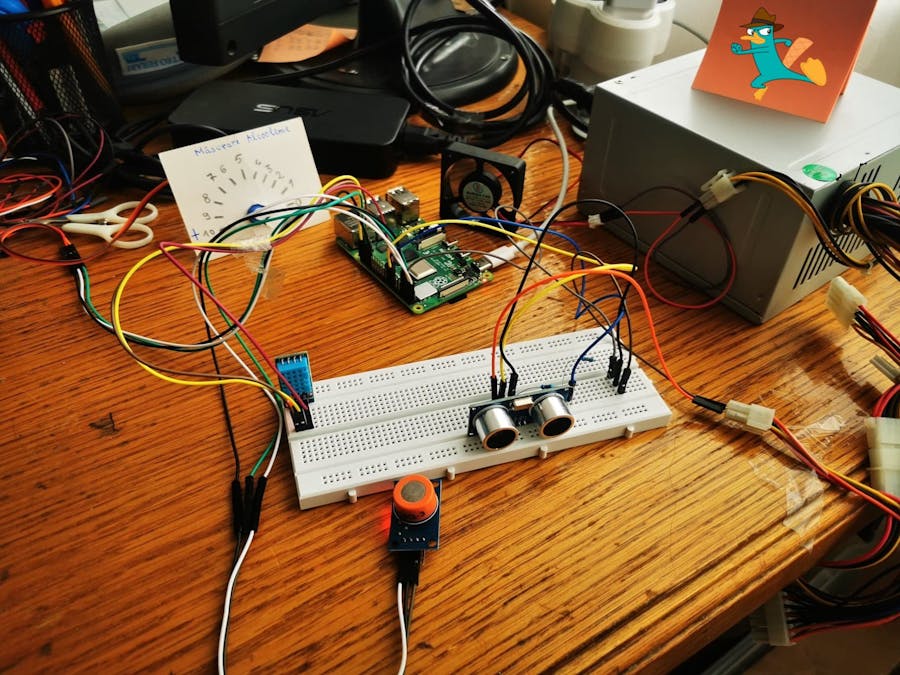
Etilotest : the last and the most complex page, who contains a sequence of measuring the alcohol presence. To do this, we must ensure that the person is close to the sensor, using and ultrasonic sensor HC-SR04, we must time the sequence of identifying the presence of the person, using a servo motor SG-90 and we must measure the presence of alcohol, using a sensor MQ3.
- Setting up the Raspberry PI
For this project, I will use a Raspberry PI 4 Model B 4GB with and 32GB microSD card. Using the Raspberry PI Imager for Windows downloaded from raspberrypi.org, we install the Raspberry Pi OS. Because I don’t have a secondary display and an external keyboard, I have to connect to the Raspberry Pi, using ssh. After connecting it to the local network, I use VNC Viewer to mirror Raspberry Pi user interface via network on my main system. Then, I installed Visual Studio Code and all the environment is prepared for starting developing.
- Server-side and specific Raspberry Pi libraries manipulation
One of the greatest feature of the Raspberry Pi is the communication with sensor or another hardware components through the GPIO pins. To handle these pins, there are certain libraries available for several programming languages, like C/C++, Python but, definitely, the easiest to use are those for Python. So, trying to find the best and easiest way to handle server side and Raspberry Pi libraries together, I found the Flask Framework for Python.
First of all, we have to install the environment. We begin by installing Python and specific libraries. Then, we can install Flask Framework and start building the server.
sudo apt-get install python3.7
python3 -m pip install RPi.GPIO
python3 -m pip install Adafruit_DHT
python3 -m pip install Flask
After installing all the required elements, we start building the server. First, we create a file named server.py, which contains all the server logic. It is needed to create a Flask instance which handles all the requests.. To run the server, we set the IP 0.0.0.0, for it to be available for all the devices in the local network and the port 5050. For handling each request, we create functions preceded by the statement @app.route(`/<request>`).
We also have to implement the pages that have to be displayed for the user. Therefore, we create a folder called templates(this is a Flask convention), where we put all the HTML files containing the interaction with the user. These files will be rendered by the server script using render_templatefunction. The client-side is built using JavaScript. It sets the behaviour of the web pages and sends requests for specific data. For making requests on the client-side, we use theFetch API.
Finally, when we want to handle the GPIO pins, we create scripts where we import the RPi.GPIO library (and Adafruit_DHT for DHT11 sensor), we create functions where we describe the specific logic for each sensor and then simply call these functions from the server script.
- Website Hosting
This is the second activity in the project and presents the capability of Raspberry PI to host an web server. It is not important, considering that this projects contains an web server hosted by the Raspberry but I wanted to host and website a little bit more complex which uses more and different elements. This page redirects to a website hosted on a NodeJS server and it describes the TV Show “Peaky Blinders”, by making a brief description and a complex show which uses aSQL Database and the SMTP for sending emails.
- Performante sistem in timp real
This is the third activity in the project which illustrates the good operability with the Linux OS. The operating system helps us retrieve some important characteristics of the system. Using the command line utility vcgencmd, located in the /usr/bin/file, we can retrieve some information by giving some specific parameters. (measure_temp /*CPU temperature*/, measure_clock arm | core | emmc /*CPU | core | SD card frequency*/, measure_volts core | sdram_c | sdram_i /*CPU | RAM | I/O voltage*/, get_mem arm | gpu /*memory used by CPU | GPU*/)
- Monitor Ambiental
This activity illustrates some environmental parameters, temperature and humidity. First, we retrieve the outdoor temperature and humidity using some API. For current location, we use the IPinfo APIwhich returns the city name and then, using the OpenWeatherMap API, we extract the weather status.
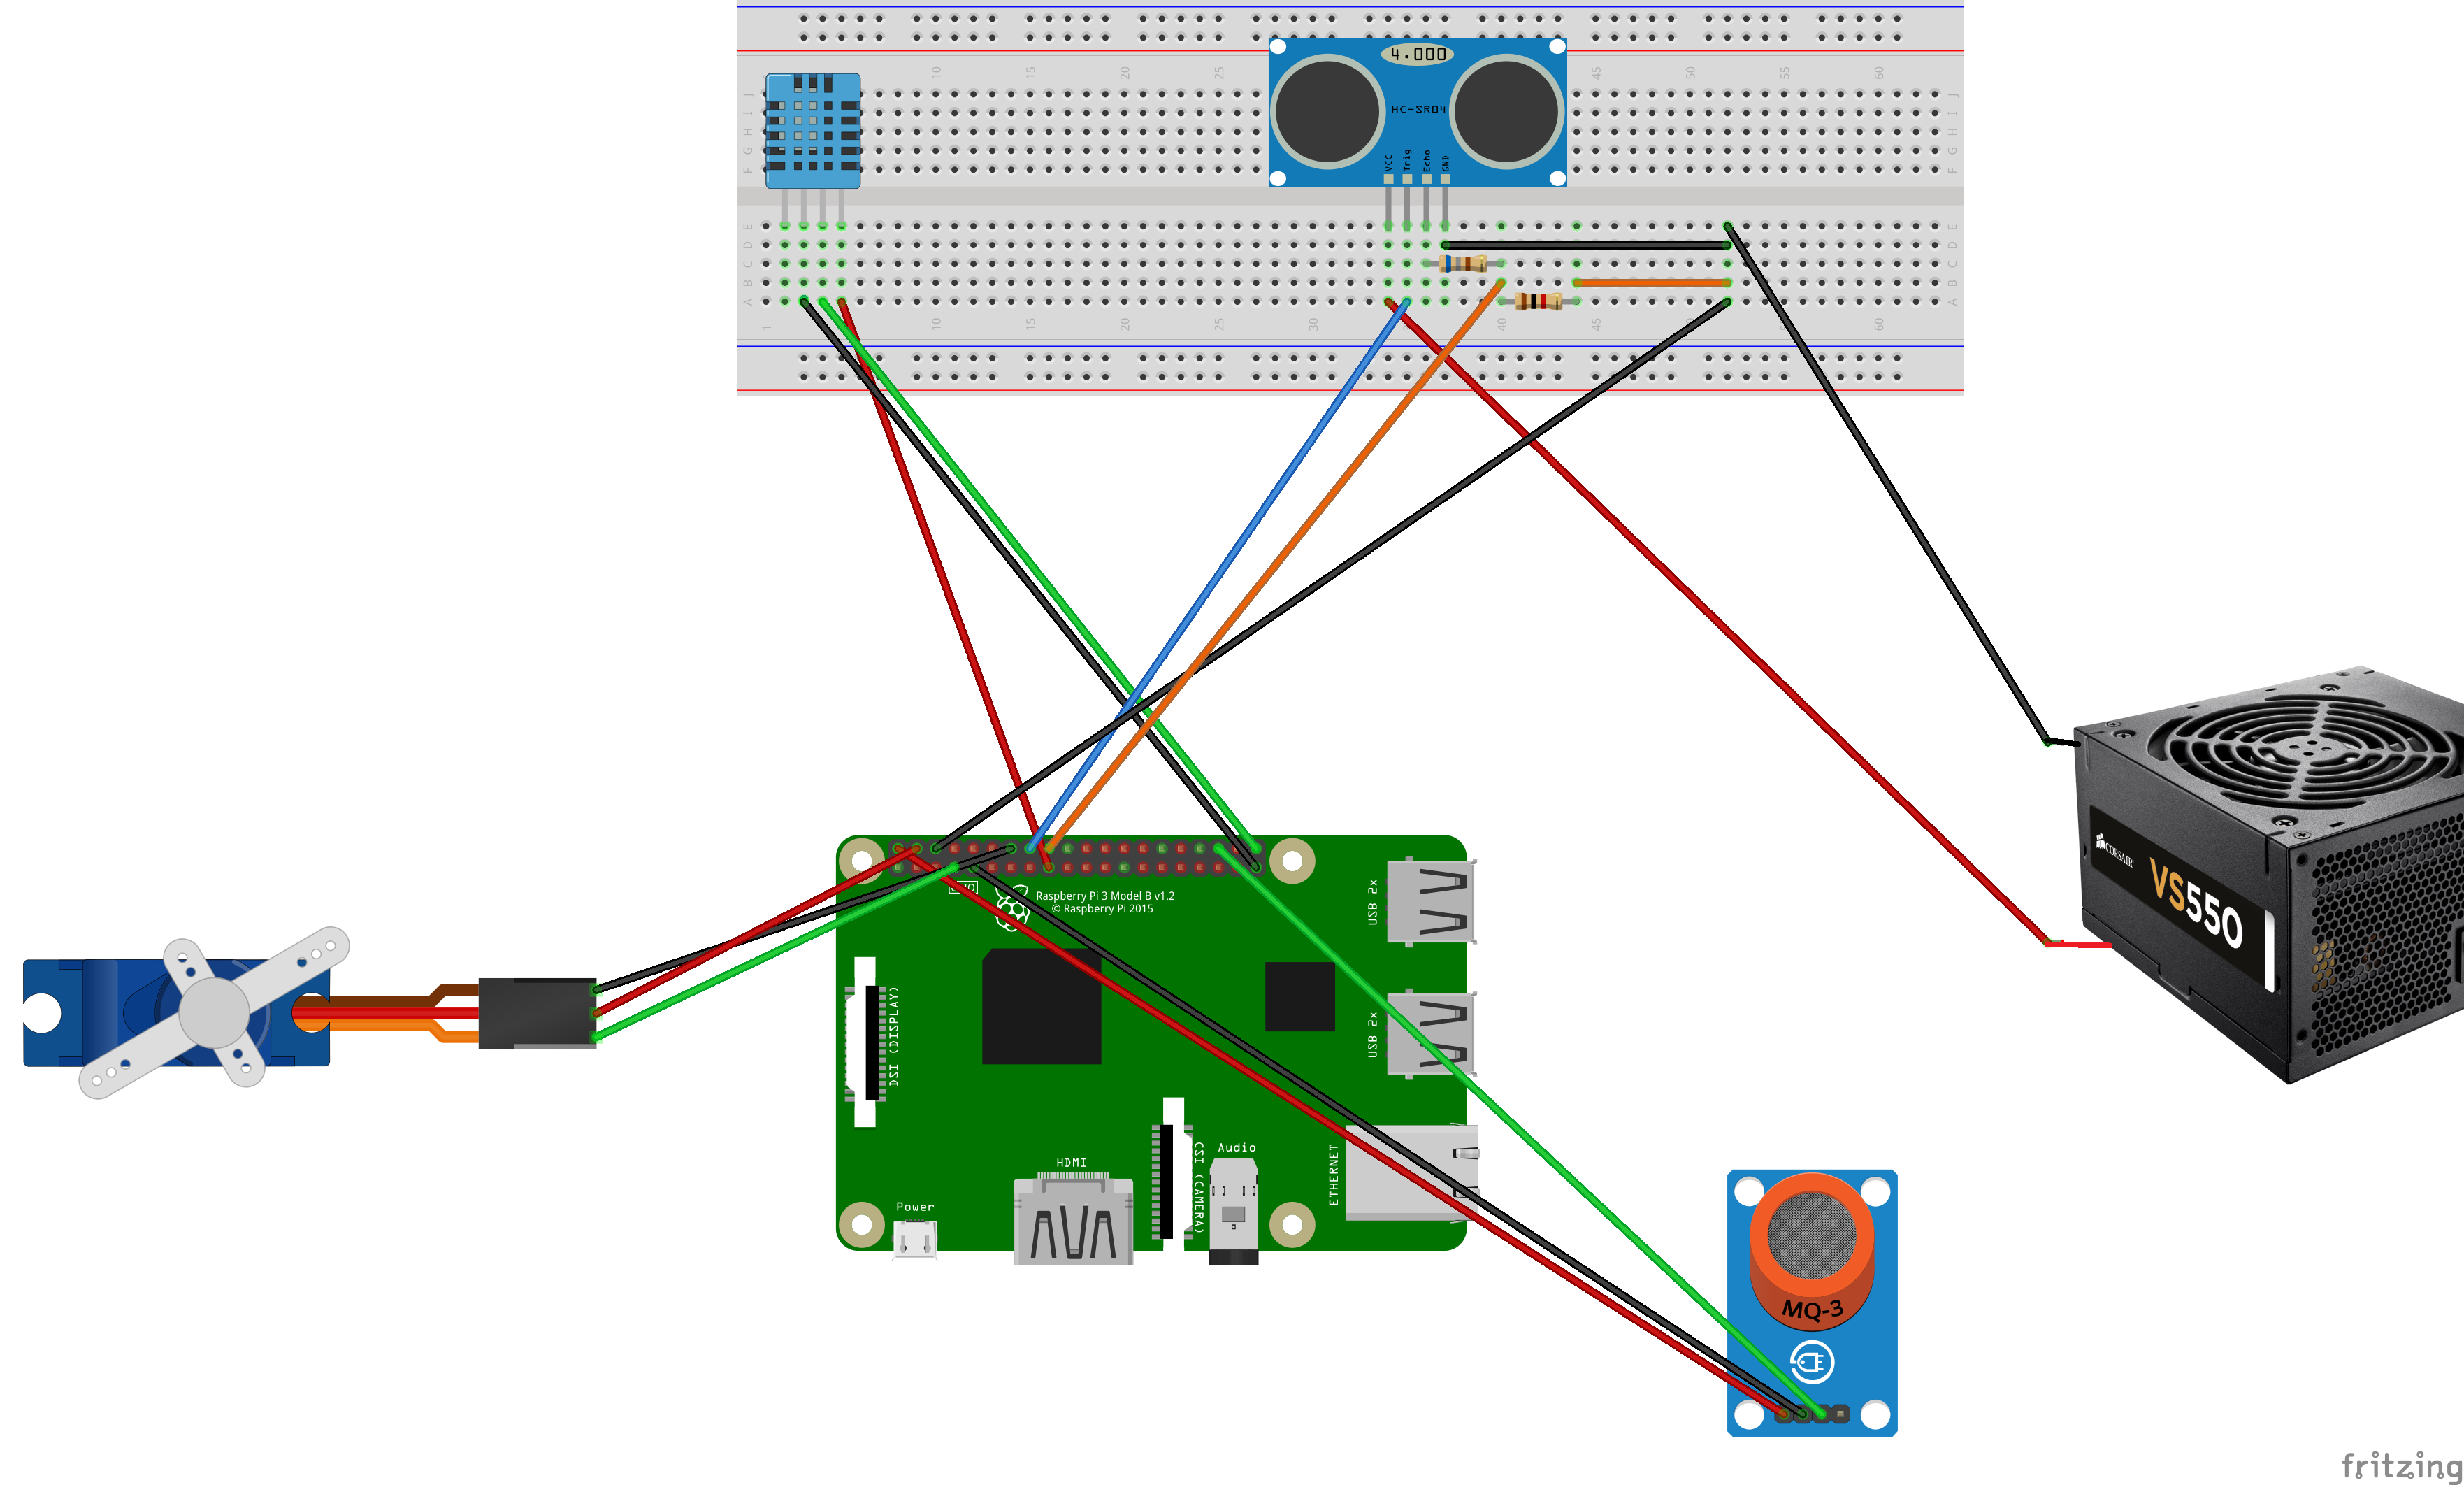
The indoor temperature and humidity are retrieved using the DHT11 sensors, handled with the Adafruit_DHT library for Python. For this sensor, we need to supply 3.3V from the 17 Pin on the board, the Ground is connected to the 39 pin and the Data Pin is connected to the 40 pin. The pin numbering is done naturally, as seen by the user (GPIO.BOARD).
The DHT11 sensor measures temperature using a thermistor, which is a resistor whose resistance varies with the temperature. For measuring the humidity, there is a component which has two electrodes with a moisture holding substrate between them, a substrate whose conductivity varies with the humidity.
- Etilotest
This is the last and the most complex activity in the page because it uses two sensors and an actuator. The main purpose of this page is to measure the presence of alcohol. To do this, there is a sequence which first wants the user to be near to the sensor. Therefore, we use an ultrasonic sensor for measuring distance HC-SR04.
The HC-SR04sensor basically measures the distance by sending a sequence of 8 pulses with the frequency of 40KHz, and calculates the time for it to reflect back from the nearest object placed in front of the sensor. First, we have to apply a pulse of 10 microseconds to the Trigger pin. Then, the sensor transmits these 8 pulses, the Echo pin goes High and we start measuring the time. When the signal comes back, being reflected by the nearest object, the Echo pin goes Low and we stop measuring the time. So, there it is the time needed for the signal to go to the object and back. Having the time, we can calculate the distance, using the formula speed = distance / time. We know the speed of sound is 340 m/s. Then, the signal goes to the object and back, so the distance is doubled. So, the final formula is distance = 340 * time / 2. If we want it in centimeters, we multiply it with 100. For connecting it to the RPi, we need 5V. We will use an external power supply, considering that we have a lot of elements already powered from the RPi. Therefore, the VCC is connected to the external power supply, the Trig pin is connected to the 16 pin on RPi, the Echo pin is connected to the 18 pin on RPi, using and Voltage Divider, because the RPi GPIO supports maximum 3.3 V and the Echo pin supplies 5V. Therefore, we use the following voltage divider. So, we need to use a 1KOhm resistor, and a 515 Ohm resistor. Because I don’t have a 515 Ohm resistor, I will use a 680 Ohm resistor, which generates a 2.9 V current, enough to be interpreted by RPi as High. The Ground is connected to the external power supply ground and to the RPi Ground. The ground is common because the data lines has the ground as the reference level.
Next, we want to ensure that the user is near to the sensor enough time to be identified. It has to be near for 10 seconds, then the measuring sequence could start. For counting this time, there is an SG 90 actuator who makes a full rotation (180 degrees) in 10 periods, one per second. Therefore, we need to supply a PWM of 50 HZ and a specific duty cycle for a specific rotation. If we want it to go to the initial position, we supply a pulse with the duty cycle 2. For a full rotation, we need the duty cycle to be 12. So, for going from 0 to 180 degrees in 10 steps, we start with the duty cycle 2 and increase with 1 at each second. After the alcohol measurement, the actuator indicates the alcohol presence. (+ | -). The actuator is supplied with 5V from the RPi pin 4, the ground is connected to pin 9 and the data pin, to pin 7.
The final step is alcohol measurement. It is done by using the MQ3 sensor, which is read digitally because the RPi doesn’t have an ADC. So, we can’t detect the gas level, but only the existence of it. It is supplied with 5V from the RPi pin 2, the ground is connected to pin 34 and the data pin to pin 36. In a sequence of 5 requests, one per second, the sensor indicated the presence of alcohol, which is displayed on the screen and on the sensor led. Considering that we have to read the pin, we set the data pin as input and activate the pull-up resistor because, when the pin is not connected, we want to read a stable value.


Comments