


Hardware components | ||||||
 |
| × | 1 | |||
 |
| × | 1 | |||
 |
| × | 1 | |||
 |
| × | 1 | |||
 |
| × | 1 | |||
Software apps and online services | ||||||
| ||||||
 |
| |||||
 |
| |||||
| ||||||
Nowadays consumption for heating buildings is a big problem due to rising prices, for this reason I think about to build an intelligent system that allows to turn on and turn off for example a fan in an intelligent way, in order to reduce the energy consumption. In particular in this project this device is thought for the workstation: it checks if there is someone on the location and, if the temperature is too hot, it automatically turn a fan. If one of these 2 conditions stops being valid, the fan turns off.
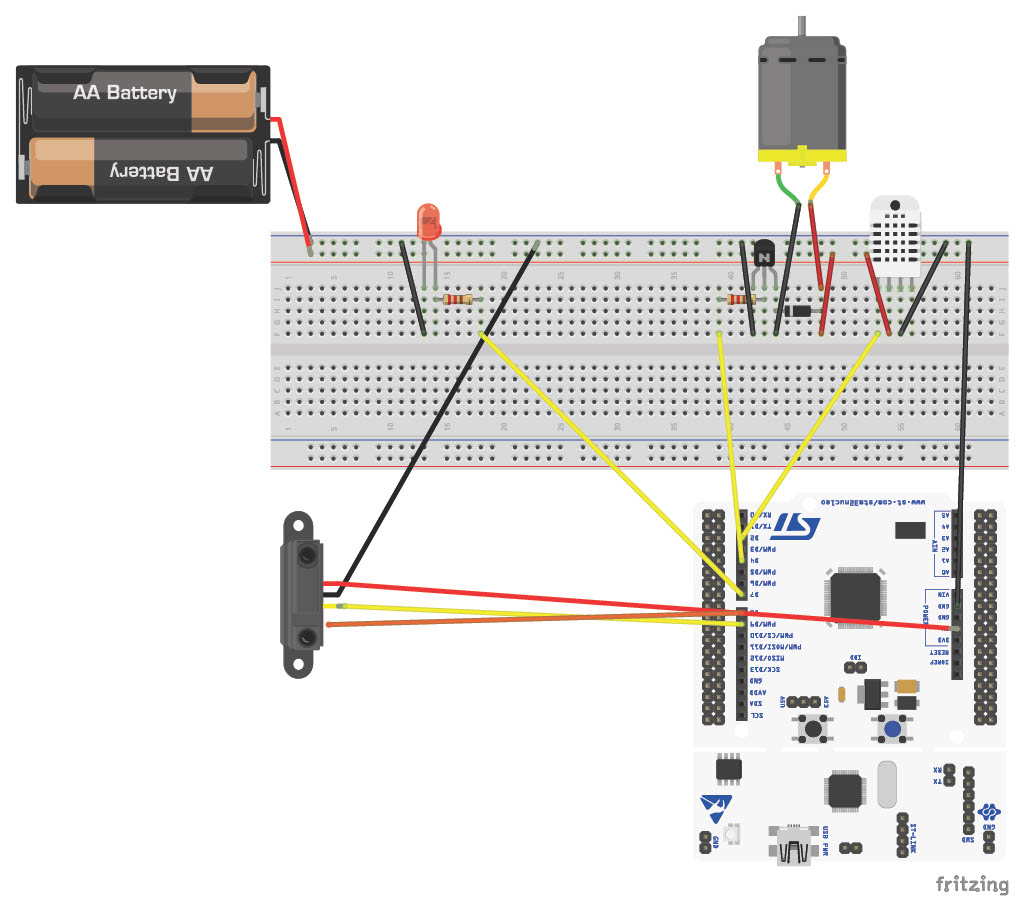
The deviceThe IoT device is developed using RIOT-OS as operating system and with a STM NUCLEO-f401re as board. The system sends data to the cloud and store there in a database, in particular the cloud-based services are based on Amazon Web Services (AWS). To the board are connected 2 sensors and 2 actuators.
SensorsThe sensors of the system are an ultrasonic sensor and a digital temperature sensor:
- Ultrasonic Sensor: by means of this sensor it is possible to check whether someone is sitting on the chair at the workstation. The HC-SR04 ultrasonic sensor uses sonar to determine distance to an object like bats or dolphins do and it operates in a distance range going from 2cm to 400 cm so it is perfect for our purpose. it is positioned on the back of the chair at neck height, so as to be able to correctly verify the presence of a person.
- Digital temperature-humidty Sensor: it is a basic, low-cost digital temperature and humidity sensor. It uses a humidity sensor and a thermistor to measure the surrounding air, and spits out a digital signal on the data pin (no analog input pins needed). With this sensor it is possible to measure the post office ambient temperature.
The actuators of the system are a light led and a fan blade motor:
- Fan Blade Motor: it is the simulation of the fan (or whatever heating system).
- Light Led: it is a simple light.
- The system is designed to reduce expenses and energy costs, therefore the ultrasonic sensor does not continuously estimate the data, but checks for the presence of someone every minute:
- if it does not detect an object in a space within 20cm, the device starts sleep-mode and measure again after 1 minute.
- on the contrary if there is someone, the temperature sensor starts to do its measurements on the ambient.
So the ultrasonic sensor works every 1 minute, and the temperature sensor works only if there is a person of the workstation. After the measurements carried out by the sensors, if there is a person in the workstation and if the temperature exceeds the fixed threshold (in our case we have chosen the temperature of 28°), the fan starts working and at the same time the led that signals that the fan is on turns on. If one of the two conditions is no longer verified (therefore if the temperature falls below the threshold or the person gets up from the chair and there is no one else) the fan and the led switch off.
NetworkThe device exchanges messages with AWS in the following ways:
- From the board to local broker: The board is connected through MQTT-SN to a local broker called Mosquitto (it supports both MQTT-SN and MQTT communication protocols) hosted on the machine. The connection is carried out using IPv6 and RIOT-OS tap interfaces. So the board exchanges messages with Mosquitto by means of MQTT-SN, a communication protocol based on a publish/subscribe mechanism on a topic to which the board must be subscribed (in this case the topic is "temp").
- From local broker to AWS: Mosquitto exchanges messages using MQTT with the AWS ecosystem through a transparent bridge that converts from MQTT-SN to MQTT. This transparent bridge is a python script that works as a bridge between Mosquitto and AWS IoT Core: the role of this component is to "take" the messages published on the Mosquitto broker by the board and then relay them to the broker situated on the cloud broker, in this case the AWS IoT Core one.
- From AWS to the end user: After this phase the data collected by the board arrive to AWS cloud service, and they have to be stored in a permanent way in a database. AWS allows us to use a NoSQL database called DynamoDB and after to have created a table inside the microservice, we store the data received on the topic temp by means of AWS IoT Core. After this in order to show these data on the web dashboard we have to use the REST API, by means of this is possible to extract the data from the table with a lambda function.
First of all you have to setup Mosquitto broker, and in order to do this you have to clone the Mosquitto repository on your local machine. So go inside this folder and by terminal do the following:
> cd rsmb/src
> make
Now you have to create a file called config.conf and to write inside it this:
# add some debug output
trace_output protocol
# listen for MQTT-SN traffic on UDP port 1885
listener 1885 INADDR_ANY mqtts
ipv6 true
# listen to MQTT connections on tcp port 1886
listener 1886 INADDR_ANY
ipv6 true
Now you have to start Mosquitto broker with the command in the terminal:
> ./broker_mqtts config.confNow the broker is waiting for connections using port 1885 for MQTT-SN and 1886 for MQTT, with the IPv6 enabled.
RIOT-OS Application:First of all we clone the RIOT repository on our machine, and so in a terminal do the following steps:
> sudo ./RIOT/dist/tools/tapsetup/tapsetup -c 2
> sudo ip a a 2000:2::1/64 dev tapbr0
With these lines we setup the interfaces and the bridge and assign a global IPv6 address to tapbr0 interface.
if you have doubts about about what has been done so far, consult this tutorial, otherwise let's continue.
MakefileHere you can find the command computed at compilation time:
# name of your application
APPLICATION = individual_project
# If no BOARD is found in the environment, use this default:
BOARD ?= nucleo-f401re
# This has to be the absolute path to the RIOT base directory:
RIOTBASE ?= $(CURDIR)/../RIOT
# Change this to 0 show compiler invocation lines by default:
QUIET ?= 1
After this there are the modules needed to the system for the sensors, the actuators and the communication with the broker:
# Modules to include:
USEMODULE += shell
USEMODULE += shell_commands
USEMODULE += ps
USEMODULE += xtimer
USEMODULE += periph_gpio_irq

USEMODULE += dht
USEMODULE += fmt

USEMODULE += periph_gpio

# Include packages that pull up and auto-init the link layer.
# NOTE: 6LoWPAN will be included if IEEE802.15.4 devices are present
USEMODULE += netdev_default
USEMODULE += auto_init_gnrc_netif
# Specify the mandatory networking modules for IPv6
USEMODULE += gnrc_ipv6_default
# Include MQTT-SN
USEMODULE += emcute
# For testing we also include the ping command and some stats
USEMODULE += gnrc_icmpv6_echo
# Optimize network stack to for use with a single network interface
USEMODULE += gnrc_netif_single

USEMODULE += stdio_ethos gnrc_uhcpc
USEMODULE += sock_udp
You can see the complete Makefile here.
Main.cYou can see the complete file here. Let's see in detail how it works.
//Definition for Emcute and MQTT Broker
#ifndef EMCUTE_ID
#define EMCUTE_ID           ("nucleo-board")
#endif
#define EMCUTE_PRIO         (THREAD_PRIORITY_MAIN - 1)
#define NUMOFSUBS           (1U)
#define TOPIC_MAXLEN        (64U)
#define MQTT_TOPIC "temp"
#define MQTT_QoS (EMCUTE_QOS_0)
#define SERVER_ADDR ("2000:2::1")
#define SERVER_PORT 1885
#define IPV6_PREFIX_LEN (64U)
#define DEFAULT_INTERFACE ("4")
#define DEVICE_IP_ADDR ("2000:2::2")
//Definition of Array used as Stack by threads
static char stack[THREAD_STACKSIZE_DEFAULT];
//Definition of Emcute Data Structure
static emcute_sub_t subscriptions[NUMOFSUBS];
//static char topics[NUMOFSUBS][TOPIC_MAXLEN];
Here there are the definition of network parameters. After done these and the needed include we go in the main:
int main(void){
    //Setting memory for the subscription list
    memset(subscriptions, 0, (NUMOFSUBS * sizeof(emcute_sub_t)));
    thread_create(stack, sizeof(stack), EMCUTE_PRIO, 0,
        emcute_thread, NULL, "emcute");
    puts("Emcute Thread Started");

    // Adding GUA to the interface
    if(address_setup(DEFAULT_INTERFACE, DEVICE_IP_ADDR)){
        puts("Impossible to set up the interface");
        return 1;
    }

    //Connecting to broker and subscribing to topics*/
    if(connect_broker()){
        puts("Impossible to Connect Correctly with the Broker");
        return 1;
    }

    //Start the program
    res = start();
    if(res == -1) puts("Somethings gone wrong..");
    return -1;
}
The first function is the address_setup that allows to initialize the device, the second one is the connection_broker that allows to connect to the Mosquitto broker on your local machine with MQTT-SN and to subscribe to topic. Last there is the function start, the core of the code.
MQTT-SN/MQTT transparent bridge from Mosquitto and AWSSo now we are in the situation in which we setup correctly our local system, and we have to forward the messages exchanged locally on the MQTT-SN, to the cloud system. You can find the code of the python script here.
Amazon Web ServiceNow first of all on AWS you have to create a table in DynamoDB where the values sent on the topic have to be stored. Once the table was created, you have to setup a thing on AWS that can store automatically messages arriving on the broker. From the AWS IoT Core homepage you have to follow the steps of connect a new device. At the end of the configuration you will have the files to configure the transparent bridge in the right way. Once this is done, by means of a rule (using role engine of AWS IoT Core) it is possible to store automatically the messages arriving on the broker inside the DynamoDB table created before. Last, thanks to this lambda function, it is possible to extract the data stored inside the table, so that it is possible to do available for the user.
Conclusion and useful linksHere is possible to find the repository of the project.
Here is possible to find the video demonstration.
Here is possible to find my LinkedIn profile.

_dE8DTpwMtg.jpg)


_dE8DTpwMtg.jpg)
Comments
Please log in or sign up to comment.