


Hardware components | ||||||
_ztBMuBhMHo.jpg?auto=compress%2Cformat&w=48&h=48&fit=fill&bg=ffffff) |
| × | 1 | |||
 |
| × | 1 | |||
Software apps and online services | ||||||
 |
| |||||
 |
| |||||
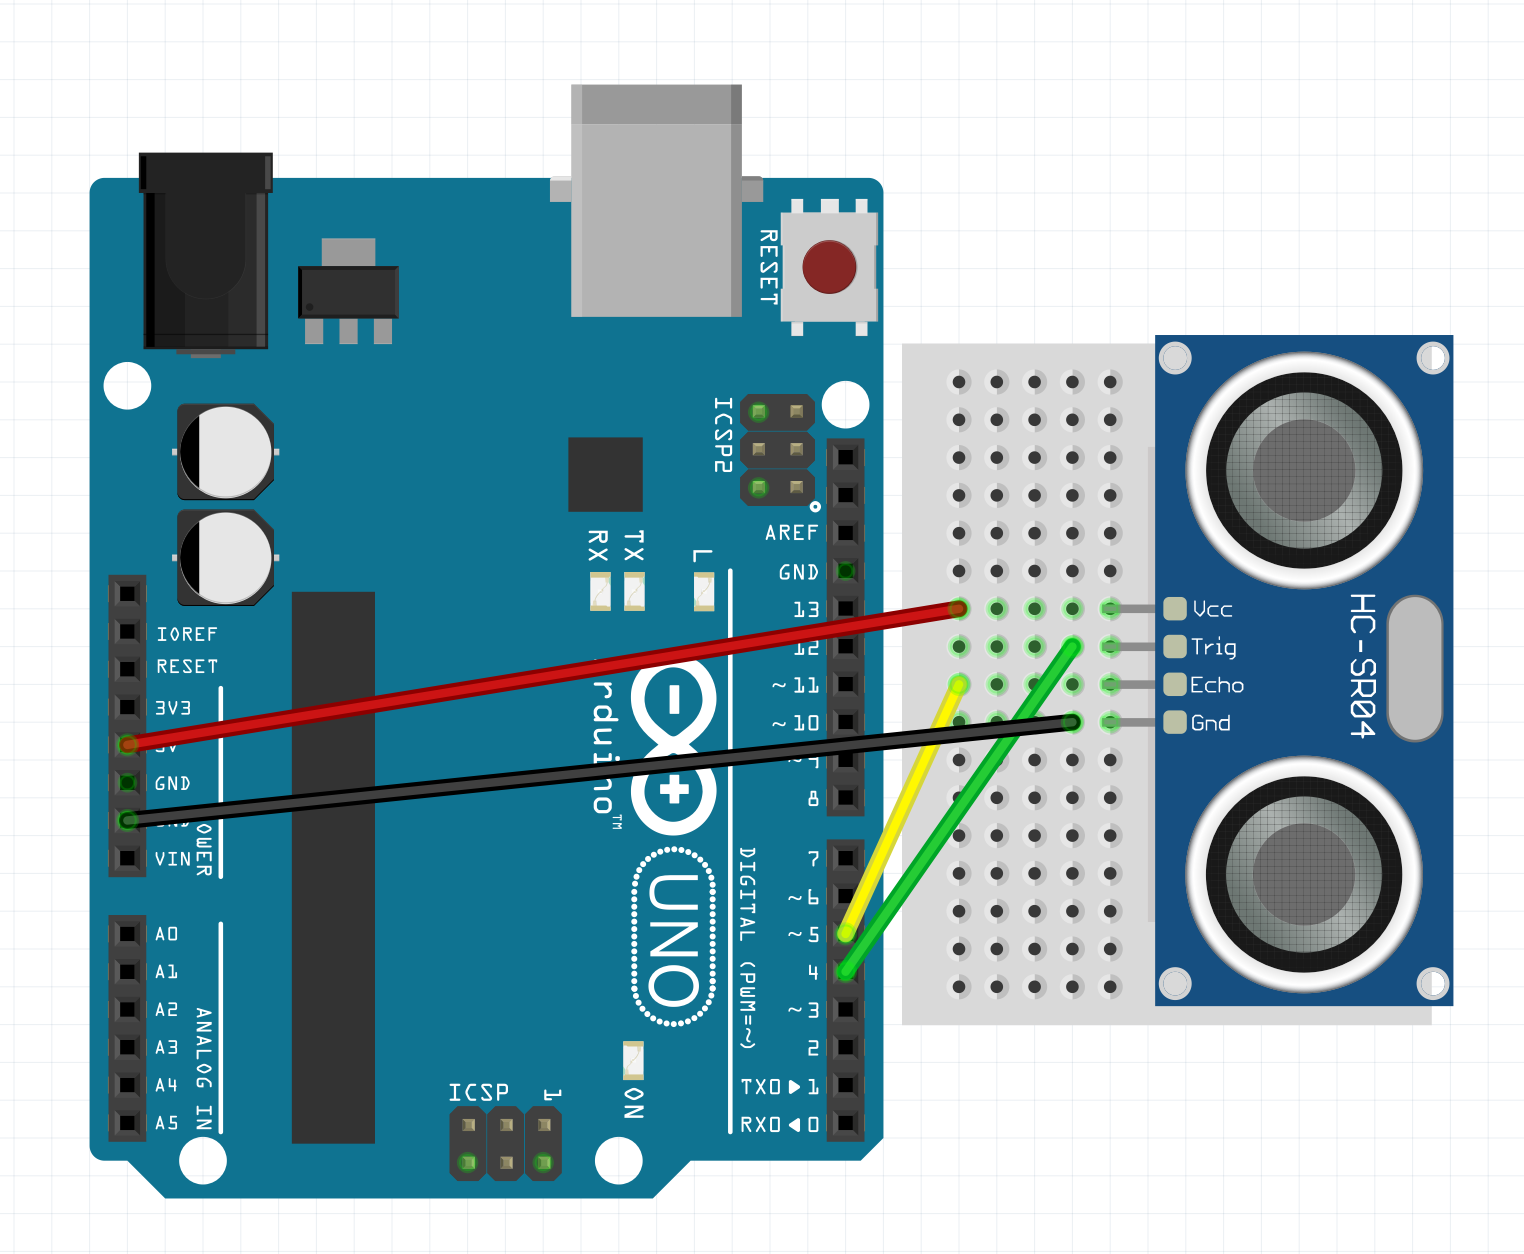
This tutorial is all about visualising Arduino streams in the browser on your Mac, using the HSC04 Ultrasonic Sensor to generate a continuous stream of sensor data. Reading data off an Arduino UNO via the serial port on a Mac computer, and rendering graphs/analytics in a jiffy in the browser.
The HSC04 is simple to use, cheap and reasonably exact. According to the specs, the operational distance range is 2 to 400 cm while very short measurements will be impaired by the gap between sender and receiver, as the angle between them affects the accuracy.
As the microcontroller, we using the Arduino UNO to convert impulses and send packets of data via the serial USB cable to a Mac. We're going to use the SA Engine framework, which can run across a range of operating systems for computers, phones and embedded devices. SA Engine is build as a federation of nodes, each with a designated purpose. Each node in the network runs an instance of SA Engine, with full functionality on computers, serves and other devices with more memory, and more restricted versions for various embedded systems.
SA Studio is the frontend to SA Engine. In SA Studio you use a high-level query and modelling language called OSQL, which holds many built-in functions refining, transforming, analyzing and visualizing data.
In this tutorial, we will query the SA Engine running on the mac computer. Summary of the steps in this tutorial:
* Download the SA Engine runtime software for your device (e.g. local on your mac)
* Login to your SA Studio, or create a new one for yourself (no credit cards or strings attached)
* Connect your device to the cloud, from the device tab in the SA Studio web app.
* Get the C++ sketch onto an Arduino (e.g. the UNO), see code section.
* Copy the OSQL script to set the whole thing in motion -- press play!
1) Download SA Engine for the device. In this case, our target is mac computer, and you can download the latests binary from https://studio.streamanalyze.com/download/#tOSX Please follow the install instructions for OSX using the Terminal app, and when you're done, come back here.
Once successful, you should see the prompt
[sa.engine] 1>in your Terminal app window -- you're now up and running your first instance of SA Engine on your mac.
2) Getting your SA Studio instance up and running.Go to the Stream Analyze website [link] and sign up using your Google account or username/password. Click the "GO TO STUDIO" button after a bit of waiting, while your personal SA Studio instance spins up in the cloud.
3) Connect your device SA Engine to SA Studio. Click on "Connect edge", name the SA Engine on the device something useful like "macedge" and copy/paste the connect command right below where it says "Connect as edge using base64 blob from within sa.engine" in the black box, starting with (where BLOB-HERE is your connection key):
connect_using_config_blob( 'BLOB_HERE' , 'macedge' , true);It is a quite long key. It's also safe so nobody else or any third parties can connect to it.
Copy and paste the whole thing in your terminal app at the prompt.
The local SA Engine client and SA Studio server now negotiate a bit, and then some connect info is rendered:
2023-02-08T23:51:28.667 [Connection (1/7) - Connecting as: macedge@13.49.231.70:35021 with TLS]
2023-02-08T23:52:37.712 [Connection (2/7) - Registered as "macedge@13.49.231.70:35021"]
2023-02-08T23:52:37.985 [Connection (3/7) - Connected to SERVER with: #[socket "13.49.231.70" 35021 SERVER 4 SECURE WS]]
2023-02-08T23:52:38.098 [Connection (4/7) - Uplink opened: #[socket "13.49.231.70" 35021 SERVER 27 SECURE WS]]
2023-02-08T23:52:38.104 [Connection (5/7) - Registered as edge]
2023-02-08T23:52:38.104 [Connection (6/7) - Uplink socket registered with edge manager]
2023-02-08T23:52:38.104 [Connection (7/7) - Established OK]
You've now registered your Mac as an edge node named "macedge" in SA Studio, so the only thing remaining is to load firmware for generating signals on the Arduino, and run while plugged into the mac with the USB cable:
4) Upload the arduino sketch. Copy the enclosed arduino sketch, and select "Arduino UNO" and the serial port where your Arduino has connected, such as "/dev/usbmodem-414010.tty" to upload the sketch. If you don't know the name of the serial port, look for "usbmodem" or "tty*" in the /dev folder of your mac. If you'd want to see the data stream from within the Arduino SDK, you can peek using the "Serial monitor" menu option, at 115200 baud, When successful, you can quit the Arduino SDK, as it may hog the serial port from other software.
5) Run the OSQL queryBuilt into the OSQL query language, there are many useful commands. Open a "new OSQL editor" in SA Studio in your browser, and write on the first line:
this_peerid();You run commands by clicking on the "play" icon.
The command you just issued on the device's peer, will give you the name of the device you're interacting with. When you press "play", make sure that you're sending the sequence of OSQL statements to the right SA Engine instance in the drop-down menu. Another device, without the UNO, won't know anything about the serial stream you're asking for. Select which node should run the code, one of the edges or the server
Select "macedge" or some other smart name you called the SA Engine running on your mac, in the connect script (in step 3 above), and press play.
To complete this tutorial, we'll be using the serial:streamer() command, to pick up six bytes between the designated start byte "55" and end byte "AA", as declared in the enclosed arduino sketch loaded onto the UNO. Replace the name of the serial port "/dev/tty.usbmodem1442401" to match your own setup.
select v from vector v, Stream of Binary sb
where sb = serial:streamer("/dev/tty.usbmodem1442401",115200, 0x55,0xAA,2)
and v in unpack(sb, "u16");
Press the "stop" button, lower left corner when you're done. Note that you need stop the stream, when editing the code in the Arduino SDK as they share the same serial connection to the Arduino.
You've come to the end of this tutorial to get you up and running, the next steps could be to edit the Arduino code to more things, add some real sensors, add more analytics on the SA Studio side, such as an FFT or why not a ML model of your own?
Thanks for following this tutorial, and happy analyzing!


Comments
Please log in or sign up to comment.