My garage tends to get a bit messy due to my Wife and I working in there on projects multiple times a week. I like to leave space in front of the work benches so that we have room to work so when I pull into the garage, I try to pull in as little as I can with the garage door being able to close. Before having the "Tennis Ball Stop Light" I often got in and out of my car at least once before I was in a parking spot that allowed the garage to close.
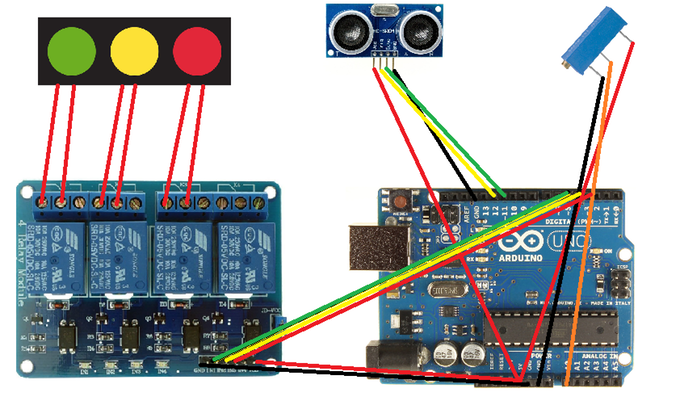
In this tutorial I will show you step by step how to make one of these on your own. Let's talk about how it actually works. The "Ultrasonic Distance Sensor" actually uses sonar ping to calculate how far away the object in front of it is. This communicates with the Arduino and tells it when to trigger the lights. First I will tell you how to wire the physical circuit. It shouldn't take long as it is not many components. Also, If you don't have a stop light laying around, feel free to run LEDs instead. They may require resistors depending on the LED. The circuit is wired as shown in the following figure.
I will try and explain the figure so you better understand the connections.
VCC (Ping Sensor) to 5V (Arduino)
Trig (Ping Sensor) to Digital Pin 12 (Arduino)
Echo (Ping Sensor) to Digital Pin 13 (Arduino)
Ground (Ping Sensor) to Ground (Arduino)
Outside Pin (Potentiometer) to 5V (Arduino)
Other Outside Pin (Potentiometer) to Ground (Arduino)
Middle Pin (Potentiometer) to Analog Pin 0 (Arduino)
VCC (Relay Board) to 5V (Arduino)
Ground (Relay Board) to Ground (Arduino)
Int 1 (Relay Board) to Digital Pin 5 (Arduino)
Int 2 (Relay Board) to Digital Pin 4 (Arduino)
Int 3 (Relay Board) to Digital Pin 3 (Arduino)
Cut 120V positive wire from each bulb and insert into each relay (Normally Closed). Here you are creating a break in the circuit so that the relay can control whether it is on or off.
Now that your circuit is wired up. We can move on to coding. Copy and paste the provided code to your Arduino software and upload it to your board. You will need a library named "NewPing" for this project and here is why. When the ping sensor can't read a distance, it delays for an entire second and your car could move quite a bit into the garage in that second. So this library fixes this and reads multiple times per second. The link to download is:
http://playground.arduino.cc/Code/NewPing. You will need to place this into your libraries folder once extracted.
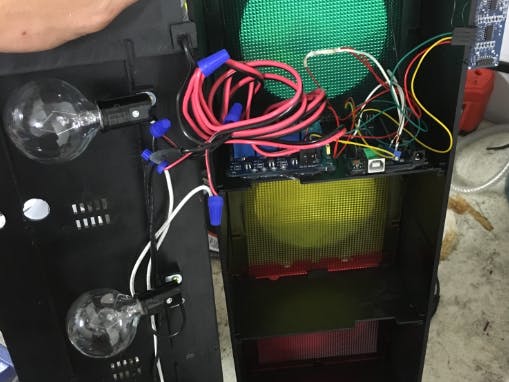
Once your code is uploaded, you should be ready for assembly. I took my boards and hot glued them inside of the light as shown in the next figure.
Next, I drilled some holes so that I have access to the Arduino USB port and power port.
All that's left is to plug in and enjoy your worry free parking! Here it is in action.


_ztBMuBhMHo.jpg?auto=compress%2Cformat&w=48&h=48&fit=fill&bg=ffffff)


Comments
Please log in or sign up to comment.