Project 1 :MUSIC REACTIVE LED LIGHTS BY ARDUINO
In this Project I have detaily explained about HOW TO MUSIC CONTROL YOUR LED LIGHTS by Arduino Uno. I have cleared the fundamental concepts of the SOUND SENSOR (KY 038) and explained how it works.
If you play any Music, then the LED Lights will get synced to it automatically and glow with the Beats of the Music.
LINK OF CODE- https://drive.google.com/open?id=1BpgurwsHzdOd_p433cno2-4zlJKizTgl
Just have a look into the You Tube video that I have specially created so that everyone can understandclearly :-
You just need to write this code in your Arduino IDE and upload it in your Arduino board. I have detaily explained each and every line of the code in my video.
Please notice: The signal will be inverted; that means that if you measure a high value, it is shown as a low voltage value at the analog output.
You can get the interesting theory of the project in the link given below -
https://drive.google.com/open?id=1gLffUhGc-gcX94Xxo_z48TSKSgzRie-f
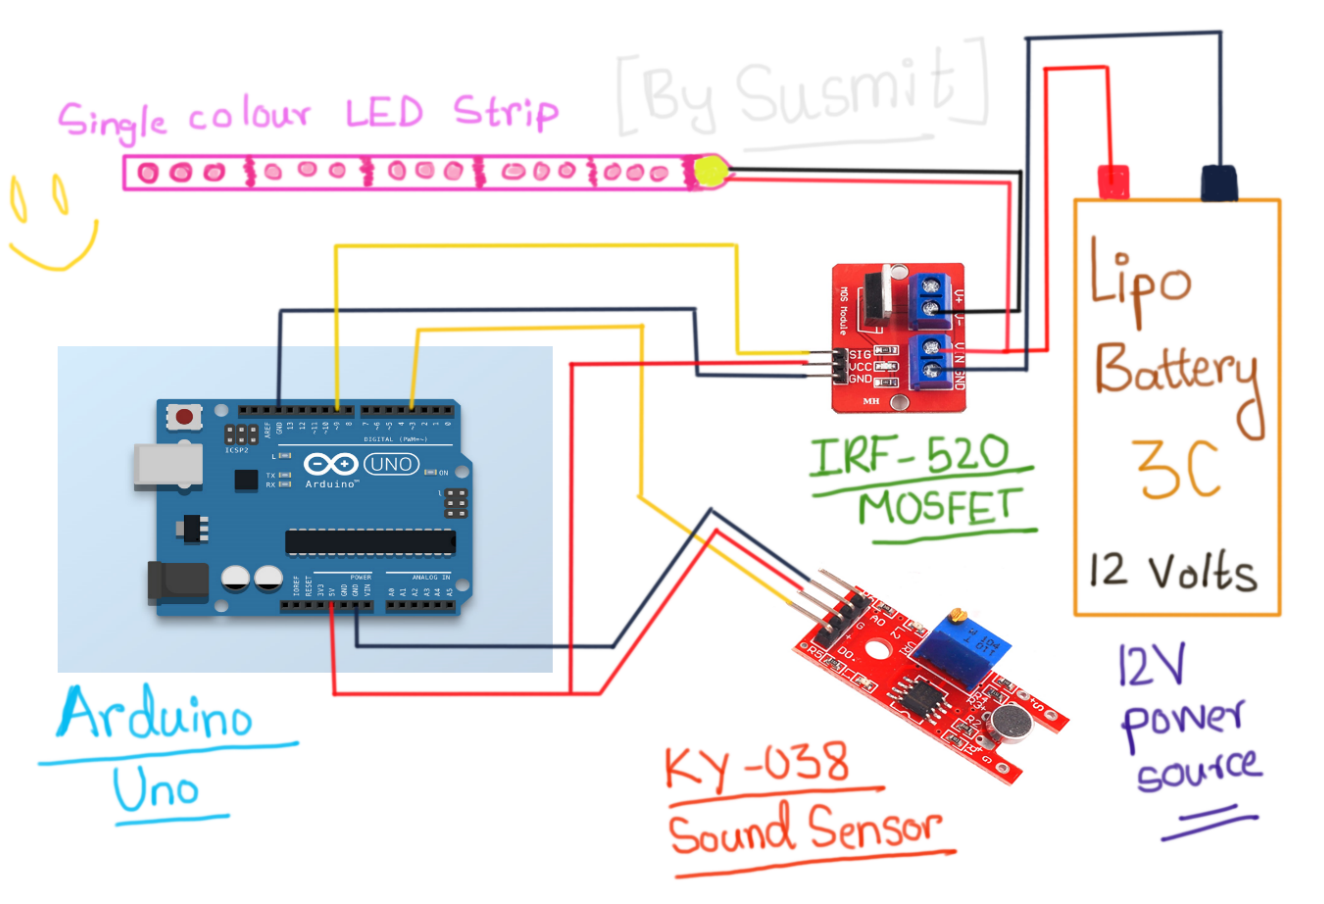
You don't even have to worry about the CIRCUIT DIAGRAM. You can easily check it out here.
https://drive.google.com/open?id=1ER08BzEhQ1AGIRqWNWdx0JZ4Pf6jVoID
So, now you all will be able to make a MUSIC REACTIVE LED entirely on your own along with understanding all the concepts.
That's Great!
2nd Project : Control Everything by Arduino | How to Use IRF 520 MOSFETIn this Project you will get detailed information about HOW TO CONTROL ANY HIGH CURRENT OR HIGH VOLTAGE APPLIANCE BY ARDUINO, using MOSFETS such as IRF 520 MOSFET.
An amazing Engineering Project for everyone.
You can easily see the Circuit Diagram here -
https://drive.google.com/open?id=1afB4wpWPWrKOAJp6eb-82zIiW0INQmaK
Generally we can control 3.3V to 5V by using any micro-controller like Arduino, but in this video I will detaily teach you to control everything with it.
Check out the interesting YouTube video of this Project -
You can easily access the theoretical portion of this project here -
https://drive.google.com/open?id=1Jq3TXUe5uV0dMqLXjzJw87WVf7onPpWk
The main device that you need for that is a SIGNAL CONTROLLED SWITCHING DEVICE which will control the current flow in the output circuit just by the signal received from the Arduino in the input circuit. For this particular switching purpose we use TRANSISTORS and MOSFETS in our circuits.
Blink-https://drive.google.com/open?id=1qqVM2TgZps0VIVyhoWpC6JFf7nD8mrGM
Motor Speed Regulation-https://drive.google.com/drive/u/0/folders/1F159LW7bgk5NyZEAh-h9VyTNSigxBIof
Music Reactive LED-https://drive.google.com/open?id=1BpgurwsHzdOd_p433cno2-4zlJKizTgl
Most of us have just read about these MOSFETS and Transistors in our book but have never practically implemented it. But now, after watching this project, I hope that you all have learnt a lot of important concepts which will surely help you in future.
Truely Amazing!
Project 3 -LPG Gas Leakage Detector with ARDUINO UNO
In this project I have shown a short demo of LPG Gas Detection and Alert system base on ARDUINO UNO. It is synced with BLYNK APPLICATION which can be easily downloaded in Play Store.
Watch this YouTube video to see the practical testing of the Kitchen Safety Kit -
When the MQ02 Gas Sensor detects the inflammable gas automatically, then it gives ALERT Notification to your Smart Phone along with physical ALARM and Blinking RED Light.
This is the Link of the BLYNK Application where you can customise your APP -
The glimpse of the customised Blynk App -
You can also call the fire-brigade automatically in case of fire with slight modifications in the project.
Just like the previous two PROJECTS, if you want a detailed DIY video about this exciting project, then please let me know in the COMMENT section.
If you like my Efforts, then please support by SUBSCRIBING to my YouTube cannel and also SHARE with your friends.
THANKYOU!❤


_ztBMuBhMHo.jpg?auto=compress%2Cformat&w=48&h=48&fit=fill&bg=ffffff)


_3u05Tpwasz.png?auto=compress%2Cformat&w=40&h=40&fit=fillmax&bg=fff&dpr=2)
Comments
Please log in or sign up to comment.