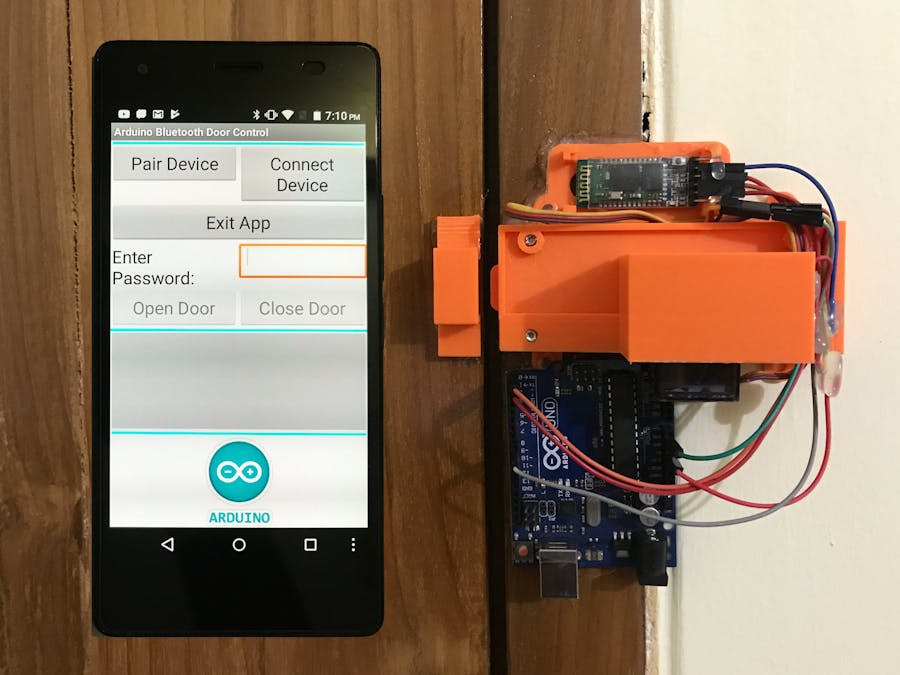
This smart lock is the secure, simple, and easy to manage your home’s lock. This lock needs no keys and the lock is attached inside the door and you can control it from outside the door using Bluetooth. As the lock is inside the door there is no way to break the door by a thief. An android application is required to open and close the lock and I will explain the details how you can develop an android app in the later part of the tutorial. A password is sent to the lock using Android app and if the password is matched to your preset-lock password then the lock will be open and sent a feedback to your phone like the lock is open.
Door Lock 3D DesignAll the parts of the lock are 3D printed. I would like to thanks, Thingiverse user ridercz for his nice design. He designed and published this servo based door lock in thingiverse.com. All the files except Rack_Holder.stl are taken from his design. You can download the files from below or from Thingiverse.com.
Some files have LT version. Light version required less PLA compare to normal version and has less strength. I printed LT version and working good. I used Anet A8 for printing all the parts. Photos of the printed parts are attached..
Assembling 3D Printed PartsAssemble all the printed parts one by one as shown in the photos. You may also follow the video instruction attached in the first step. After assembling use four screws to tightly fix all the parts.
Arduino Program for Bluetooth Control Password Protected Door LockThe code for bluetooth control smart door lock is very simple. I have designed android application in such that it sent a command with the password. Actually I set two command, one is "OPEN=" and another is "CLOSE=" and password may contain any digit, later or symbol or combination of them as you like. In the app I used two buttons one for open the door and another for closing the door. When password is given to password box and open button is clicked than app joint the "OPEN=" command with the password and sent it to arduino. I add '=' sign with command for that I will separate command and password by using this '=' . After receiving the string from phone arduino program separates command and password from the receive string and save them into two separate variables. Then check the password first, if password matched with saved password then open the door for "OPEN" command, and close the door for "CLOSE" command. "=" helps to separate command and password. Complete arduino sketch is given below.
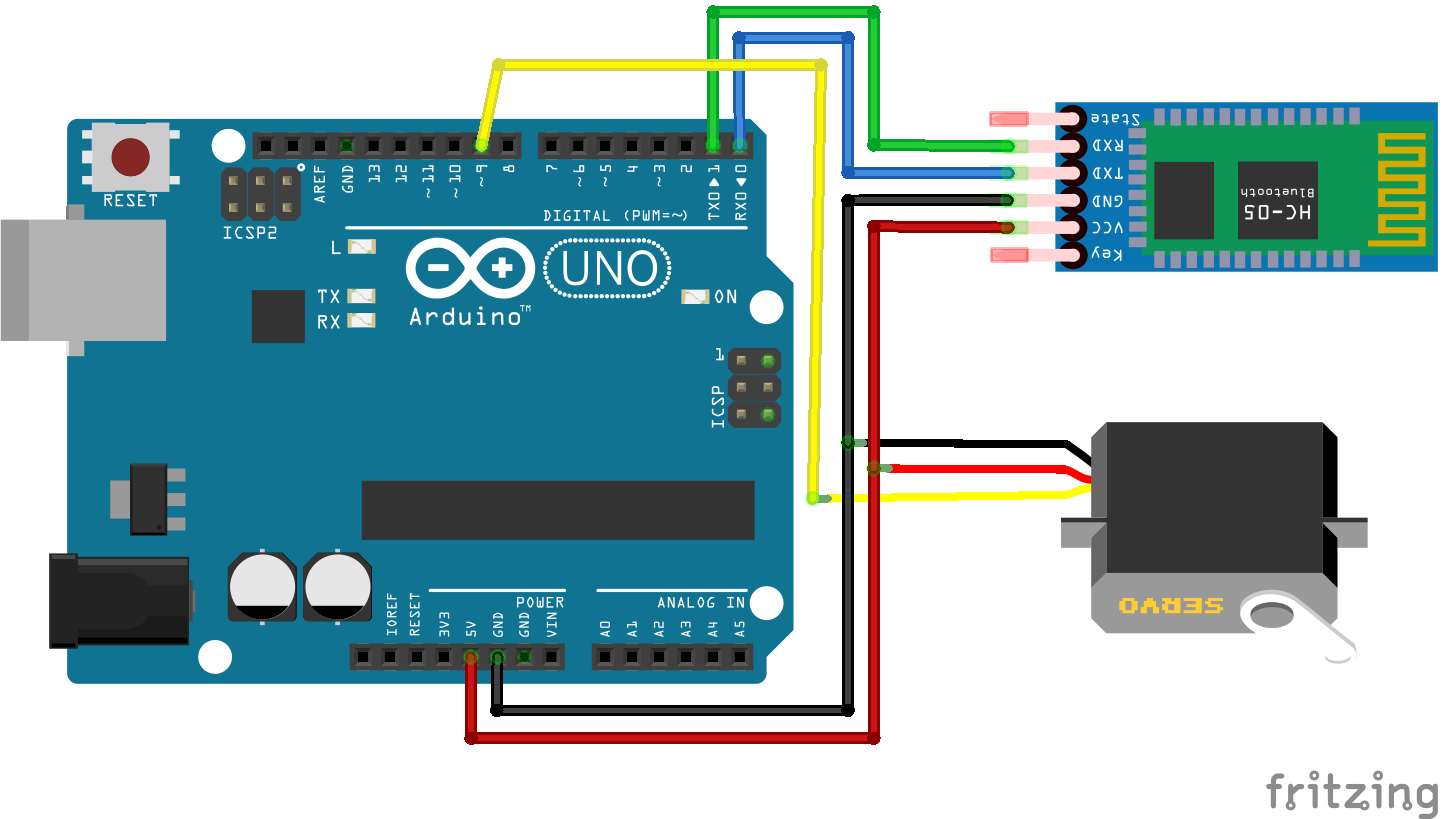
SchematicThe connection between the components is very simple. First, connect Bluetooth module HC-05 to the Arduino. Note the schematic. TX pin of the Arduino board is connected to the RX pin of Bluetooth module and RX pin of the Arduino is connected to the TX pin of the Bluetooth module.
Setting the Lock to the DoorI hope you programmed your Arduino board with the sketch attached in the previous step and you already tested all the connection according to the schematic. If you completed all the steps then it is the high time to place the lock in the appropriate place of the door. First, place the lock with four screws. Then, fix the Bluetooth module at the right place of the lock and add some hot glue to tightly adjust the module with the lock. After that, place the Arduino board to the bottom side of the lock and connect all the wires according to the schematic. After placing the lock and making the connections you should power up the lock. I used a 5V, 1A wall adapter to provide the power to the circuit.
Android App Development for Password Protected Door LockI will show you how to develop an Bluetooth android application using MIT App Inventor. I am using App Inventor because it does't required any coding and no software installation. You only need a google account. Go to http://ai2.appinventor.mit.edu/, you will ask to log in using google account.
Log in to App Inventor using gmail and follow the steps below:
- i. Accept terms & conditions image 1
- ii. Click 'take survey later' and then 'continue' to dismiss the splash screen image 2, 3
- iii. Start a new project (no spaces!) image 4
- iv. Name the project "BluetoothControlDoorLock" (no spaces!) image 5
You are now in the Designer, where you lay out the "user interface" of your app (image 6). The Designer Window is where you lay out look and feel of your app, and specify what functionalities it should have. You choose things for the user interface things like Buttons, Image, Label, Text boxes, and functionalities like Text-to-Speech, Bluetooth, Sensors, and GPS.
Now, follow the figure 7 and add a List Picker to the viewer. Rename it to "Connect to Bluetooth Device" (image 8). Add one Label, one Password Text Box, and two buttons shown in figure 10. Change the text properties of the components as "Enter Password", "Open Door", and "Close Door" respectively. Final User Interface should look like as figure 11. Now add a Bluetooth Client to the viewer. It is an invisible component and it has no UI. See Image 12.
Switch over to the Blocks Editor
It's time to tell your app what to do! Click "Blocks" to move over to the Blocks Editor (image 13). Think of the Designer and Blocks buttons like tabs- you use them to move back and forth between the two areas of App Inventor. The Blocks Editor is where you program the behavior of your app. There are Built-in block that handle things like math, logic, and text. Below that are the blocks that go with each of the components in your app. In order to get the blocks for a certain component to show up in the Blocks Editor, you first have to add that component to your app through the Designer.
Let us, design blocks for List Picker. List Picker is a UI element when clicked it shows a list of corresponding elements here is the paired Bluetooth device. We have to add two blocks ListPicker.BeforePicking and ListPicker.AfterPicking (image 14). Complete Blocks are shown in figure 18 & 19.
Make apk file
Our design is complete, now we need to build the apk file for our android phone. Click to build menu and select "App(save .apk to my computer)". Wait for a minute. An apk file will download to your default download folder. Install and use it.
A More Feature Rich Android AppIn previous step I have showed you how to develop a basic bluetooth app in App Inventor. But that app is not so user friendly. It will not show you any message either your door is open or closed or bluetooth can not connected for any error. I have attached here a more advanced app for our project.
When you run you app this app check either your bluetooth radio is enable or not, if not enable a bluetooth enabling dialog will appear. Click yes to turn on your bluetooth radio. Then pair the device using pair device button. Then click to connect button, if successfully connected to any device the application shows the connected device's MAC address and name. Enter password to the password box then click the open door button, if you entered correct password door will be open and application will show you a message that your door is now open. Then enter password again if you want to close the door. If you give the wrong password, then app will show wrong password message.
Complete App Inventor source file (BTcontrol.aia) is attached herewith. If you did not like to make your own app or modify it, just download the BTcontrol.apk and install it to your android pone.
You can also download it from Google Play Store using the link:
https://play.google.com/store/apps/details?id=appinventor.ai_khairul_uapstu.BTcontrol&hl=en
For modifying the source click the "Projects" menu and select "Import project (.aia) from my computer" shown in figure 24 and browse the BTcontrol.aia file from your computer. After importing you can modify it easily.
If you want to know more about android app developing using App Inventor browse: http://appinventor.mit.edu/explore/ai2/tutorials.html. You can also try http://meta-guide.com/videography/100-best-appinventor-videos/


_ztBMuBhMHo.jpg?auto=compress%2Cformat&w=48&h=48&fit=fill&bg=ffffff)


Comments
Please log in or sign up to comment.