


Hardware components | ||||||
_ztBMuBhMHo.jpg?auto=compress%2Cformat&w=48&h=48&fit=fill&bg=ffffff) |
| × | 1 | |||
 |
| × | 1 | |||
 |
| × | 1 | |||
Software apps and online services | ||||||
 |
| |||||
Hand tools and fabrication machines | ||||||
 |
| |||||
In this project I am going to show you how you can use Arduino to measure the distance of an object and send the notification to your smartphone for a preset distance. Here Arduino is using to read the sensor and Cricket WiFi Module is using to send the push notification to smartphone. I will provide power to the Cricket from Arduino uno's 3.3V pin. For sending push notification to the smartphone I will use Pushsafer notification service but of course you can use other services like Pushover, IFTTT, Blynk, Zapier, Emails, Firebase or any other internet service you like.
You can modify this project to make a smart vehicle detector for a parking lot and you can get notified to your phone on the absence or presence of a car. Installing a device on every slot you can also count total number of free slots available in a parking lot and visualized the information from smartphone application or web dashboard.
So, without further discussing let's start making!
Prerequisites
- · Arduino Uno
- · IoT Cricket WiFi module
- · HC-SR04 Ultrasonic Sensor
- · Male to female jumper wire
- · Power supply or power bank for Arduino
- · Basic knowledge on Arduino and soldering
The ultrasonic sensor uses sonar (ultrasound) to determine distance of an object. It is a non-contact sensor for determining distance or range with high accuracy and stability. An ultrasonic sensor consists of a ultrasonic transmitter and receiver. Transmitter of HC-SR04 sends 8 cycle burst of ultrasound at 40KHz and receiver waits to receive the echo. Distance is calculated from the time interval between transmitting the signal and receiving the echo.
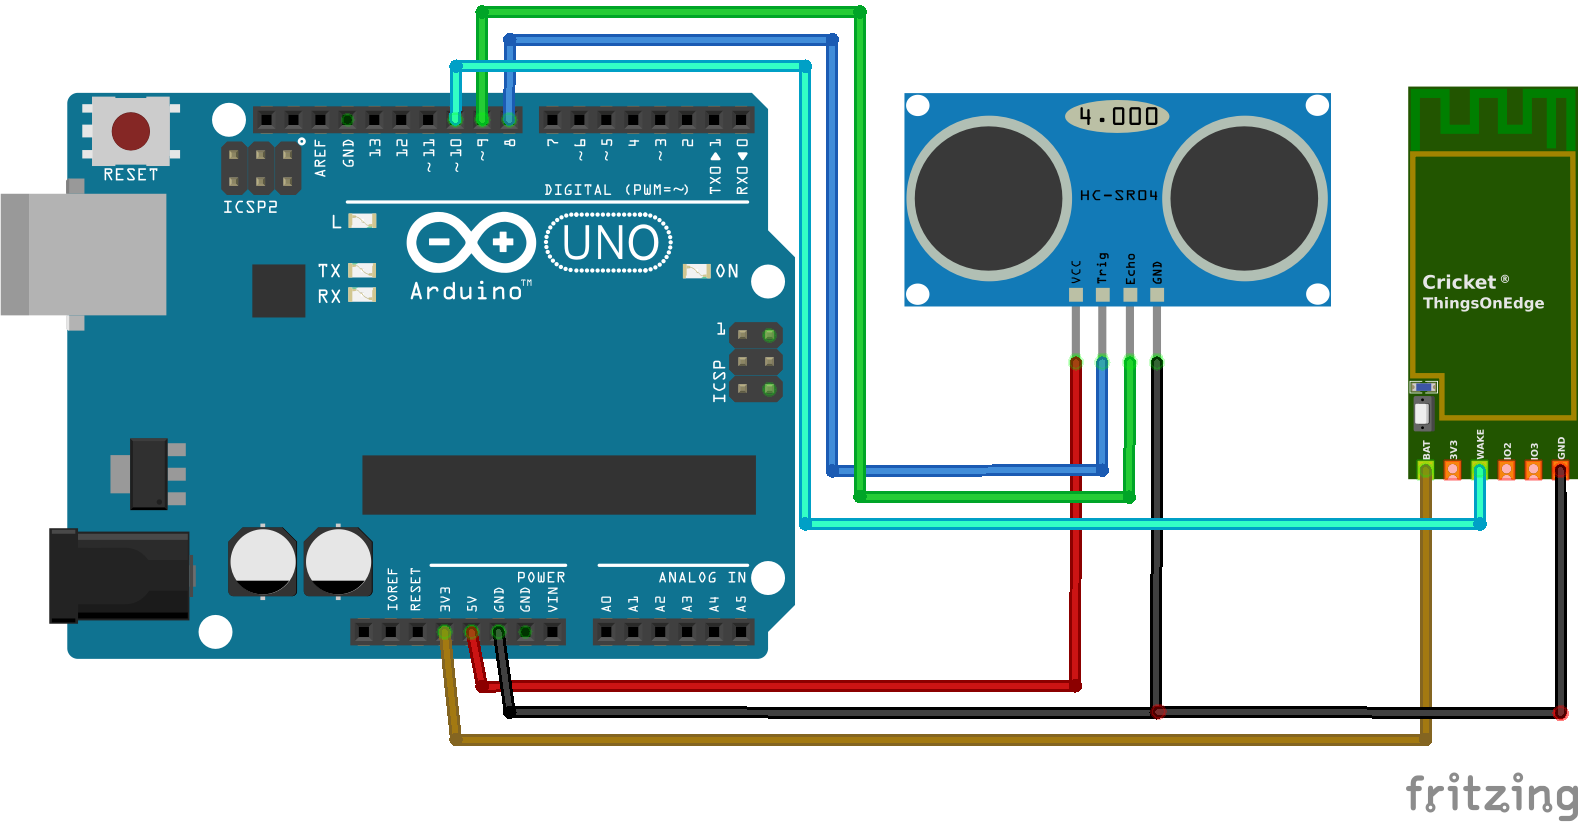
For triggering the transmission HC-SR04 has a pin named Trig and for notifying the reception it uses Echo pin. Trig and Echo pin should be connected to two digital pins of Arduino. Vcc and Gnd pin of the sensor should be connected to 5V and GND pin of the Arduino respectively.
I used 4 male to female jumper wires to connect ultrasonic sensor to Arduino according to the above schematic
Arduino has no network capability. So, we are using Cricket for connecting Arduino to internet and for sending notification to mobile application. WiFi devices are power hungry but Cricket is not! To be honest, Cricket uses sleeping technique very efficiently to save power. This power efficiency and voltage compatibility made it perfect choice for battery power IoT application. Cricket goes to zero power mode automatically after sending data to cloud once. If you want to sent data at a regular interval, you can configure Cricket for this. Cricket will wake up automatically on that interval by utilizing its internal RTC. You can also wake it up by giving a voltage to WAKE_UP pin from an external source. We will use this external wake up feature in our current project.
Connect 3.3V output of the Arduino to BATT pin of the Cricket and digital pin 10 to the WAKE_UP pin of the Cricket. Connect a GND of the Arduino to the GND of Cricket.
I cut 2 male to male jumper wire at the middle to make 4 and soldered three with the Cricket according to the schematic. Then I connected the Cricket with Arduino using the male header.
Suppose we want to get notification to out smartphone if any object comes within a 30CM of the ultrasonic sensor. To do this we need to measure the object's distance, check either the value is 30cm or less than 30cm and generate a 3.3V pulse to a Arduino digital pin. By default Arduino digital pin produce 5V which is not compatible to Cricket. So, we will use analogWrite() function to a PWM pin (pin 10 in our case) to generate a 3.3V short pulse. To generate 3.3V the analog write value is around 170.
Copy the following sketch and upload to your Arduino.
int trigPin = 8; // Trigger
int echoPin = 9; // Echo
int wakePin = 10;
long duration;
int cm;
void setup() {
//Serial Port begin
Serial.begin (9600);
//Define inputs and outputs
pinMode(trigPin, OUTPUT);
pinMode(echoPin, INPUT);
pinMode(wakePin, OUTPUT);
}
void loop() {
int distance = calculate_distance();
if(distance<=30){
analogWrite(wakePin, 170); //produce 3.3V to wake up pin, digitalWrite() will produce 5V
delay(10); // make high pulse for 10ms
analogWrite(wakePin, 0); //make it low
delay(20000); //don't measure again untill 20seconds passed.
}
delay(500); //check every 1/2 second
}
int calculate_distance(){
// The sensor is triggered by a HIGH pulse of 10 or more microseconds.
// Give a short LOW pulse beforehand to ensure a clean HIGH pulse:
digitalWrite(trigPin, LOW);
delayMicroseconds(5);
digitalWrite(trigPin, HIGH);
delayMicroseconds(10);
digitalWrite(trigPin, LOW);
// Read the signal from the sensor: a HIGH pulse whose
// duration is the time (in microseconds) from the sending
duration = pulseIn(echoPin, HIGH);
//We need to convert the duration to a distance.
//We can calculate the distance by using the following formula:
//distance = (traveltime/2) x speed of sound
//The speed of sound is: 343m/s = 0.0343 cm/uS = 1/29.1 cm/uS
cm = (duration/2) / 29.1; // Divide by 29.1 or multiply by 0.0343
Serial.print(cm);
Serial.print("cm");
Serial.println();
return cm;
}
For testing if it is working perfectly open the serial monitor and observe the reading. Place your hand or any obstacle in front of the sensor, make it closer slowly and notice the reading. If it show the right value then everything is good so far.
Pushsafer is one of the easiest and reliable multi-platform push notification service. Using Pushsafer you can get 50 notification for free. You can purchase 1000 extra for around $1. It is very easy to configure. Follow the steps:
- · Go to pushsafer.com and create an account.
- · Login to your account and from the dashboard go to Send a Notification section
- · Write your notification message on Message box
- · Click on Create Link and write the generated link in notepad and save. We will use this link while configuring Cricket.
- · Install the Pushsafer app in your smartphone.
For testing you can press the Send Message button. If everything configured correctly you should receive a notification message in your smartphone containing the sentence you entered in the Message box.
Step 5: Configuring CricketNow we are going to configure Cricket to send a notification to a smartphone when it wakes up. This happens when WAKE_UP pin receives a short pulse (some voltage for a short time) and in our case it receives 3.3V pulse for 10ms from Arduino digital pin 10. After getting the pulse, Cricket wakes up and gets connected to the Pushsafer service by using the URL link we obtained in the previous step. Once connected, the Pushsafer service sends the notification to the phone if Pushsafer app is installed in that phone.
Let's start configuring Cricket step by step.
First we need to connect the Cricket to our WiFi network. To do this
- · Press the built-in Cricket's button for 5 seconds (it will start a new WiFi hotspot named as toe_device)
- · Connect to that hotspot from a phone or laptop
- · Set you WiFi credentials: SSID and Password and press CONNECT button.
If connected successfully, open CONFIG panel and set the following
- · CONNECTIVITY-> type: HTTP_GET
- · CONNECTIVITY-> url: [paste the URL obtained from the previous state]
- · IO1-> force update: On
After successful configuration we need to press the switch off button on top right corner to exit from the configuration and our device is ready to go.
Step 6: Physical connection and testingSo far, we have connected the ultrasonic sensor and Cricket to Arduino, uploaded the program to Arduino, configured the Pushsafer and Cricket. We also installed the Pushsafer app to our smartphone and logged in to our account. Now, it's the right time to test it.
Power up your Arduino from your laptop or power bank using the USB cable. Alternatively, you can use 7 to 24 volt power adapter to power up your Arduino. I am using power bank here for testing. After power up place your hand in front of the sensor and bring it within 30cm. If you receive the notification in your phone then Congratulation! You successfully made it!!
SummaryYou have seen how easily you can make a project with Arduino and Cricket. By connecting Cricket with Arduino you can be connected with almost any internet service and it may open a new way in your IoT development. Not only for Arduino, Cricket can also be used with lots of other microcontroller development boards to bring internet connectivity on those board. Raspberry Pi Pico, Teensy, Sparkfun Apollo3 baord, Microchip curiocity nano evalution kit, DFRobot Beetle, Texas Instrument LaunchPad boards, Maxim Integrated MAX78000FTHRI board, Maxim Integrated MAX32666FTHR Evaluation Kit, QuickLogic QuickFeather Dev Kit, Nordic nRF52840 Board are few of them. Like Cricket most of them can be powered from battery. You can make battery powered IoT device vary easily using these boards and Cricket. Even some of them (e.g. Apollo3 baord, QuickFeather Dev Kit or MAX78000FTHRI board) have machine learning capability and consume very little power. So one of these boards and Cricket can be a perfect combination for battery operated machine learning capable IoT device.
Thank you for getting up to here! I hope you enjoyed this tutorial.


Comments
Please log in or sign up to comment.