My city Dhaka is a very congested one. In the city spaces for home or office are very much limited. In my friend's office they has around 50 employees and there is only two toilet for all employees and it is not possible to increase the number due to the shortage of space. Most of the offices in Dhaka city have same scenario. When someone want to use toilet most of the time he gets it engaged and need to wait there about 5-10 minutes to get it free. It is boring and also hampers works. I think the problem can be solved without increasing the number of toilet by efficiently managing it using IoT technology.
Recently, I have been able to develop a management system for the toilet of my friend's office. It is also possible to monitor some important parameters (e.g. air quality, temperature & humidity) of the toilet using the system.
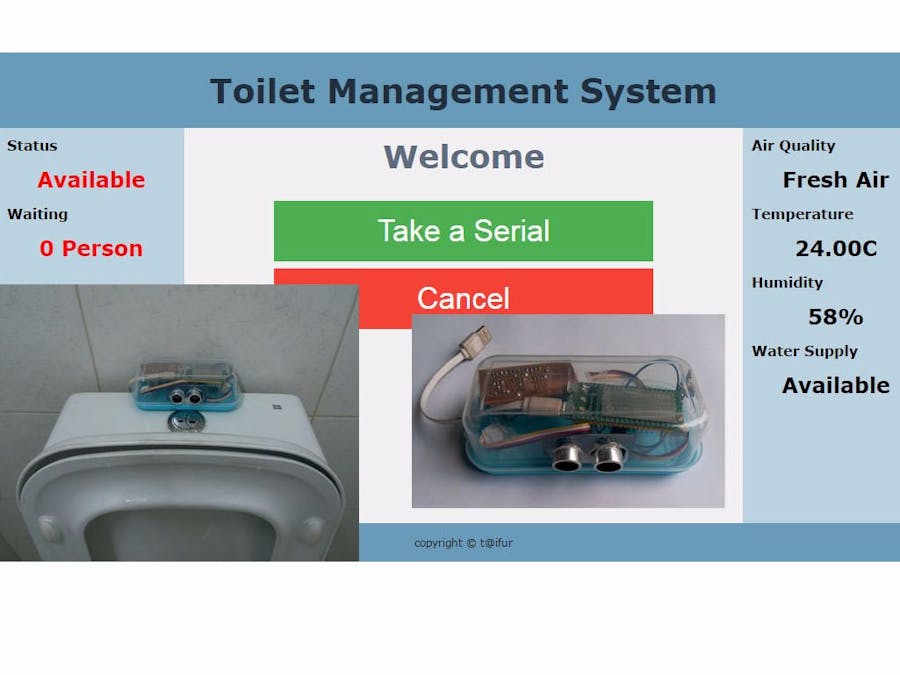
I used MediaTek LinkIt Smart 7688 DUO for my web-based smart system. I interfaced ultrasonic sensor with Linkit Smart to detect either the toilet is engaged or free. Other sensors (e.g. air quality, DHT) are also connected with LinkIt Smart. From a simple web interface an employee can see either the toilet is engaged or not as well as internal condition like air quality, temperature & humidity. If he found the toilet engaged he can book it using the web app and get notified when his serial comes. The system saves lots of time and we all are getting benefit from it. We are happy with the smart toilet.
In this project I will give you complete instructions how you can develop your own system. Before that enjoy the short demo video.
Steps Involved with the Project- Collecting the components (Linkit Smart 7688 DUO, Air quality sensor, ultrasonic sensor, temperature & humidity sensor, buzzer)
- Preparing Linkit Smart 7688 DUO (wifi configuration + firmware upgrade)
- Preparing Arduino Environment (adding Linkit board support)
- Programming in Arduino environment (installing required libraries and developing sketch for reading all the sensors)
- Connecting sensors and testing
- Preparing Node.js Environment (installing required modules)
- Developing Web Application & Testing.
- Packaging all the hardware.
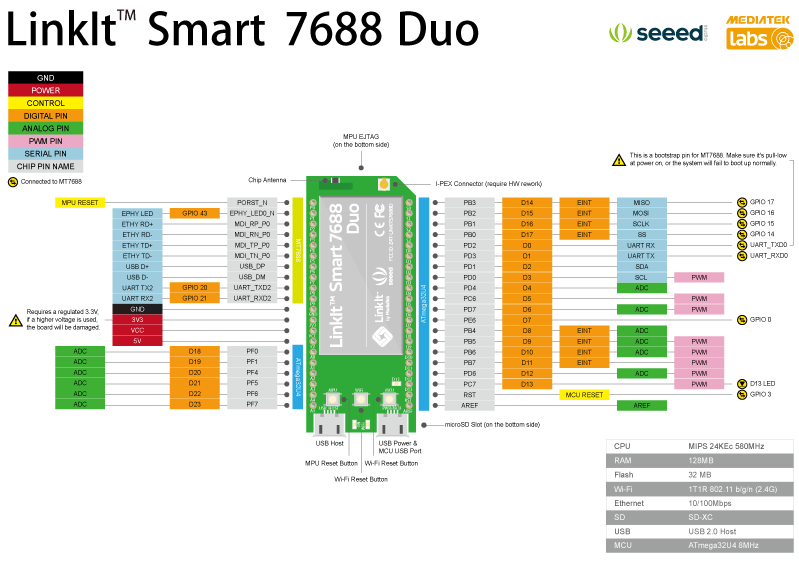
The list of all components used in the project is mentioned in the Things section with the store link. The main component of the system is MediaTek LinkIt Smart 7688 DUO. It has a MT7688 MPU unit and a ATmega32u4 MCU unit. It is based on the OpenWrt Linux distribution and offers options to create device applications in Python, Node.js and C programming language. ATmega32u4 MCU unit can be programmed using Arduino environment.
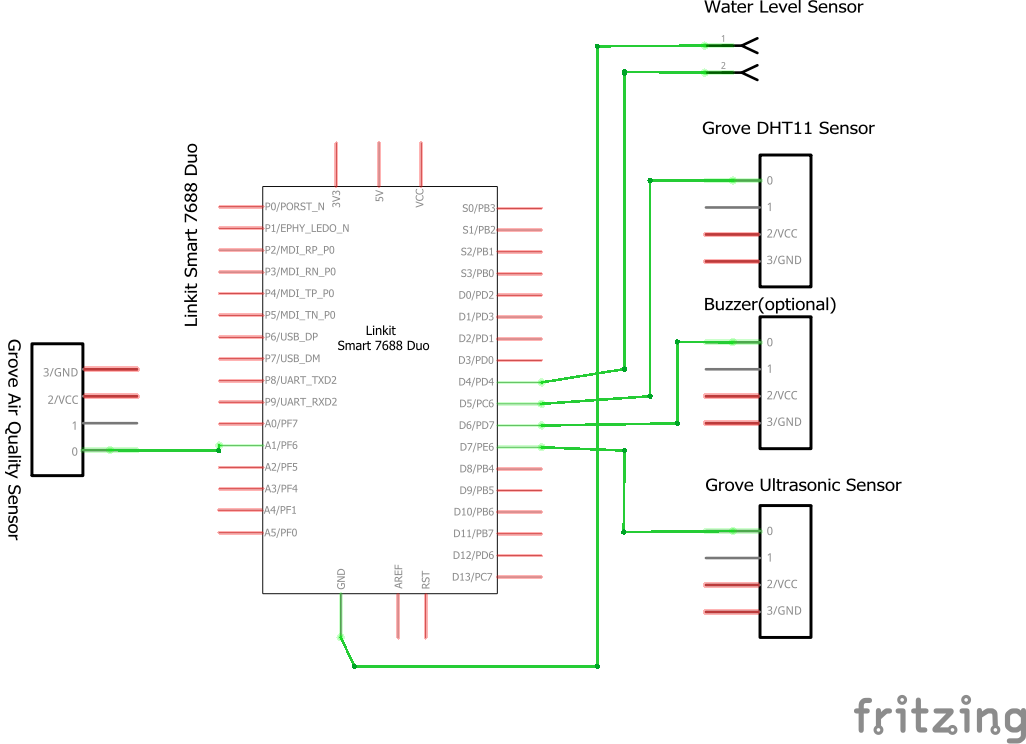
I used several sensors like Grove Air Quality sensor, Grove Temperature & Humidity sensor, Grove Ultrasonic sensor and water level detector. For easily connecting the Grove sensors to the Linkit board Grove Breakout for LinkIt Smart 7688 Duo can be used. I used Grove - Universal 4 pin connector to make my own breakout.
Air quality, Temperature & Humidity sensors are used to monitor the internal condition of the toilet. Water level detector is used to sense either water is available or not. The Ultrasonic sensor is the main sensor for the project. I am sensing the presence of a person in the toilet using ultrasonic sensor. Buzzer is used to sent any emergency alert to the person using toilet (option is not implemented in node app yet).
Step 2: Configuring Linkit Smart 7688 DUOTo work with the Linkit Smart board you first need to configure the wifi connection. Linkit Smart can connect both Access Point and Station Mode. In my project it is working as a web server and for that I configure it in Station Mode. A new Linkit Smart first connects as Access Point mode. Using your computer or smart phone you can configure it from Access Point mode to Station Mode very easily. To configure the board please follow the Get Started Guide from MediaTek. LaurenceHR has publish an excellent tutorial on Getting Started with Station Mode of LinkIt Smart 7688 Duo.
Before going further I assumed you have successfully configured your board in Station Mode.
Step 3: Preparing Arduino Environment for Linkit Smart 7688 DUOFor reading the sensors I used ATmega32u4 MCU unit of Linkit Smart Board. The board support Arduino programming and I took the advantage. To program the board with Arduino IDE you need to add LinkIt Smart 7688 Duo development board support package in Arduino IDE. To add the support package to Arduino IDE please visit the link from MediaTek labs official webpage.
Step 4: Writing and Uploading Arduino Sketch to Linkit Smart HDKThe complete Arduino sketch for reading all the sensors is attached in code section. For properly compiling the sketch some libraries are required (e.g. Air Quality Sensor library, Ultrasonic Ranger library, DHT11 Library). All the libraries are attached to my Github repository. Before compiling the sketch you must include all the libraries to the Arduino environment.
I setup two serial ports to the code. Serial port 0 (Serial.begin(9600)) is for displaying the sensors data to Arduino terminal and Serial port 1 (Serial1.begin(57600)) is for transferring data from ATmega32u4 MCU to MT7688 MPU. Though other protocols like Firmeta are available I am using serial protocol for MCU to MPU communication. We will receive the data from MPU using Node.js environment and for that we will be required serialport a popular node module pre-installed in Linkit Smart HDK.
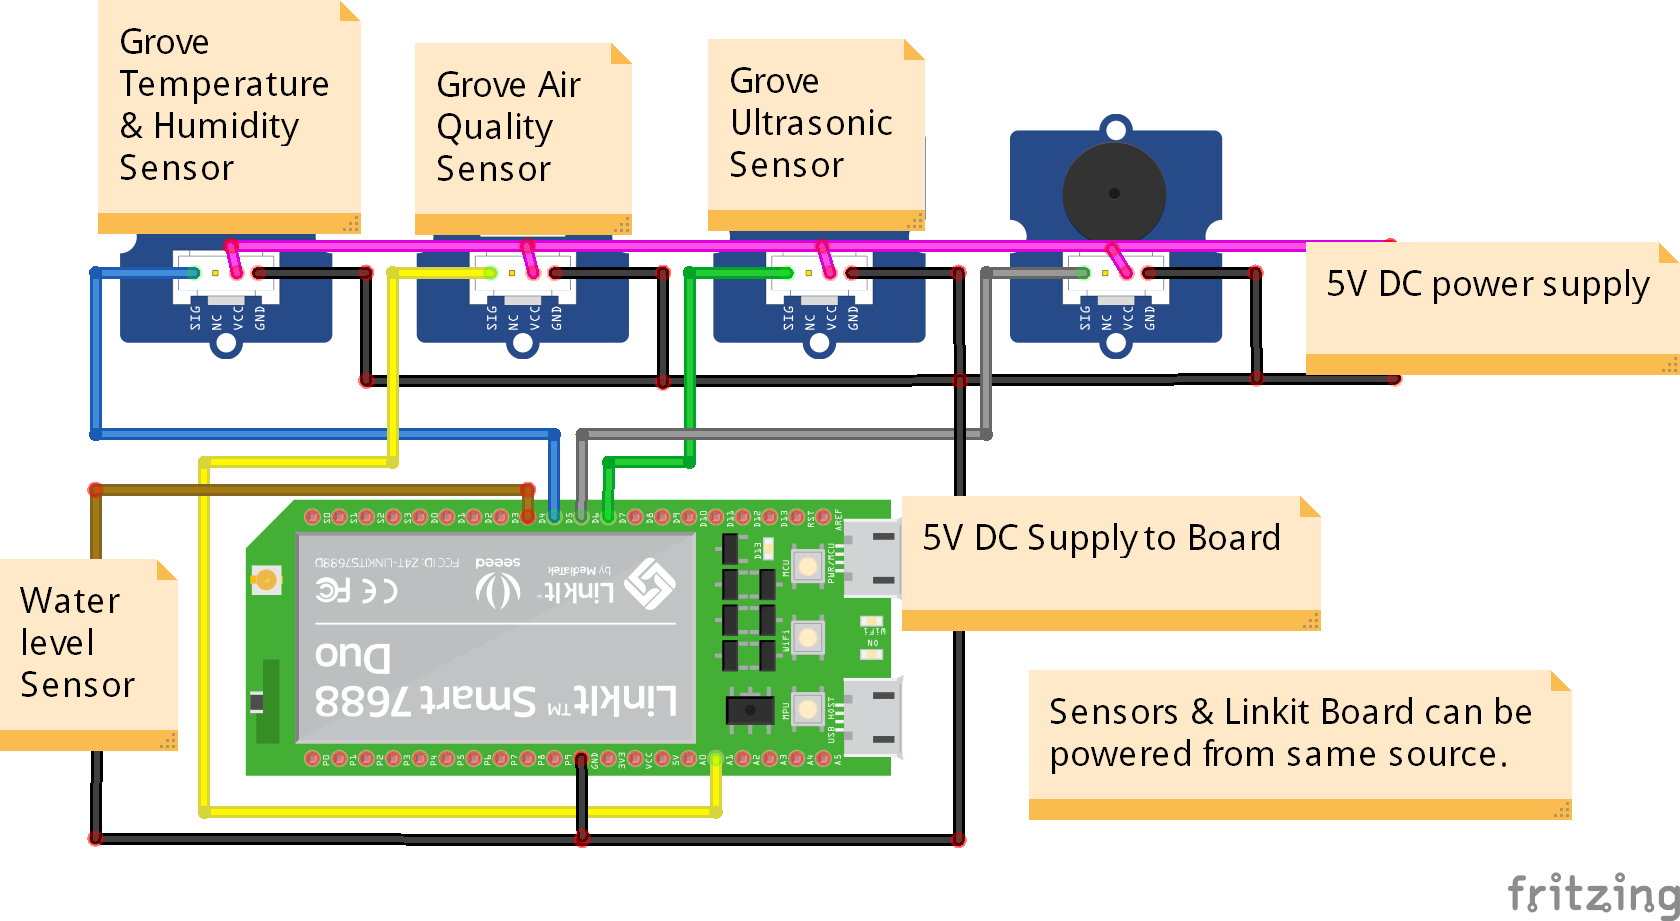
Step 5: Connecting Sensors and TestingAfter successfully uploading the sketch to the LinkIt Smart 7688 Duo board you can test either all are working or not. To test connect all the sensors to the board using Grove breakout. Follow the schematic attached to the schematic section to connect the sensors to the board.
After completing the connections attache a USB cable to USB PWR port of LinkIt board and connect it to your computer. I am powering all the sensors without water level sensor from the 5V pin of LinkIt board for testing. For permanently use it is recommended to power the sensors directly from the source not from the 5V pin of LinkIt Board.
Now, open the Arduino serial monitor to observe the reading from the sensors. I got the following result for my test case and I found all the sensors perfectly working.
In this step I will show you how I develop Node application for my LinkIt HDK. I developed the complete application to my Windows PC and then transferred all the necessary file to the LinkIt board using WinSCP. But you can also develop complete application to your Linkit board. I found the first step convenient.
So, Let's start working.
Step 6.1: Accessing the System Console of the LinkIt Smart 7688 Duo development board using PuTTY
- Download PuTTY for windows from http://www.putty.org/
- Open PuTTY and in the configuration window, type
mylinkit.localor the IP address of LinkIt device in Host Name (or IP address) field, select the SSH and then click Open, as shown below.
- A PuTTY Security Alert pops up. This happens when you use PuTTY for the first time, after updating the firmware or make use of a different board. Click Yes.
- The PuTTY terminal window displays. Sign in with the username root and the password you set previously in the Web UI.
- After signing in you should see a screen similar to the one below. (If you get the message Access Denied, make sure you set an alphanumeric password in Web UI.
- Make a directory as smart-toilet by typing mkdir smart-toilet as shown below. We will upload all the necessary files to this directory later.
The web application has two parts. One part is for server side and another for client side. I named server side program as app.js and client side program as index.html. Server side program is developed using Node.js with some node modules and client side program is developed using JavaScript, HTML & CSS. So, let's start.
- Download & Install Node in your PC from https://nodejs.org/en/
- Open Node.js command prompt from start menu.
- Make a directory as smart-toilet.
- Go to the directory you just created.
- Type the command npm init to create a package.json file. It'll ask you some questions, answer them in the following way. To keep anything default just press enter.
This will create a package.json a node.js configuration file. Now we need to install express framework and Socket.IO module.
- To install express and Socket.IO and save them to package.json file, enter the following command in your terminal, from your project directory:
npm install --save express socket.io
- Then, create a file called app.js in the project directory using window's explorer.
- The app.js is the server program we are going to develop. Enter the following code in your app.js file to set up an express application.
var app = require('express')();
var http = require('http').Server(app);
    app.get('/', function(req, res){
    res.sendfile('index.html');
});
http.listen(3000, function(){
    console.log('listening on *:3000');
});
Use any text editor you like. I am using Notepad++ one of my favorite editor.
- Now, we need an index.html file with app.js to access server information from client side. So, create a new file called index.html in the project directory and enter the following into it to test either our setup is working or not:
<!DOCTYPE html>
<html>
    <head><title>Hello world</title></head>
    <body>Hello world</body>
</html>
- To test if this works, go to the node command window and run the node app using the following command
node app.js
This will run your server on localhost:3000.
- Now, go to your browser and enter localhost:3000 to check this You will get the following result if all are OK.
You got it? Congratulation!! Your node environment is perfectly working and you successfully created your first node app. You can also test it from your LinkIt board.
Now, let's complete our app. The complete application for the project "Toilet Management System" is attached in code section. I am explaining some important parts here.
I used several node modules for the project. So, first I imported all the modules as like as following:
//importing required modules
var app = require('express')();
var http = require('http').Server(app);
var io = require('socket.io')(http); //creates a new socket.io instance attached to
//http server
var serialport = require("serialport");
var SerialPort = serialport.SerialPort;
//routes the index.html file
app.get('/', function(req, res){
	res.sendfile('index.html');
});
Then, I setup the serial port to receive the data from the MCU unit to the MPU to use the data in our node application.
//setup serial port
var sp = new SerialPort("/dev/ttyS0", { //for serial communication with arduino chip
   baudrate: 57600,
   parser: serialport.parsers.readline("\n")
});
After successfully opening the serial port I am checking for any socket.io client connection. For a client connection I am receiving the data from Arduino microcontroller and after processing the data I am sending the required information to the connected client using WebSocket protocol.
//triggers when connected to serial port
sp.on("open", function () {
	//trigger on connection to any client
   io.on('connection', function(socket){
	console.log('A user connected (id=' +socket.id + ').');
	//In order to send an event to everyone, Socket.IO gives us the io.emit:
   //this function is triggered on any serial data received
	sp.on('data', function(data) {
           console.log("Serial port received data:" + data);
           //data gets split by " " to get the values and stored in result array
           var result=data.split(" ");
			var temperature = result[1];
			var humidity = result[2];
			var air_quality = result[3];
			var distance = result[4];
			var water = result[5];
			var air_status; var water_supply; var toilet_status;
			if(air_quality == 3)  air_status = 'Fresh Air';
			else if(air_quality == 2)  air_status = 'Low Pollution';
			else if(air_quality == 1)  air_status = 'High Pollution';
			if(water>30) water_supply = 'Available';
			else water_supply = 'Not Available';
			if(distance<10) {toilet_status = 'Engaged'; flag = 1; engaged = true; if(button_flag){total_clients++; button_flag = 0;}}
			//if(distance<10 && flag==1) toilet_status = 'Engaged';
			else if(distance>20 && total_clients<1) toilet_status = 'Available';
			else if(distance>20 && total_clients>=1) {toilet_status = 'Engaged'; if(button_flag) total_clients++; }
			//socket.emit sends data to all client
			//data is updated in every 2s
			socket.emit('update', { temp: '24.00C', humid: '58%', air: 'Fresh Air',
									stat: 'Available', per: '0 Person', water: 'Available'});
			if(distance>20 && flag==1) {
				flag = 0; engaged = false; button_flag = 0;
				io.to(connected_clients_id[0]).emit('info', 'it is your time');
				connected_clients_id.splice(0, 1);
				if(total_clients>0)total_clients--;
				socket.emit('person', { per: (total_clients-1).toString()+' Persons'});
			}
   });
For implementing WebSocket protocol, I used Socket.IO module. Socket.IO is a JavaScript library for realtime web applications. It enables realtime, bi-directional communication between web clients and servers. It has two parts: a client-side library that runs in the browser, and a server-side library for node.js. Both components have a nearly identical API. I add socket.io library for client side in index.html file using following command:
For transferring data from server to all connected client you have to use socket.emit( ) method. For sending the data to a specific client I am using io.to(socket.id).emit( ) method. Here, socket.id is the unique id for every connected client.
Step 7.1: Transferring the developed Node Application to LinkIt Smart 7688 Duo boardAfter developing the complete node application in you PC it is the perfect time to transfer the application files to Linkit board. Let's do it.
- Download WinSCP from https://winscp.net/eng/download.php and install it in your PC. (WinSCP is used for transferring application files from my PC to LinkIt Smart 7688 Duo board).
- To connect with your LinkIt Smart 7688 Duo board with WinSCP follow the image below. (1. Select SCP as file protocol, 2. Type the IP address of Linkit Board, and 3. Use the username and password you used when connecting with PuTTY)
- Click on Login button, you will get following result while connecting with the board.
- After successfully connecting you will see the directory smart-toilet you have created earlier using PuTTY as like following.
- Transfer index.html, app.js and package.json files from your PC to LinkIt's smart-toilet directory by dragging all the files from left-side (your PC) and dropping to the smart-toilet directory. All the files are attached to the code section and also available on my Github.
- Now, you need to install Express and Socket.IO and save them to package.json file for later. To do this, go to the PuTTY and type the following command in terminal (we did the same in our PC):
npm install socket.io express --save
- After successfully installing the modules you will get the following confirmation. We don't install serialport module because it is pre-installed with node in LinkIt board.
OK, our node environment is now ready with all the required modules and we also imported node application from the PC to LinkIt means we are ready to start our application.
- To start and test the application we should connect all the sensors to the LinkIt board. Connect all the sensors to the LinkIt Smart 7688 Duo board and power it up. I powered all using USB port.
- Go to the PuTTY terminal and from the smart-toilet directory enter the following command to run the app.
npm app.js
You will get following result from the terminal means our node application is receiving all the necessary data from MCU unit using serial port.
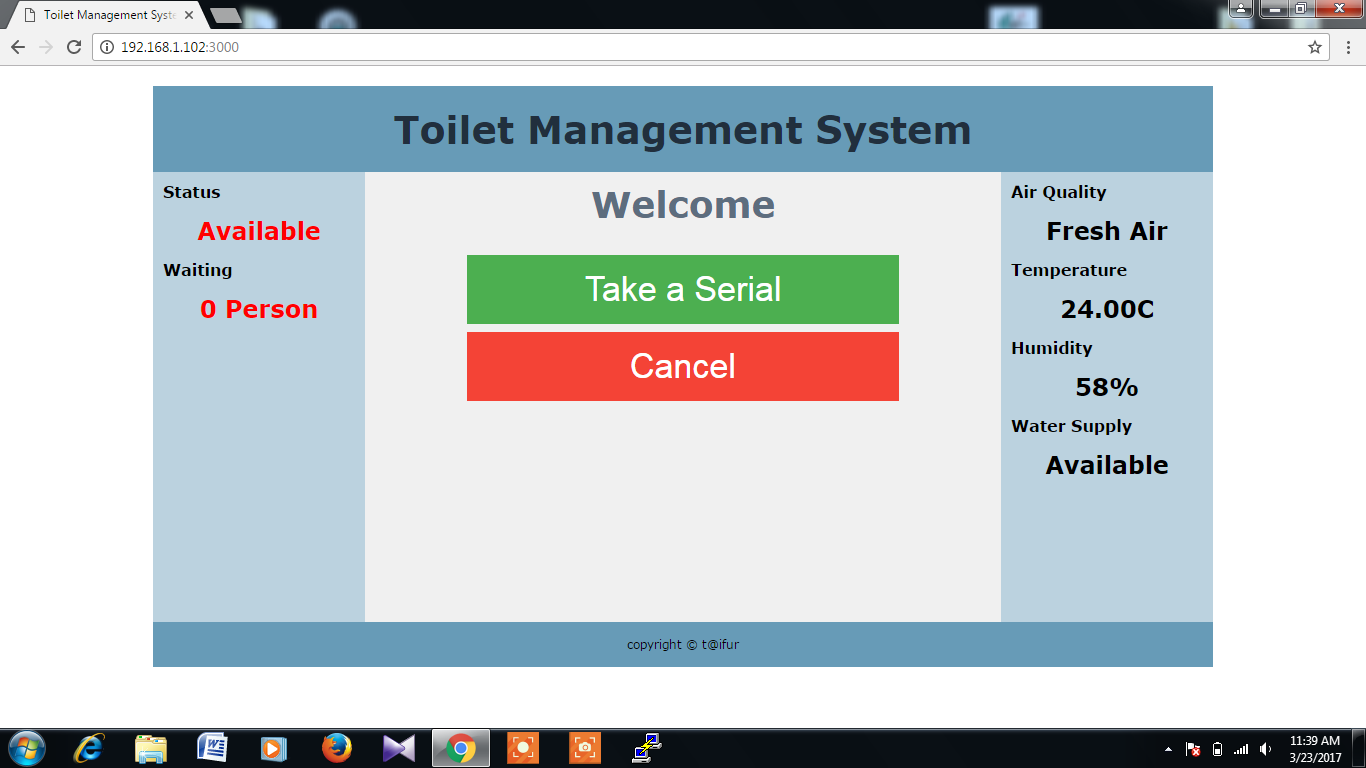
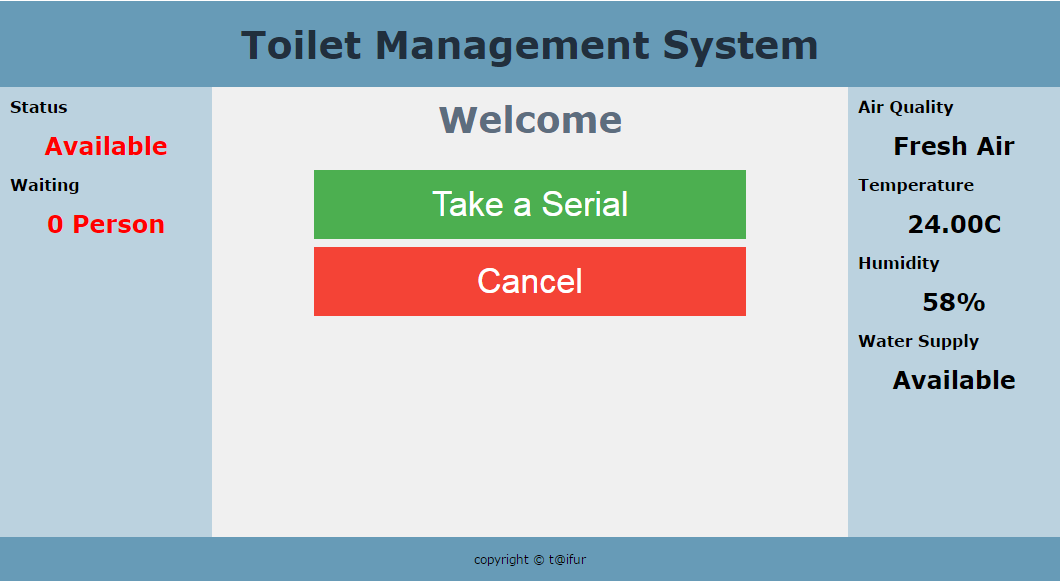
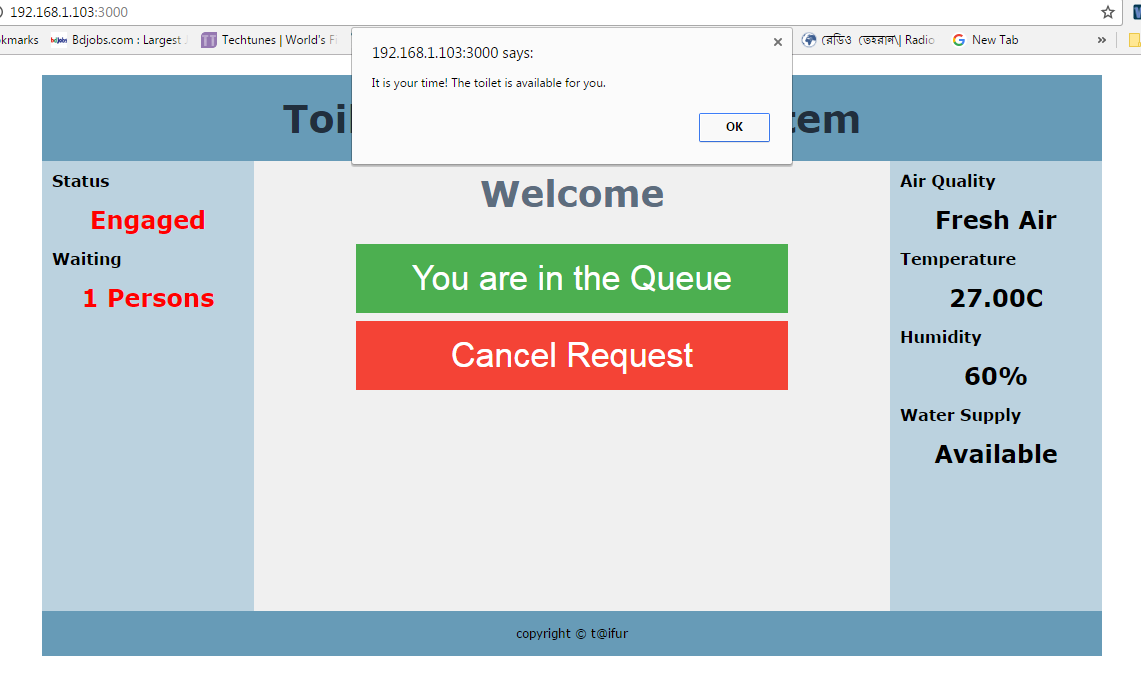
- Now, from your PC open a browser and type the IP address of LinkIt board and port number you used in your app.js file as like as 192.168.1.102:3000 in the address bar (here 3000 is the port number we used in our app.js file). You will get following output:
Congratulation!!! You have successfully created a smart Toilet Management System.
Step 7.2: Configuring the node server to start automatically at bootBy default node apps are not automatically started if the system is restarted. To ensure that our node app restarted automatically after a reboot we should make some change on system configuration file. There are several way to do this. One of the easiest way is to add our app in rc.local file.
- To add your app, open the rc.local file using vim by typing the following command in terminal (rc.local file is in etc directory):
vim /etc/rc.lcoal
The rc.local file will be open. Add the following command
node /root/smart-toilet/app.js
before exit 0 as shown in the image below.
- Now, press the esc key from the keyboard and type :wq to save and exit.
Your node server is ready to start automatically on every restart. If you try to access the server from the browser in this stage it may not work. Don't panic! The problem is about the route of the index.html. To solve the problem we need some modification on app.js file. Open the app.js file and make the path of index.html relative by adding full path of the index.html to app.get() function.
Three lines within red boxes are added to app.js file.
- Restart the LinkIt board and try access the app from the browser. This time it should work perfectly.
We successfully completed our system development phase. Let's decorate our hardware.
Step 8: Enclosing all the ComponentsI enclosed all the components in a single 6 inch x 2.5 inch plastic box. Definitely a 3D printed box will be a elegant choice but I don't have access to 3D printer and for that I am using plastic box. It works well. According to ultrasonic ranger I made two holes in the middle of the box using hot soldering iron.
Then, I made another two holes in two sides of the box to place air quality sensor and temperature & humidity sensor. I made one hole slightly bigger to bring out power cable and two wires for water level sensor.
After making the holes I placed ultrasonic ranger first. Then I placed another sensors.
I used some hot glue to fix the sensors in right place.
After placing the sensors I placed my LinkIt Smart board and then the breakout.
Finally, I placed all the wires and cables inside the box and then attached the cap.
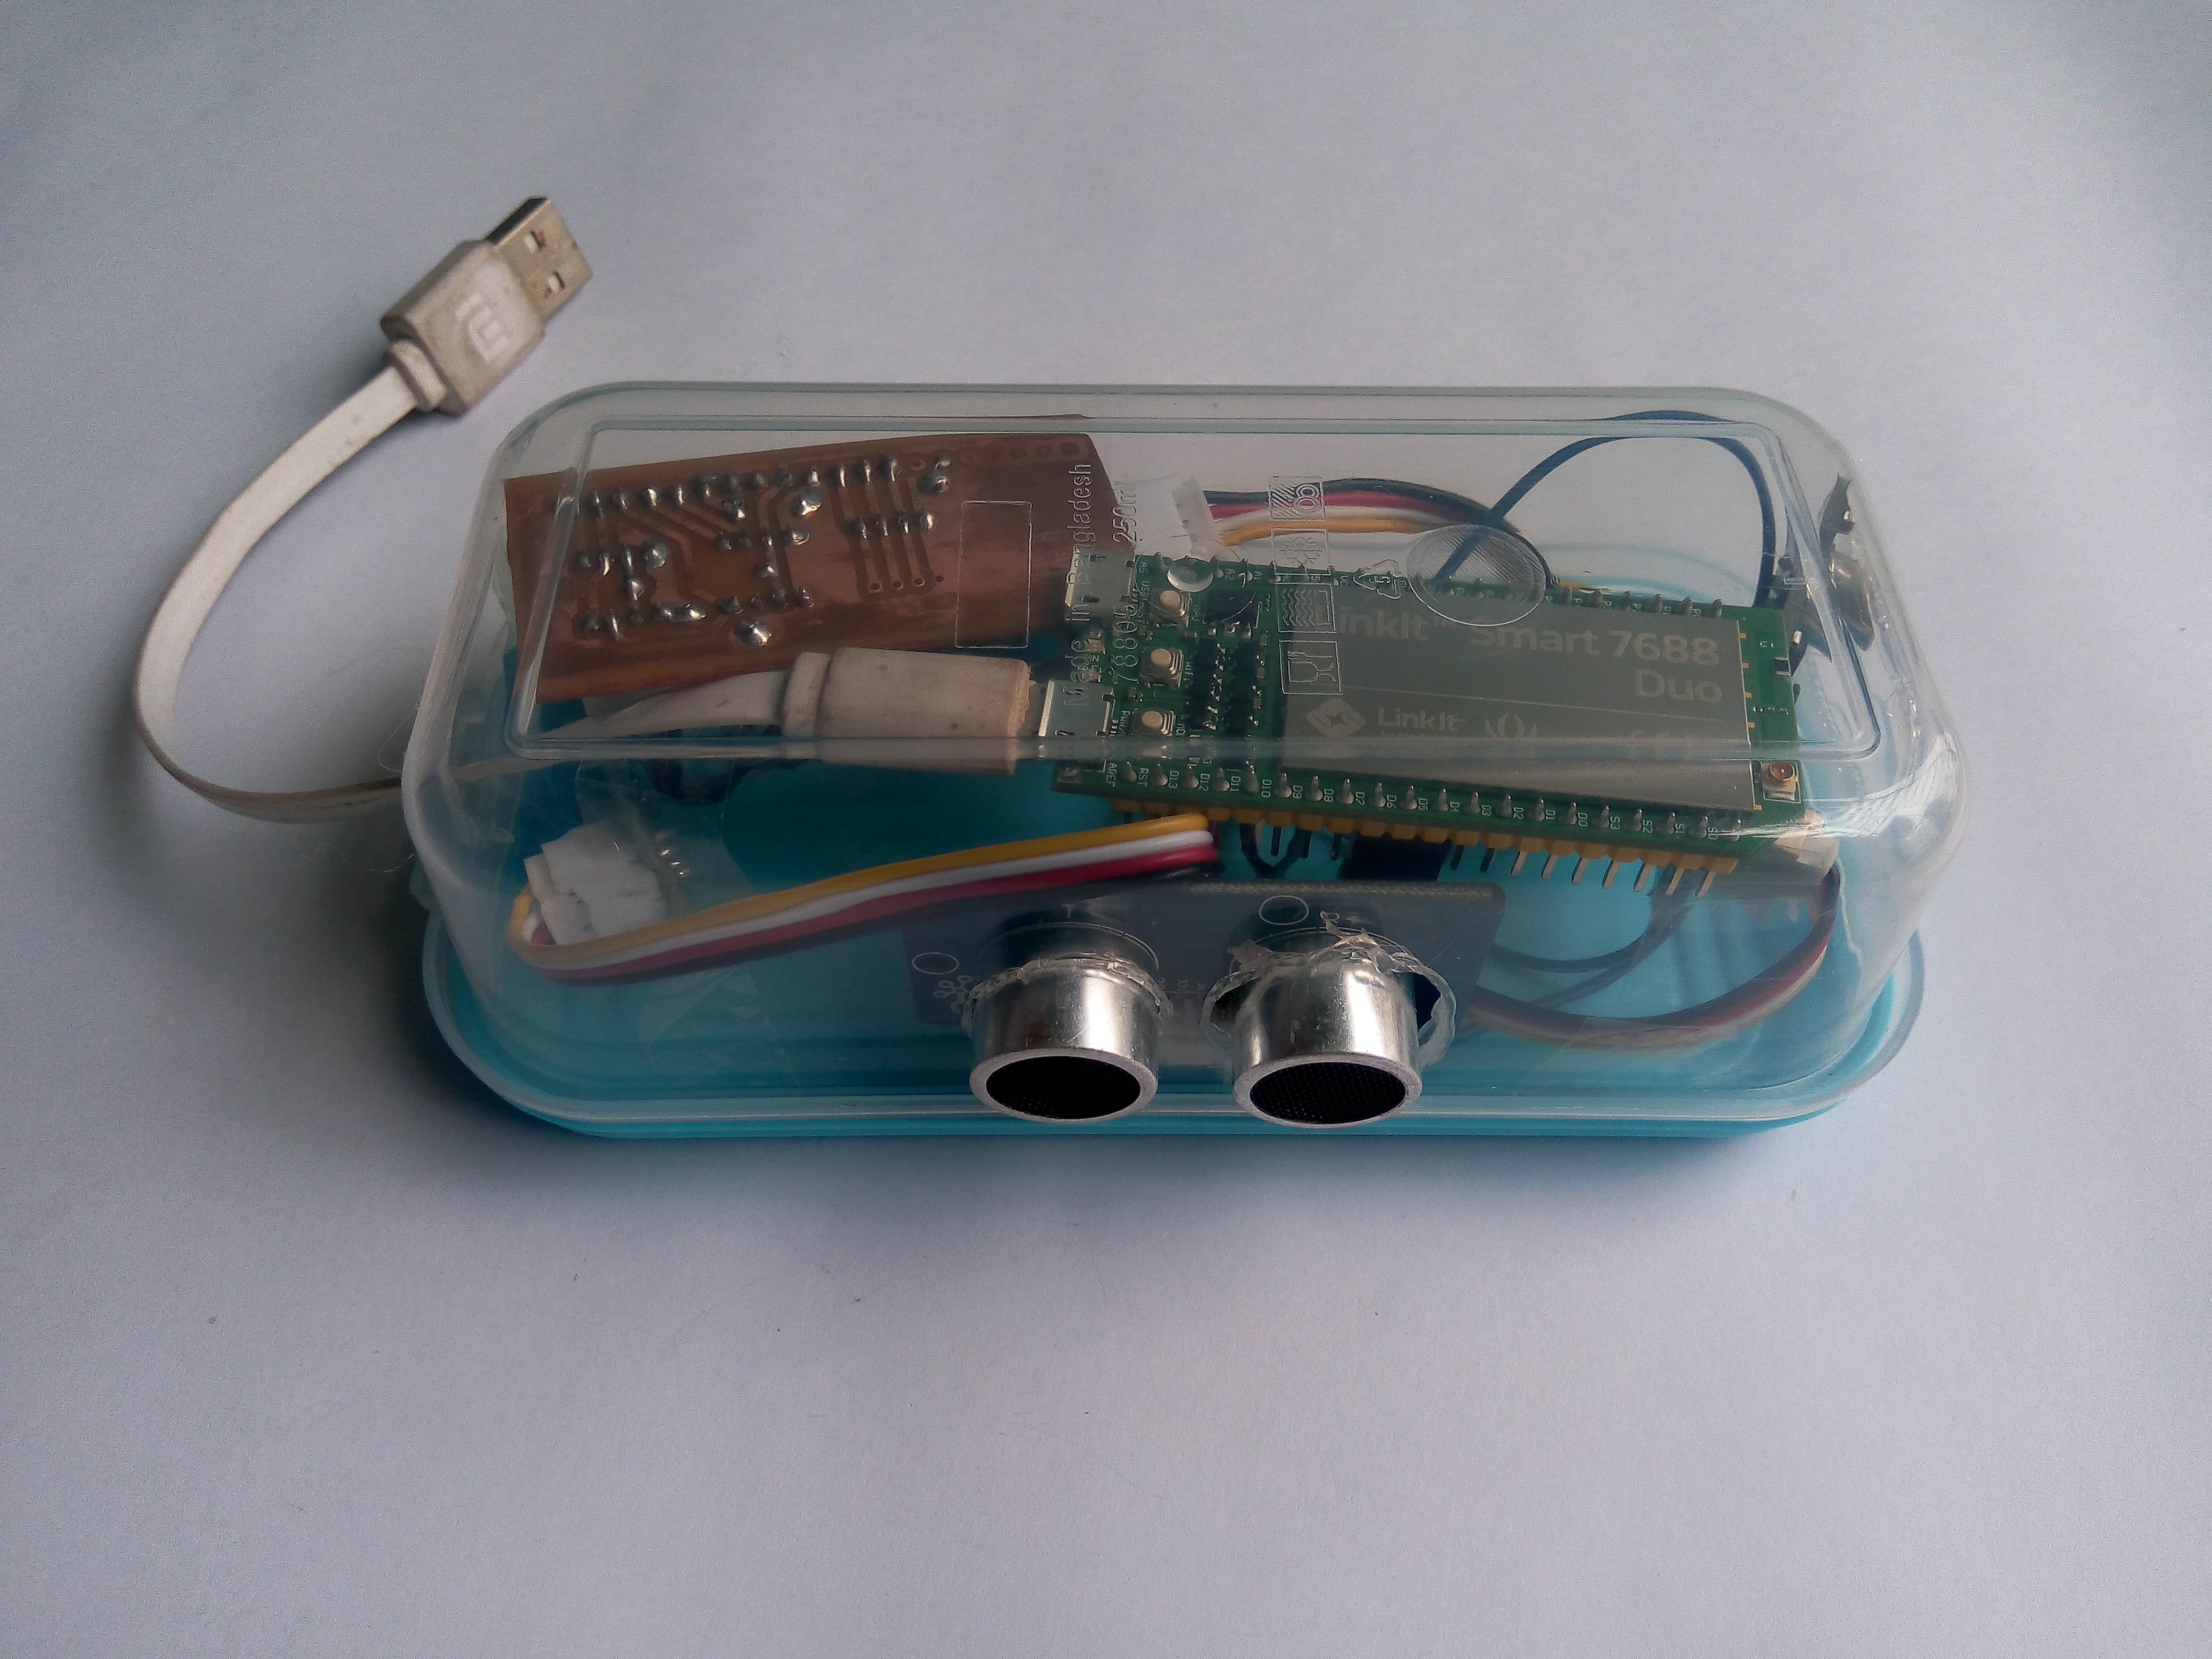
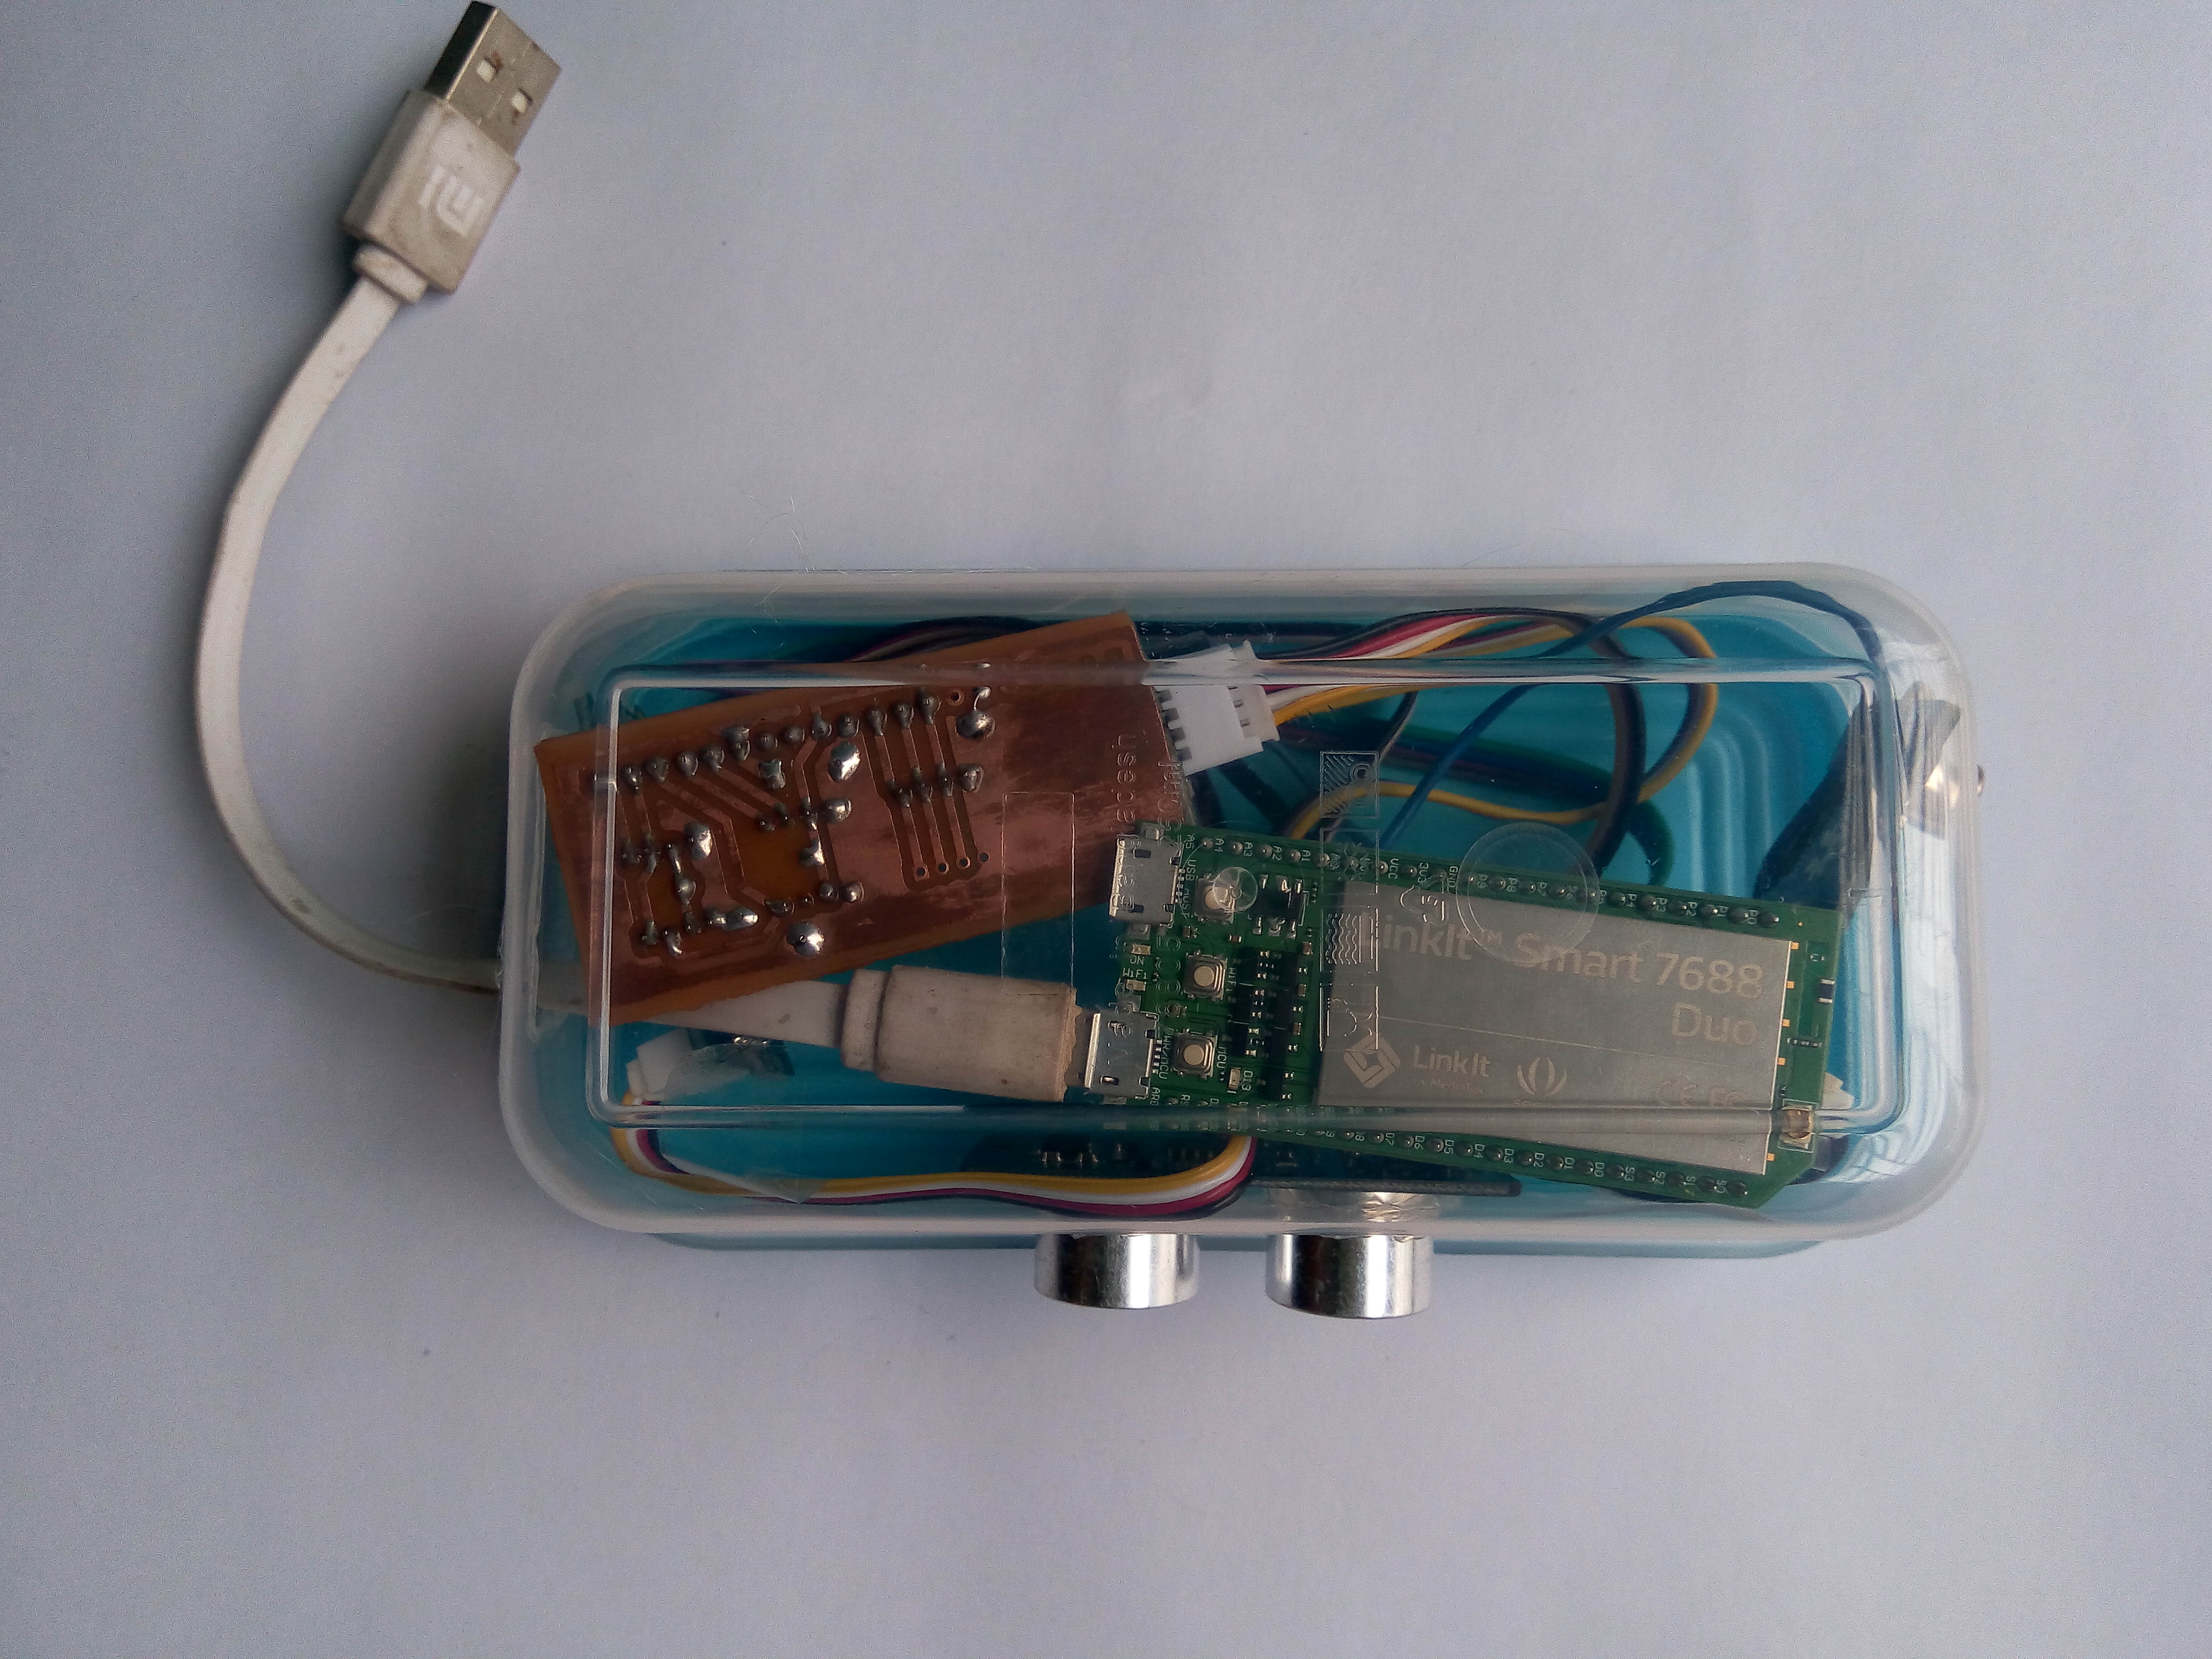
The final enclosed device looks like following. The white cable is for providing power in the device and sensors.
After completely enclosing all the components to the box I placed it in my toilet.





Comments
Please log in or sign up to comment.