The temperature and humidity of the air in your bedroom are important for a comfortable sleep. Generally, we turn on the air conditioner to adjust the temperature, but it can be difficult to adjust the temperature at bedtime, as it can be cold when the air conditioner is on, or too hot and stuffy to sleep without it. In Tokyo, where I live, it is not that hot at night except for a few days in the middle of summer when it is very hot, and sometimes it is just fine to open the windows and let the cool air in. However, even with the windows open, it can be too cold in the morning, making it difficult to adjust the air quality in the bedroom. Just to note, in most parts of Japan, it is safe to sleep with the windows open. It's so safe that there was a big fuss over a small monkey the other day.
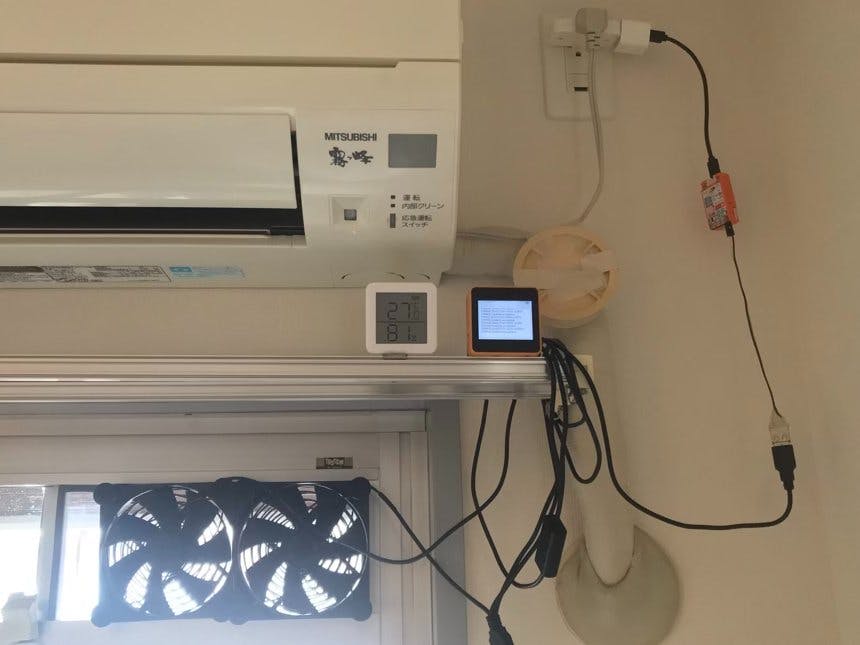
We will create an IoT system that automatically turns on and off the fan in the room based on the data from the thermometer.
Since many elements work together, we will explain each element in turn.
The source code is here.
https://gist.github.com/takeru/c1505539a3621898d1318d0ba15c51ca
It is based on the Core2 tutorial and sample code from the esp-aws-iot library, so please refer to the original for detailed configuration and build settings.
https://github.com/m5stack/Core2-for-AWS-IoT-EduKit/tree/master/Smart-Thermostat
https://github.com/espressif/esp-aws-iot/tree/master/examples/thing_shadow
SwitchBot MeterThis is a thermo-hygrometer that flies data via BLE. The protocol has been analyzed, so you can use ESP32 to get the data.
I think it is the best temperature and humidity sensor because it is small, can be placed anywhere, and runs on AA batteries for over a year.
In this case, I'm going to put it near my pillow in my bedroom. The temperature in the room is different between the top and bottom, and also between the window and the bedside. It takes some trial and error to figure out where to measure the temperature. At the very least, I don't think you can really make a comfortable adjustment if the thermometer is fixed next to the control system.
Core2 -- Send temperature data to AWSTemperature and humidity data acquired from the SwitchBot Meter via BLE is sent to the AWS IoT Core. It sends the data only when there is a change in the data.
https://qiita.com/takeru@github/items/f42381e8482c3bf484e7
This is based on the code in the thermostat tutorial, with the addition of BLE processing and a command to change the LED color.
I've also fixed a bug in the textarea handling part of the original code. I'll make a pull request later if I remember.
Cloud -- Determine fan behavior from dataI would like to somehow process the temperature data sent to AWS IoT with an AWS service and send a message to the device controlling the fan telling it to turn on or off.
AWS is very flexible, so if I sent the data to IoT Core for now, I could do a lot of trial and error later on to figure out which service to use to process the data and how.
In this case, we first implemented the decision logic using Dynamo+Lambda. After that, we had to switch to the method of republishing messages within IoT Core's Rule.
DynamoDB+LambdaThe first thing I did was to store the data in DynamoDB.
We put the following query in the DynamoDBv2 rules of IoT Core.
SELECT *, topic(3) as client_id, timestamp() as aws_timestamp FROM '$aws/things/+/shadow/update/accepted'The topic(3) extracts the part of the topic that corresponds to thingName.
The destination DynamoDB table is
Partition key: client_id (String)
Sort key: aws_timestamp (Number)
We'll set it up like this.
Next, we will create a Lambda. In this Lambda, we will read a few data from the latest data stored in DynamoDB, and send a command based on the data to determine the fan behavior. The reason for retrieving several data is that we were thinking of using time series changes or averages as the logic to make decisions.
The code is a bit long so please refer to the link.
The fan is turned on when the temperature is above 30 degrees Celsius. I also changed the color of the LED so that you can see how it is working.
If you run this periodically, such as every minute, you should be able to control the fan ON/OFF according to the temperature.
M5StickC -- Fan controllerNow that we have the logic to turn the fan on and off on the cloud side, the next step is to create the device that will actually run the fan.
We could have crammed this function into Core2, but since this is an IoT Core project, we decided to implement it as a separate thing and try to work with multiple devices.
The GPIO of the M5StickC cannot output enough current to run a fan. If you want to run the fan, you will need to use a relay unit or something similar.
https://docs.m5stack.com/en/unit/relay
https://docs.m5stack.com/en/unit/ssr
However, this time we will use a technique to turn on/off a larger current with the M5StickC alone. By manipulating the power supply IC with I2C, we can turn the 5V output on and off.
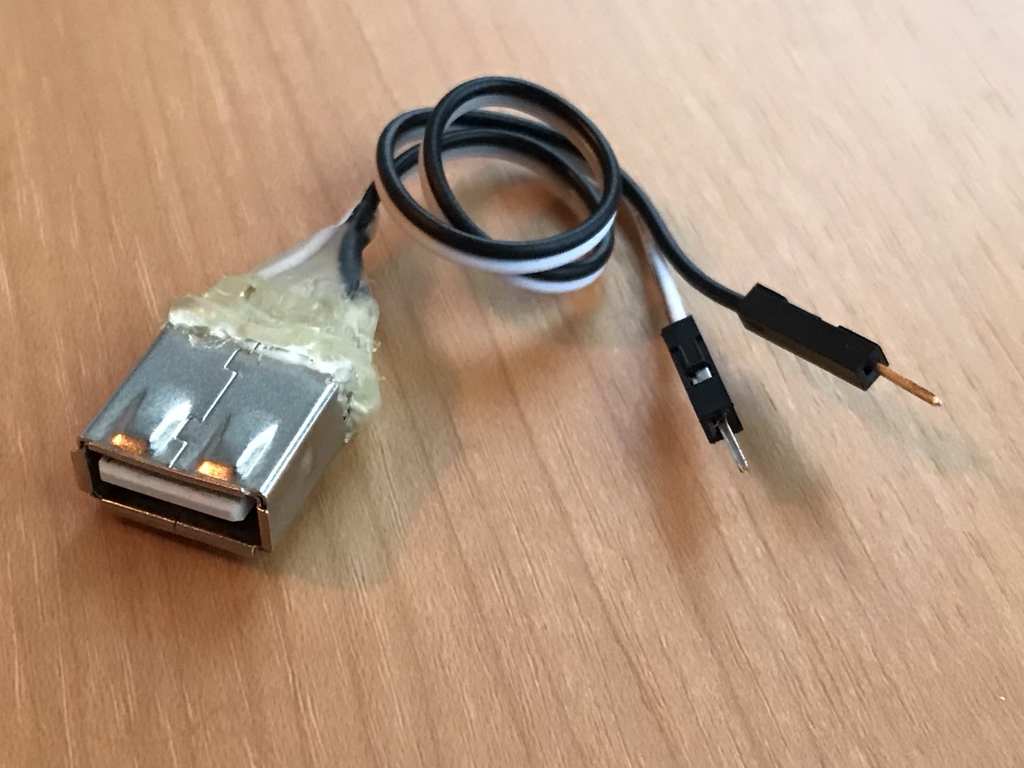
It converts the output of the 5V pin to a USB connector and turns a fan that takes power from the USB.
See the file m5stickc_5v.cpp at the link for the code.
Note: This technique for controlling 5V will only work with newer versions of the M5StickC. You need something newer than what is called the blue perfect version.
Arduino + AWS IoT CoreThe Core2 project is based on the thermostat tutorial, so it was an ESP-IDF project. it is developed using FreeRTOS tasks, but it seems to be more difficult than Arduino. The M5StickC library and peripheral device libraries are available for Arduino, so it would be nice to be able to use them.
The AWS IoT component (https://github.com/espressif/esp-aws-iot) is for ESP-IDF, so I can't use it with Arduino.
I did some research and found a way to incorporate the Arduino core library into the ESP-IDF project as a component and use the Arduino code and library.
https://docs.espressif.com/projects/arduino-esp32/en/latest/esp-idf_component.html
Follow the instructions here to embed the Arduino core in the components. I also installed the AWS IoT library in the components.
Now you can use IoT Core components while using the usual Arduino libraries.
The code is basically similar to that of the Core2 ESP-IDF project, but I feel better about it because I don't use the FreeRTOS task functions to process each task. There may be some performance issues, but for a hobby project, I think this is a good option.
AWS IoT -- Rule RepublishI created the logic for fan control with DynamoDB and Lambda. However, it is somewhat inefficient to store all messages in DynamoDB and run Lambda periodically. I think I can do better.
I set up a Rule to store the messages in DynamoDB, and in the action of this Rule, there was an action called Republish. It can receive messages, process them, and publish the processed messages.
The query now looks like this.
SELECT
  CASE current.state.reported.temperature > 27.5
  WHEN true THEN 1
  ELSE 0
  END
  AS state.desired.fanSpeed
FROM '$aws/things/012395fb0a29199a01/shadow/update/documents'
WHERE current.state.reported.temperature > 28.0 OR current.state.reported.temperature < 27.0
The fan turns on when the temperature is above 28 degrees Celsius and turns off when the temperature is below 27 degrees Celsius. We are able to achieve a logic with hysteresis in such a short query.
AS state.desired.fanSpeedThe JSON output from this will look like this.
{
    "state": {
        "desired": {
            "fanSpeed": 1
        }
    }
}
Set the topic's destination like this.
$$aws/things/M5StickC-003/shadow/updateNow we can update the shadow of this thing.
DebugAWS_PROFILE=awsiot-admin-202108 AWS_DEFAULT_REGION=ap-northeast-1 aws iot-data update-thing-shadow --endpoint-url "https://a15o79dfbws0i-ats.iot.ap-northeast-1.amazonaws.com" --thing-name "M5StickC-003" --cli-binary-format raw-in-base64-out --payload '{"state":{"desired":{"fanSpeed":1}}}' output.txtThis command will allow you to update the shadow. This is useful to verify that a part of the system is working correctly.
You can use the test tool in the AWS console that allows you to subscribe to and publish MQTT to view and send messages for debugging.
https://console.aws.amazon.com/iot/home#/test
You can also look at the Device Shadow documentation in the IoT Core thing. If something doesn't work properly, use these to check one by one.
Web InterfaceThe ventilation system is connected to the Internet. You may want to control it with your smartphone.
Let's create a controller for the ventilation system using Amplify, a website building framework.
https://docs.amplify.aws/lib/auth/getting-started/q/platform/js/
First, let's create a website with a login function using this tutorial as a guide. I used Cognoto, but I think other logins will work as well.
Next, configure your site as described in this PubSub article.
https://docs.amplify.aws/lib/pubsub/getting-started/q/platform/js/
This is all you need to create a web application to communicate with AWS IoT MQTT.
The completed code can be found at the link. Amplify-App.js
We have created an IoT system for automatic ventilation by combining a device with ESP32 from M5Stack and AWS services.
ESP32 can also use HTTP, so it can connect to ordinary WebAPI. Until now, I have also used HTTP. However, by using MQTT-based AWS IoT this time, and combining AWS services, I was surprised at how convenient the world of IoT development has become, including even the cloud side.
For now, I found out that IoT devices can be implemented simply by using device shadow and connecting them to AWS, which makes it very easy to implement subsequent development in conjunction with the cloud.
By using Amplify, we were able to create a system that connects IoT devices to smartphones and the web very easily.
=========Japanese温度計のデータをもとに部屋のファンを自動的にON/OFFするIoTシステムをつくります。
たくさんの要素が連携して動作するので、各要素を順に説明していきます。
ソースコードはここにあります。
https://gist.github.com/takeru/c1505539a3621898d1318d0ba15c51ca
Core2のチュートリアルやesp-aws-iotライブラリのサンプルコードをベースにしていますので、詳細の設定方法やビルドの設定はオリジナルのものを参照してください。
https://github.com/m5stack/Core2-for-AWS-IoT-EduKit/tree/master/Smart-Thermostat
https://github.com/espressif/esp-aws-iot/tree/master/examples/thing_shadow
SwitchBot MeterBLEでデータを飛ばしてくれる温湿度計です。プロトコルが解析されているのでESP32でデータを取得することができます。
小さくてどこにでも置けて、単三電池で1年以上動き続けるので温湿度センサーとして最強だと思います。
今回はこれを寝室の枕元あたりに置きます。部屋の中は上の方と下の方で温度は違いますし、窓際と枕元でも温度が違います。どこで温度を測るべきかは試行錯誤してください。少なくとも、温度計が制御システムの横に固定されているのでは本当に快適な調整をすることはできないと思います。
Core2 -- 温度データをAWSに送信するSwitchBot MeterからBLEで取得した温度湿度データをAWS IoT Coreに送信します。 データに変化があったときにだけ送信しています。
コードはリンク先を見てください。
https://qiita.com/takeru@github/items/f42381e8482c3bf484e7
サーモスタットのチュートリアルのコードをベースに、BLE処理を追加したものです。LEDの色を変えるコマンドも追加しました。
また、元のコードのテキストエリアの処理部分にバグがあったので修正しています。覚えていたらプルリクエストします。
クラウド -- データからファンの動作を判断するAWS IoTに送った温度のデータをAWSのサービスでどうにか処理して、ファンをコントロールするデバイスにON/OFFを指示するメッセージを送信したいです。
AWSはとても柔軟なので、とりあえずIoT Coreに送っておけば、データをどのサービスでどのように処理するのかを、いろいろ後から試行錯誤することができました。
今回は、最初にDynamo+Lambdaで判断ロジックを実装しました。その後、IoT CoreのRule内でメッセージを再パブリッシュ方法に切り替えることになりました。
DynamoDB+Lambdaまず、初めにやったのはDynamoDBに保存することでした。
IoT CoreのDynamoDBv2のルールに以下のクエリをいれます。
SELECT *, topic(3) as client_id, timestamp() as aws_timestamp FROM '$aws/things/+/shadow/update/accepted'topic(3)はトピック内のthingNameに当たる部分を取り出しています。
保存先のDynamoDBテーブルは、
パーティションキー:client_id (String)
ソートキー:aws_timestamp (Number)
このような設定にしておきます。
次にLambda作成します。このLambdaでは、DynamoDBに保存したデータを最新のものから数件読み、それを元にファンの動作を判断してコマンドを送信することにします。何件かを取得するのは、時系列での変化や平均を用いて判断するロジックにすることを考えていたためです。
コードは少し長いのでリンク先を参照してください。
温度が30度以上ならファンをONにするようになっています。ついでにLEDの色を変えて動作状況がわかるようにもしました。
これを1分おきなど定期的に動作させれば、温度によってファンのON/OFFを制御することができるはずです。
M5StickC -- ファンコントローラークラウド側でのファンのON/OFFロジックができたので、次は、実際にファンを動作させるデバイスを作ります。
Core2にこの機能を詰め込むことも可能でしたが、せっかくのIoT Coreでのプロジェクトなので別のthingとして実装し複数デバイスでの連携を試してみることにしました。
M5StickCのGPIOにはファンを動作させることができるほどの電流を出力することはできません。ファンを動作させたい場合はリレーUnitなどを使う必要があります。
https://docs.m5stack.com/en/unit/relay
https://docs.m5stack.com/en/unit/ssr
しかし、今回はM5StickC単体で大きめの電流をON/OFFするテクニックを使います。電源ICをI2Cで操作すると5V出力をON/OFFすることができるのです。
5Vのピンの出力をUSBコネクタに変換してUSBから電源を取るファンを回します。
コードは、リンク先のm5stickc_5v.cppというファイルを参照してください。
注意:この5Vをコントロールするテクニックは新しいバージョンのM5StickCでしか動作しません。青いパーフェクトバージョンと呼ばれているものより新しいものが必要です。
Arduino + AWS IoT CoreCore2のプロジェクトはサーモスタットのチュートリアルを元にしているのでESP-IDFのプロジェクトでした。FreeRTOSのtaskをつかって開発しますが、Arduinoより難しそうな雰囲気です。M5StickCのライブラリも周辺デバイスのライブラリもArduino向けにたくさん用意されているので、これらを使うことが出来るとうれしいです。
AWS IoTのコンポーネント(https://github.com/espressif/esp-aws-iot)はESP-IDF用なのでArduinoで利用することができません。
どうにかする方法は無いかと、すこし調べてみると、ESP-IDFプロジェクトにArduinoのコアライブラリをコンポーネントとして組み込んでArduinoのコードとライブラリを利用する方法をみつけました。
https://docs.espressif.com/projects/arduino-esp32/en/latest/esp-idf_component.html
こちらの手順にしたがって、componentsの中にArduinoのコアを組み込みます。また、AWS IoTのライブラリもcomponents内にインストールしました。
これでいつものArduinoライブラリを使いながらIoT Coreのコンポーネントも利用することができるようになりました。
基本的にはCore2のESP-IDFのプロジェクトのコードに似ていますが、各タスクの処理にFreeRTOSのtaskの関数を利用しないので、気分が楽です。パフォーマンス的な問題があるかもしれませんが趣味のプロジェクトではこのような選択肢もよいと思います。
AWS IoT -- Rule RepublishDynamoDBとLambdaでファン制御のロジックを作りました。しかし、すべてのメッセージをDynamoDBに保存し、Lambdaを定期的に実行するのは、なんだか非効率です。もっとうまくできそうです。
DynamoDBに保存する際にRuleを設定しましたが、このRuleのアクションにRepublishというアクションがありました。メッセージを受けて、加工して、加工したメッセージをパブリッシュすることができます。
クエリはこのようになりました。
SELECT
  CASE current.state.reported.temperature > 27.5
  WHEN true THEN 1
  ELSE 0
  END
  AS state.desired.fanSpeed
FROM '$aws/things/012395fb0a29199a01/shadow/update/documents'
WHERE current.state.reported.temperature > 28.0 OR current.state.reported.temperature < 27.0
28度を超えるとファンがONになり、27度を下回るとファンがOFFになります。こんなに短いクエリでヒステリシスを持ったロジックを実現できています。
AS state.desired.fanSpeedこれにより出力されるJSONはこのようになります。
{
    "state": {
        "desired": {
            "fanSpeed": 1
        }
    }
}
トピックの送信先はこのように設定します。
$$aws/things/M5StickC-003/shadow/updateこれで、このthingのshadowを更新できました。
デバッグAWS_PROFILE=awsiot-admin-202108 AWS_DEFAULT_REGION=ap-northeast-1 aws iot-data update-thing-shadow --endpoint-url "https://a15o79dfbws0i-ats.iot.ap-northeast-1.amazonaws.com" --thing-name "M5StickC-003" --cli-binary-format raw-in-base64-out --payload '{"state":{"desired":{"fanSpeed":1}}}' output.txtこのコマンドでshadowの更新することができます。部分的に正しく動作していることを確認するために便利です。
AWSのコンソールの中のMQTTをサブスクライブ、パブリッシュできるテストツールをつかってメッセージを見たり送信したりしてデバッグできます。https://ap-northeast-1.console.aws.amazon.com/iot/home?region=ap-northeast-1#/test
IoT Coreのモノの中に「Device Shadow ドキュメント」を見ることもできます。うまく動かないときは、これらを使って一つずつ確認していきましょう。
Webインターフェイス換気システムはインターネットに接続されています。スマホで操作したくなりますよね。
AmplifyというWebサイト構築フレームワークをつかって換気システムのコントローラーをつくってみます。
https://docs.amplify.aws/lib/auth/getting-started/q/platform/js/
まず、このチュートリアルを参考にしてログイン機能をつけたWebサイトを作ります。私はCognotoで作りましたが、他のログインでも大丈夫だとおもいます。
次に、このPubSubの説明のとおりに設定します。
https://docs.amplify.aws/lib/pubsub/getting-started/q/platform/js/
これだけで、AWS IoTのMQTTのやり取りをするWebアプリケーションを作ることができます。
完成したコードはリンク先にあります。Amplify-App.js
M5StackのESP32が搭載されたデバイスとAWSのサービスを組み合わせて自動換気のIoTシステムを作りました。
ESP32はHTTPも利用できるので普通のWebAPIに接続できます。今までは私もHTTPを利用していました。しかし、今回MQTTベースのAWS IoTを利用し、AWSのサービスを組み合わせることで、クラウド側まで含めたIoT開発の世界がこんなにも便利になっていることに驚きました。
とりあえず、IoTデバイスはシンプルにデバイスshadowで実装し、AWSにつないでおくだけで、その後のクラウドとの連携開発がとても簡単に実装できることがわかりました。
また、AWSに接続した時点で、Webの世界とも簡単につながります。Amplifyを利用すれば、IoTデバイスとスマホやWebと接続するシステムを非常に簡単に作ることが出来ました。


Comments
Please log in or sign up to comment.