


Hardware components | ||||||
| × | 1 | ||||
| × | 1 | ||||
| × | 3 | ||||
| × | 3 | ||||
| × | 1 | ||||
| × | 1 | ||||
| × | 1 | ||||
| × | 1 | ||||
| × | 1 | ||||
| × | 1 | ||||
| × | 1 | ||||
| × | 2 | ||||
| × | 2 | ||||
| × | 1 | ||||
| × | 1 | ||||
| × | 2 | ||||
| × | 1 | ||||
| × | 2 | ||||
| × | 2 | ||||
| × | 1 | ||||
| × | 2 | ||||
Software apps and online services | ||||||
 |
| |||||
 |
| |||||
Hand tools and fabrication machines | ||||||
 |
| |||||
 |
| |||||
https://certification.oshwa.org/nl000015.html
Objective:There are various Light sensors and reporting techniques on the measured incident light. This projects attempts to follow one such approach with one specific concept in mind - "Optimising the footprint of the end solution and making it portable for application", which literally translates to small size of the actual board, Integrated sensor with the Microcontroller, Devoid of redundant hardware components, no wires sticking out and with a proper enclosure which complements the size of the board.
So let's dive a little deep into what this 'Thing' is and where we can potentially use this.
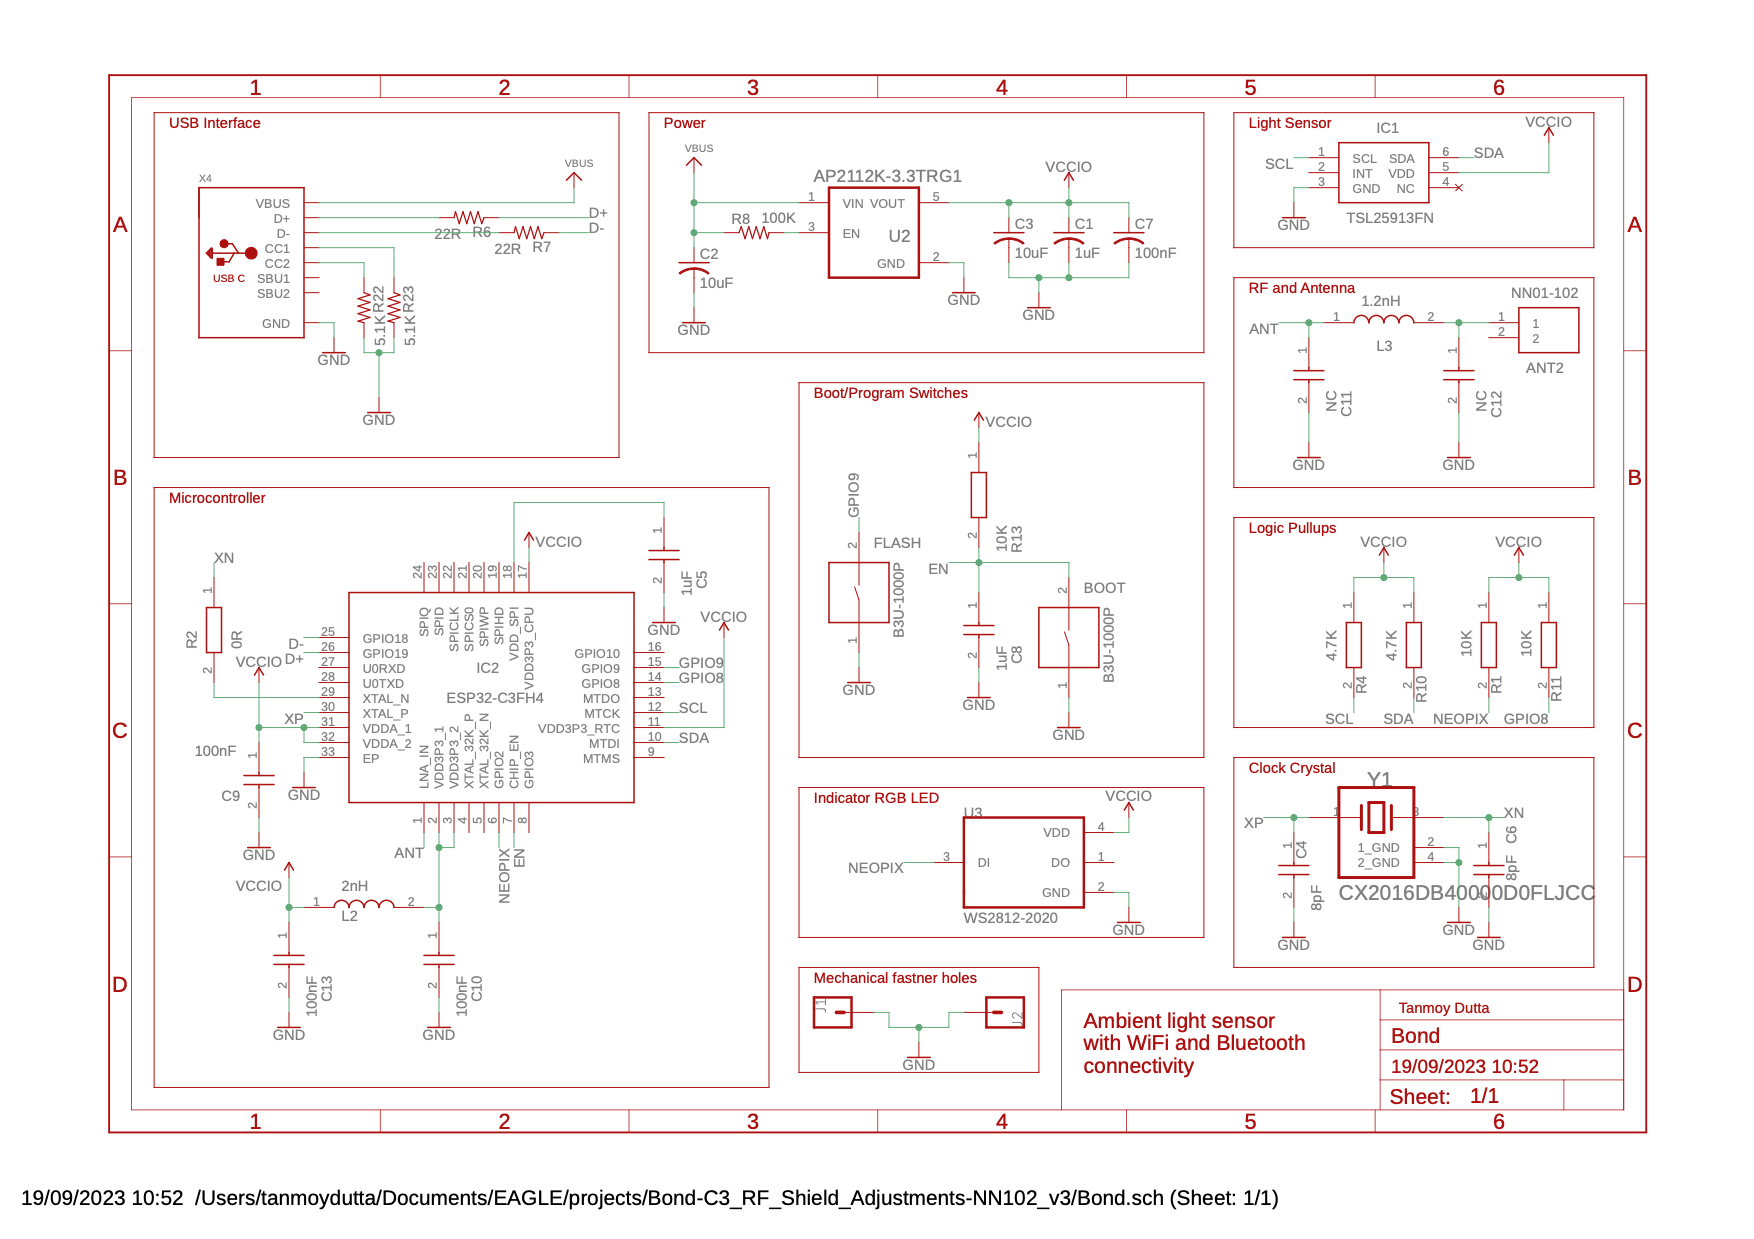
This tiny module is designed around Espressief's ESP32-C3 System On a Chip. Purpose of this module is simple, measure the ambient or incident light and communicate the reading through the chip's built-in WiFi/Bluetooth interface. It uses AMS OSRAM TSL2591 sensor to measure the incident light.
Use:A simple home based application can be measuring the outside light intensity and based upon certain threshold triggering an event to initiate something, e.g. a light in the house or living room. This requires the light switch to be automated or the power source connected to a remotely triggered relay. This tutorial, however, does not talk about such implementation rather about generating a message for triggering such an an activity only. Example of one such WiFi enabled switch is from Sonoff, e.g. S26 which can be easily hacked for this purpose.
Below is a depiction of such a system where the sensor plays a vital role on measuring and communicating the light intensity reading through the use of MQTT (Message Queue Telemetry Transport) protocol and sending the measured value to the MQTT Server which then can route the information to any recipient client waiting to listen to this broadcast.
The end device upon receiving this message (Light Intensity) can decide to actuate a switch depending on a certain threshold agreed between the devices and also depending on the visibility.
Construction:The module is built with a custom PCB and I used professional services for the build of this PCB. Circuit is built with all Surface Mount (SMT) components to maintain the small footprint. I did reflow soldering of all the components but use of an SMT soldering service is recommended.
Details about schematics, components, PCB and source code can be found in GitHub - https://github.com/tanmoydutta/lightsensorwithwifi
Programming:The module can be programmed both with Arduino IDE or ESP IDF. For my implementation I used Arduino IDE. The board has similarity with ESP32-C3 QT Py board from Arduino. Hence during programming the same board can be selected -
This example project sends reading from the built-in TSL2591 sensor using MQTT protocol to a target MQTT server over WiFi. Hence it follows the following flow of actions to read and send the data -
Step1: Initialise the sensor (Connection via I2C) and other variables
Step2: Connect to the desired WiFi Access Point (2.4GHz only)
Step3: Connect to MQTT Server via the required IP and Port
Step4: Setup the MQTT topic to publish the measured light intensity
Step5: Read light intensity using the sensor
Step6: Publish the value on the configured MQTT topic
Step7: Repeat Step 5 through Step 6 via a loop every defined interval.
Let's take a closer look at the code used for each step -
Initialising the sensor -
Import the required libraries
#include <Wire.h>
#include <Adafruit_Sensor.h>
#include "Adafruit_TSL2591.h"

#include <WiFi.h>

#include "Adafruit_MQTT.h"
#include "Adafruit_MQTT_Client.h"
Initialize the variables and constants
Adafruit_TSL2591 tsl = Adafruit_TSL2591(2591); // pass in a number for the sensor identifier (for your use later)

// Create an  WiFiClient class to connect to the MQTT server.
WiFiClient client;

#define WLAN_SSID "<WiFi SSID>"
#define WLAN_PASS "<WiFi Password>"

#define MQTT_SERVER "<MQTT Server IP on the Network>"
#define MQTT_SERVERPORT 1883

// Create an  WiFiClient class to connect to the MQTT server.
WiFiClient client;

Adafruit_MQTT_Client mqtt(&client, MQTT_SERVER, MQTT_SERVERPORT);

Adafruit_MQTT_Publish lightIntensity = Adafruit_MQTT_Publish(&mqtt,  "/feeds/message/ambient/light");
The following methods are defined to handle the MQTT connection setup and configuring the TSL2591 sensor. Sensor is set to lowest gain for bright outside light.
void MQTT_connect() {
    int8_t ret;
    // Stop if already connected.
    if (mqtt.connected()) {
        return;
    }
    Serial.print("Connecting to MQTT... ");
    uint8_t retries = 3;
    while ((ret = mqtt.connect()) != 0) { // connect will return 0 for connected
        Serial.println(mqtt.connectErrorString(ret));
        Serial.println("Retrying MQTT connection in 10 seconds...");
        mqtt.disconnect();
        delay(10000);  // wait 10 seconds
        retries--;
        if (retries == 0) {
            // basically die and wait for WDT to reset me
        while (1);
        }
    }
    Serial.println("MQTT Connected!");
}

void configureSensor(void) {
    // You can change the gain on the fly, to adapt to brighter/dimmer light s   ituations
    tsl.setGain(TSL2591_GAIN_LOW);    // 1x gain (bright light)

    // longer timelines are slower, but are good in very low light situtations!
    tsl.setTiming(TSL2591_INTEGRATIONTIME_100MS);  // shortest integration time (bright light)
}

void setup() {
    Serial.begin(115200);
}

void loop() {
}
Initialise the sensor and configure the same within the setup function
if (tsl.begin()) {
        Serial.println(F("Found a TSL2591 sensor"));
    } else {
        Serial.println(F("No sensor found ... check your wiring?"));
        while (1);
    }
    /* Configure the sensor */
    configureSensor();
Connecting to desired Access Point -
Connect to the desired access point also in the setup function
WiFi.begin(WLAN_SSID, WLAN_PASS);
    while (WiFi.status() != WL_CONNECTED) {
        delay(500);
        Serial.print(".");
    }
    Serial.println();
    Serial.println("WiFi connected");
    Serial.println("IP address: "); Serial.println(WiFi.localIP());
Connect to MQTT Server via the required IP and Port and Setup the MQTT topic to publish the measure light intensity -
Note that I'm using an unsecured connection here. This can also be repeated in a loop.
MQTT_connect();Read light intensity using the sensor -
int light = tsl.getLuminosity(TSL2591_VISIBLE);Publish the value on the configured MQTT topic -
String dat = "";

dat += "{\"l\" : ";
dat += String(light);
dat += "}";
Serial.println(dat);
int z = dat.length();
Serial.print("Size of Data : "); Serial.println(z);
char c[z+1];
dat.toCharArray(c, z+1);
Serial.print("c=");
Serial.println(c);
uint8_t a[z+1];
for (int i = 0; i <= z; i++) {
    a[i] = (uint8_t)c[i];//Serial.print(interim[i]);
}
lightIntensity.publish(c);
MQTT Clients connected to this MQTT Server and subscribed to this specific topic - "/feeds/message/ambient/light"
will receive a data packet with the following JSON format containing the light intensity value -
{"l": <Light Intensity value>}
This can now be used to make decisions based upon the value against a predefined threshold to switch on or switch off certain instrument.
Positioning the sensor:The sensor can be housed in a 3D printed casing and mounted with sticky tapes whilst the sensor window faces the outside on the glass windows of a room. The sensor configuration is made to accept direct sunlight without any significant degradation to the measured value.
This project demonstrates a light measurement based implementation using a unified design approach. There are definitely other ways to do this or apply for other purposes and even a wide area for improvement and enhancement. e.g. Making this device more energy efficient and run on light energy etc.
Thanks for reading through this I hope this was useful.


Comments