A centuries old problem solved with this years technology - Machine learning vs bike thieves.
The fear of having your bike stolen has for years been something that bicycle owners had to live with. The only solution for this problem was the boring old bicycle chain, that although effective is something that belongs in the past century.
We present to you: TapLock. A lock, that mounts anywhere on you steel beast and protects it from possible thieves - 21st century style.
The platform that we use to implement ML is Edge impulse. It allows for a very user friendly interaction and allows you to customize many parameters and block types in the ML chain.
For tap detection we used the accelerometer that can be found on the Arduino Nano 33 BLE sense. By default, Edge impulse records the three separate axes for 5000 milliseconds and presents it as a graph of axial acceleration based on time.
What worked best for us, was preprocessing the accelerometer output on the board by averaging the acceleration over all three axes - taps and vibrations caused by them don't really have a direction. We then took the time between two peaks as the time between taps and outputted it as four numbers for a five tap sequence(time in milliseconds between the first and second peak, second and third,...).
This data was then imported into Edge impulse as a.json file with a window size of 1 ms and 4 axes(4 peak-to-peak times). We used the raw data processing block and Keras neural network learning block. We changes the Neural network parameters a bit and used 500 training cycles with 0.005 learning rate and 0.60 minimum confidence rating. With those settings, we were able to get 96.4% accuracy.
The different tap sequences(with a morse code equivalent) use were as followed:
Bluetooth connectionThe work flow of the lock-app bluetooth connection is as follows:
1. Arduino advertises itself openly on Bluetooth, and the app checks if the localname is correct. If it finds a device, which was the last connected device it chooses it as a priority.
2. The application checks its locally saved file, which contains information about the last locked/unlocked status and the map pins.
3. The app reads the current Arduino status(locked/unlocked) and updates it's file.
4. When we wish to change the lock status, the app waits for an acknowledgment message from the lock only then does the status change in the app.
Native appApp was developed in programming language react native. It consist of three screens. The first one allows the user to connect with arduino and lock/unlock device. Devices are represented in different views as scrollable list. User can also check for more detailed informations of device, such as battery level and distance to the device by long pressing on device name.
The second screen is used for maps. When the user locks the device, a marker is created on this screen. We can also create marker manually and store the location with a press on the marker. The last screen is reserved for app setting (sign up, log in). We can navigate between the screens with tapping on navigator on the bottom of the app.
3Dprintablebikemount
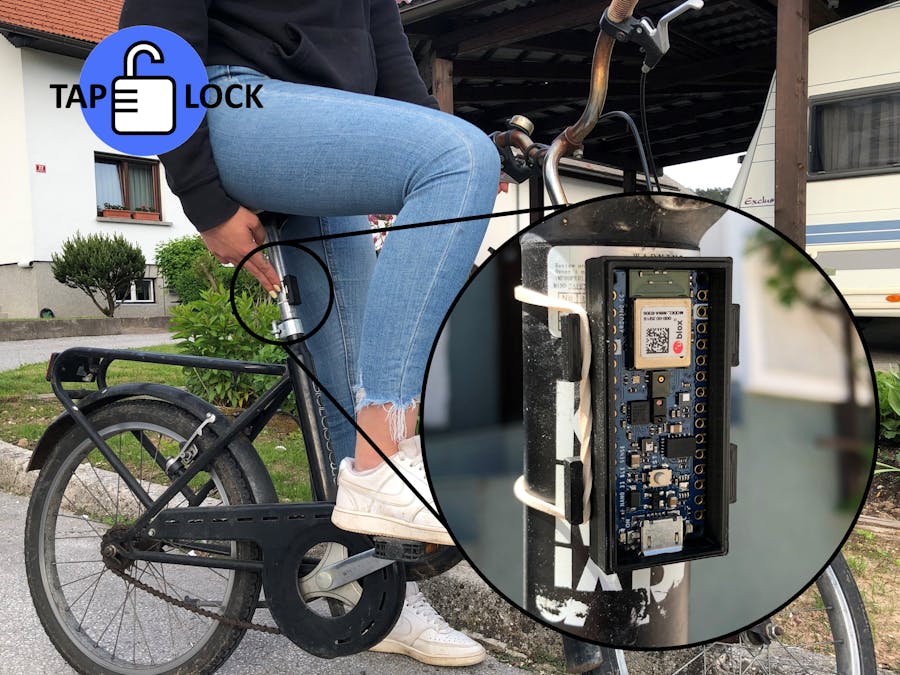
We have designed a simple 3D printable mount, that securely houses your Arduino Nano and allows you to mount it virtually anywhere on your bike. All you need is a 3D printer and some rubber bands. The mounting points are designed in such a way, that it is possible to use a single rubber band, but if you want extra security, you can double up on them.
The microcontroller can be mounted anywhere on the frame of the bicycle, and should be able to read any signal you tap on the frame.
Note: At the current stage of the project the solution for powering your Arduino Nano is a powerbank attached to your bicycle connected with a USB cable
. We recommend using rubber bands and/or duck tape to fix it to the bicycle.
How it all comes togetherThe entire package works as followed:
1. You connect to your lock.
2. You lock your lock, which also drops a marker on your current position.
3. The 'locked status' LED turns on(a feature, that can later be expanded e.g. connect an actuator to some pins to engage a lock)
4. You can then unlock it via the app or the correct tapping sequence.
5. The 'unlocked status' LED turns on.
As you might have guessed by now, currently, the lock doesn't feature any lock :) We made the groundwork, so it is rather simple to add your own locking mechanism. The only thing you need to change are the pins on which the 'locked' status is outputted and connect that to your mechanism.
The ML part of the project works surprisingly well and the taps are transmitted over the bike frame, so it is possible to tap a few centimeters away from the Arduino. Experiment :)


Comments
Please log in or sign up to comment.