


Hardware components | ||||||
 |
| × | 1 | |||
 |
| × | 1 | |||
 |
| × | 1 | |||
 |
| × | 1 | |||
Software apps and online services | ||||||
 |
| |||||
| ||||||
 |
| |||||
| ||||||
| ||||||
Hand tools and fabrication machines | ||||||
| ||||||
| ||||||
| ||||||
Story
Introduction- Hello World
I'm TCHAMIE Edmond, this a project specified in my Internshala IoT Training powered by my Bolt IoT. This Capstone Project description given as follows the pharmaceutical companies use a cooling chamber which is similar to a refrigerator to keep the tablets and maintain the temperature in the required limits; and made an anomalie detection when something is happen with the refrigerator or the cooling chamber. In this fact, that a video is made to show us what in a real life is happen.
Embeded of youtube video link-Here for this project, below is the output of the system build with Wifi Module + an LM35 and others components which will listen in next section in a video:
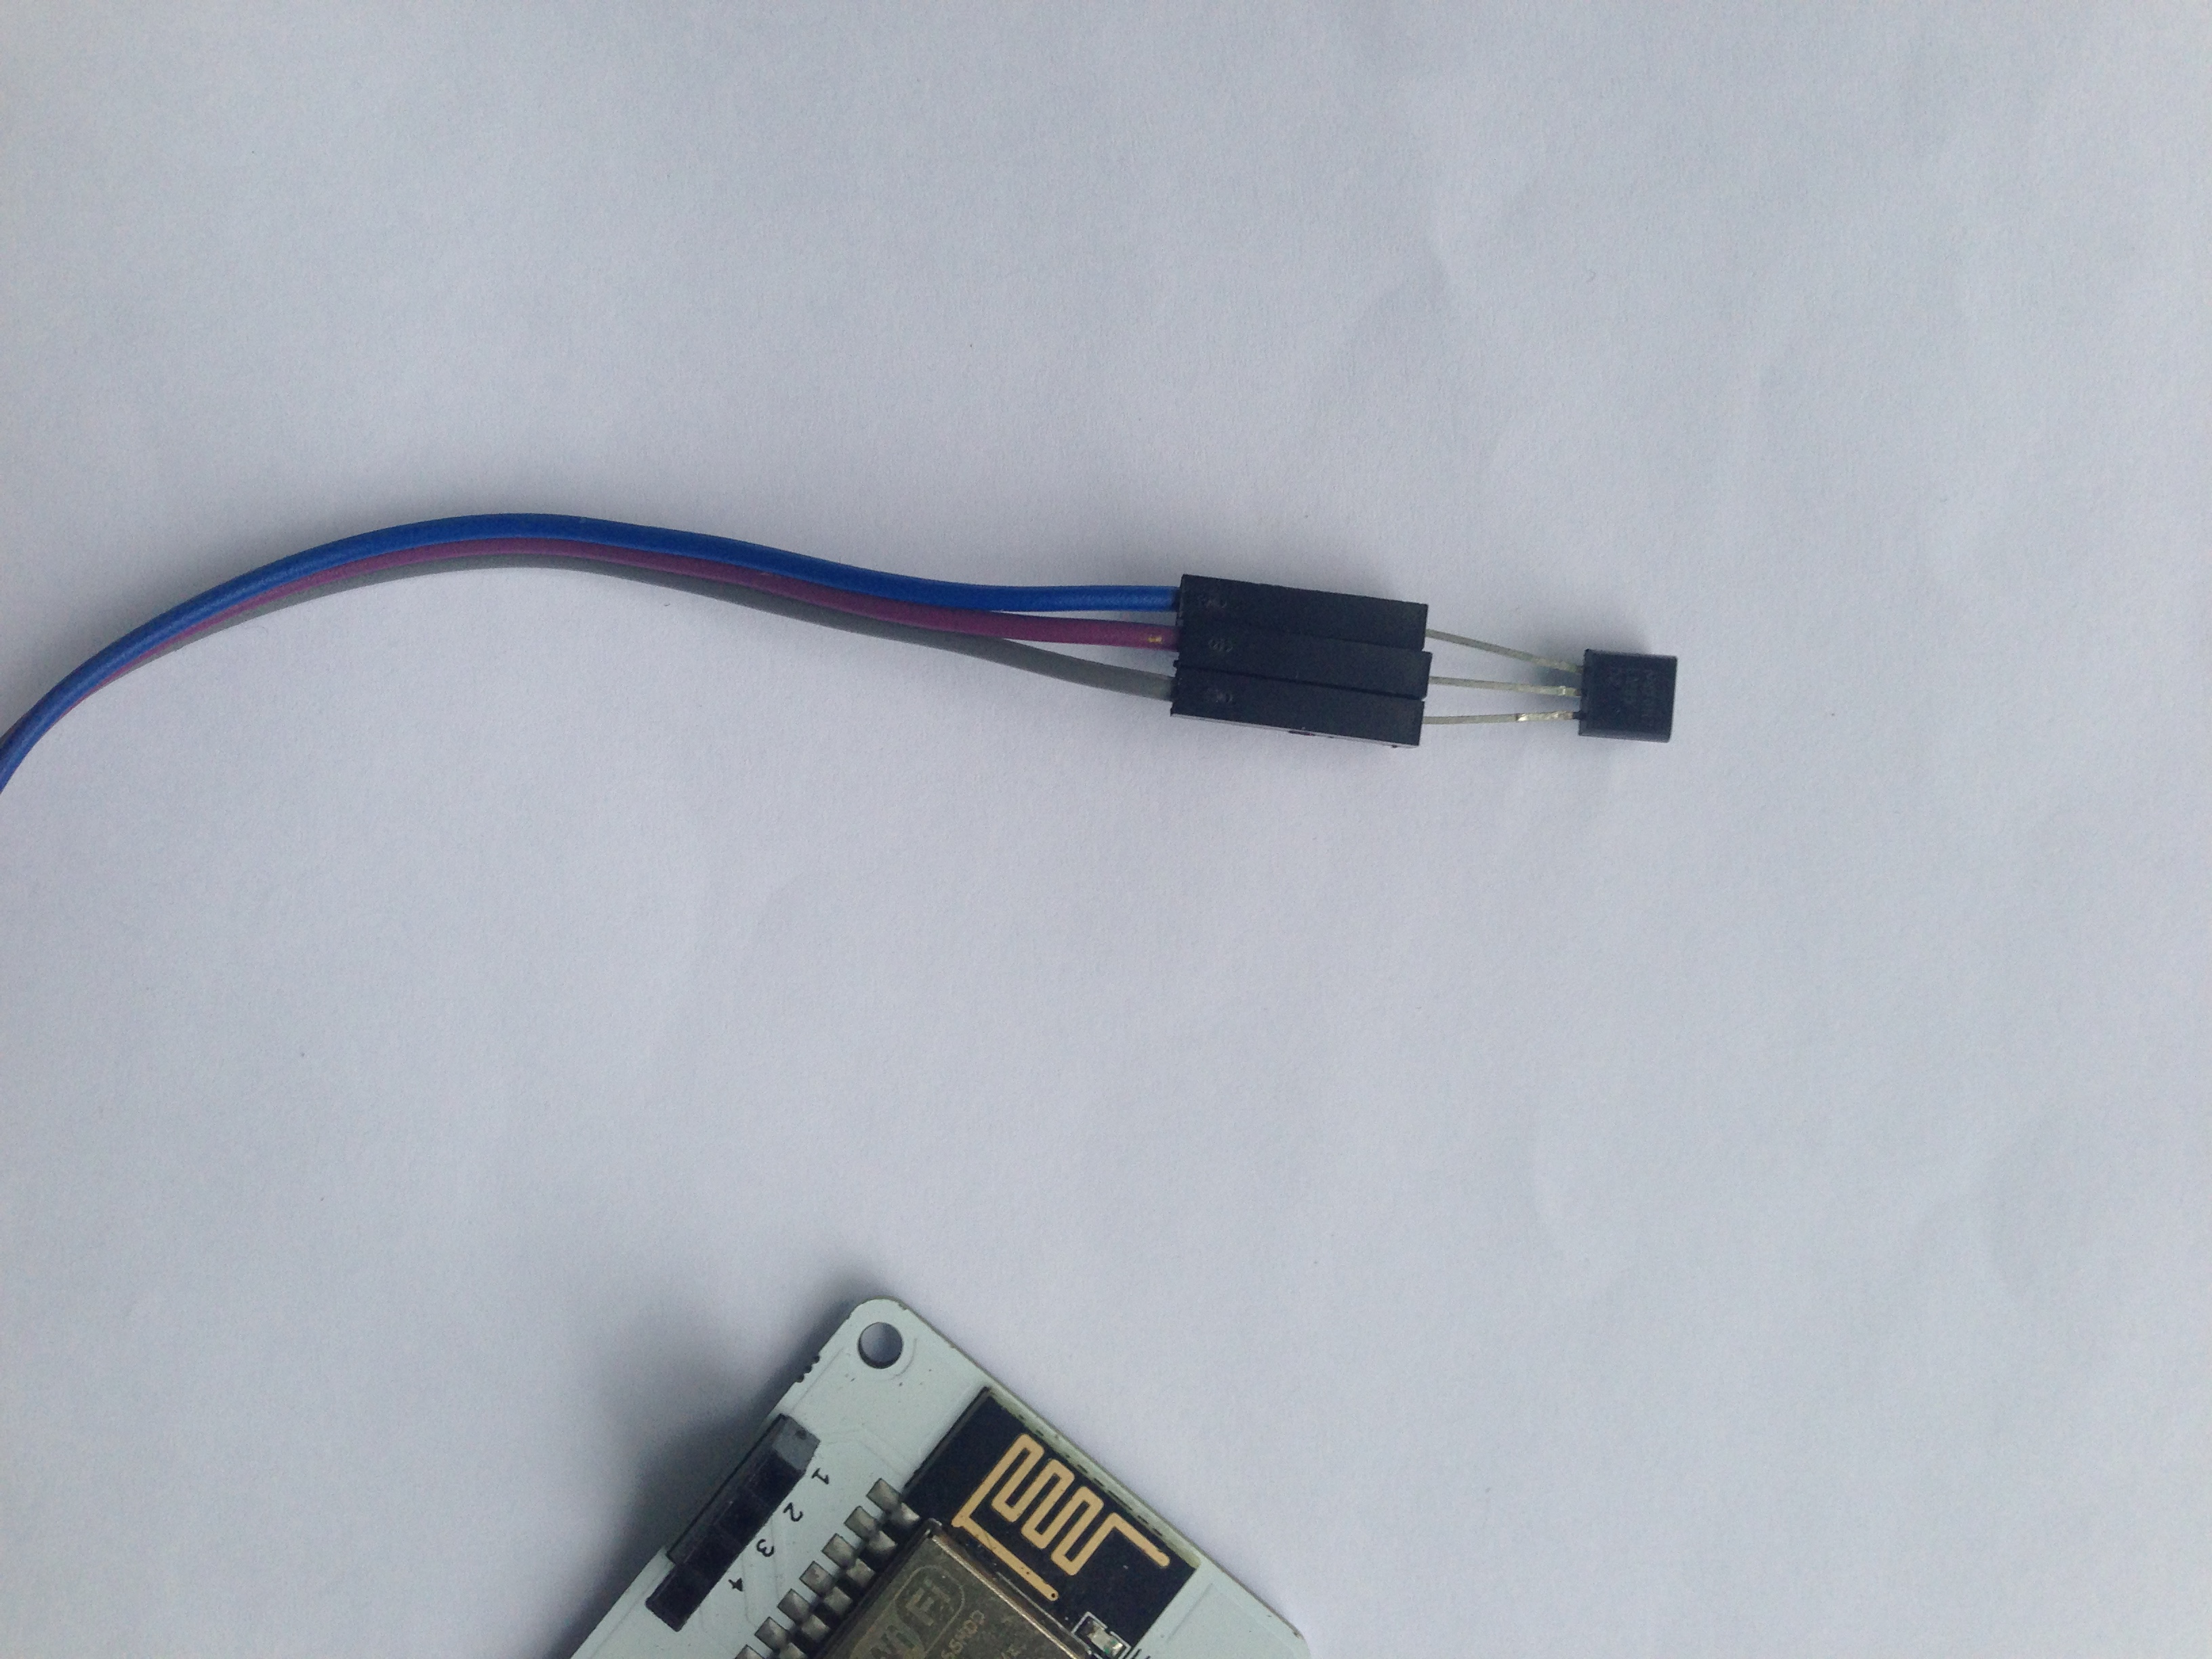
Steps for building the project:Step 1: Hardware SetupI) Hold the sensor in a manner such that you can read LM35 written on it.
II) In this position, identify the pins of the sensor as VCC, Output and Gnd from your left to right.
In the above image,
VCC is connected to the blue wire
Output is connected to the red baurdeaux wire
Gnd is connected to the ash wire
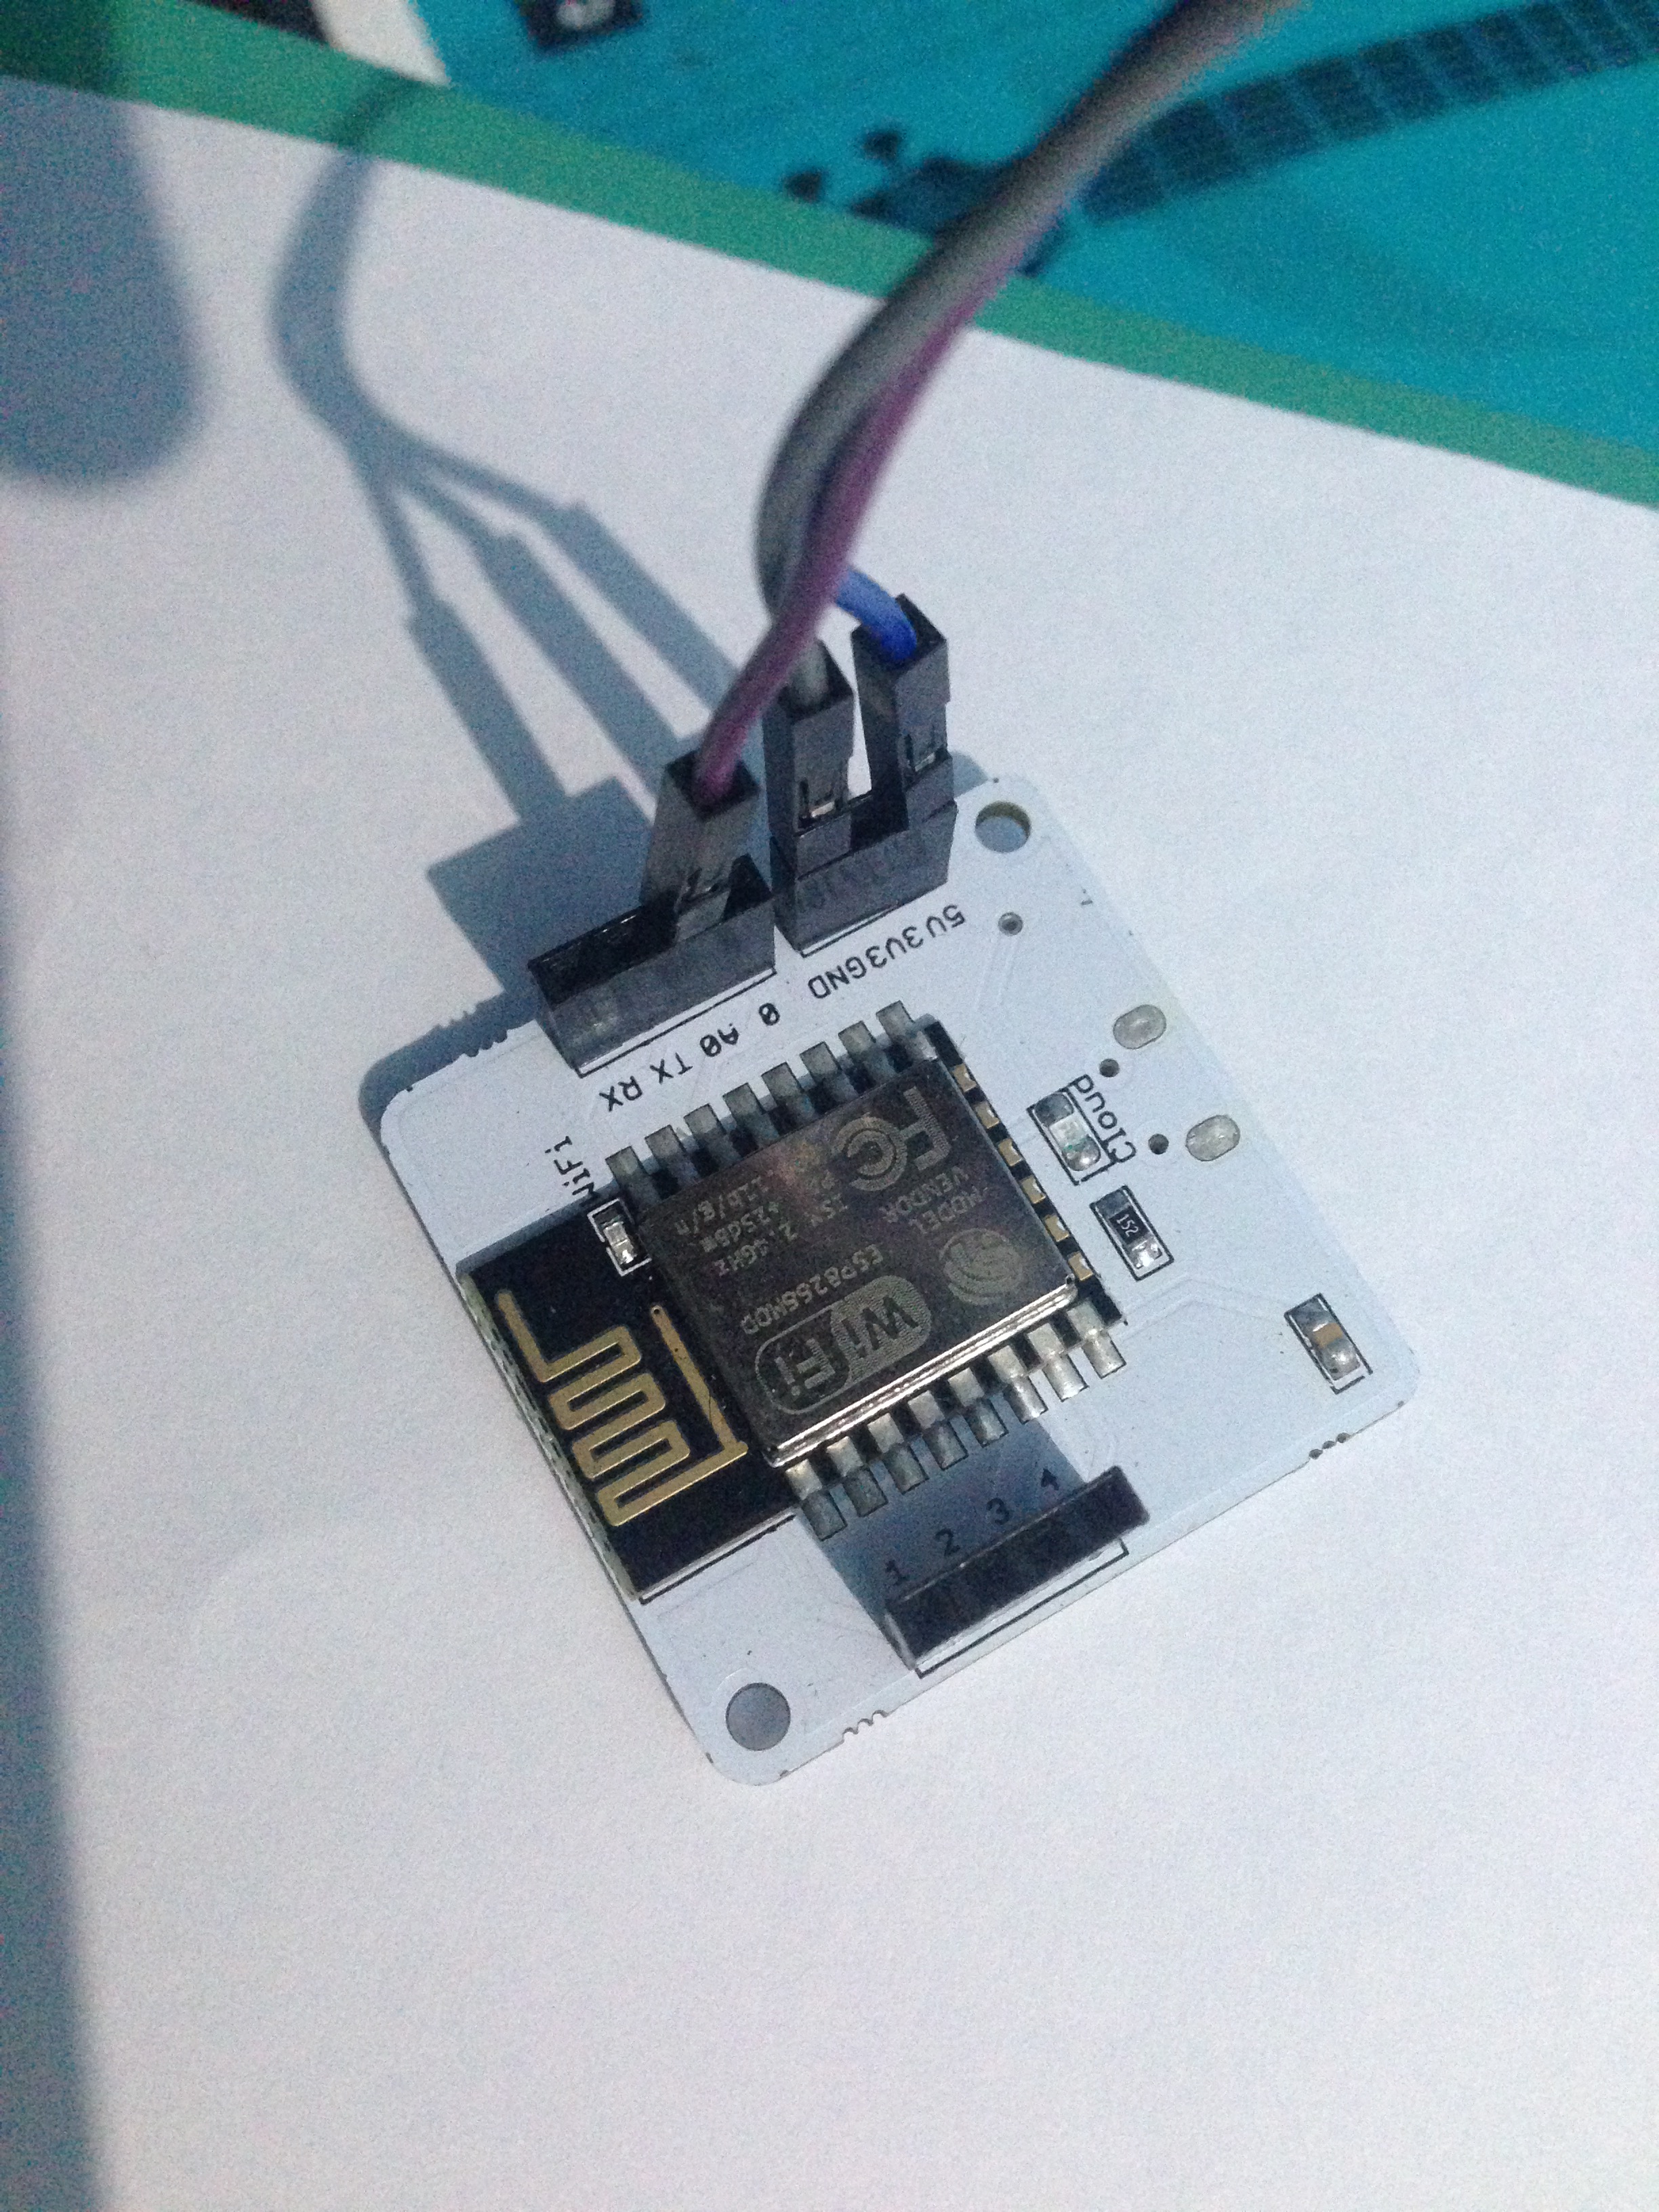
III) Using male to female wire connect the 3 pins of the LM35 to the Bolt Wifi Module as follows:
- VCC pin of the LM35 connects to 5v of the Bolt Wifi module.
- Output pin of the LM35 connects to A0 (Analog input pin) of the Bolt Wifi module.
- Gnd pin of the LM35 connects to the Gnd.
IV) The final circuit should look like the image below:
The image below show that you are done with the hardware connection...
Login to cloud.boltiot.com and note the ID of your Bolt WiFi Module.
Now click on the API Tab and under the section for Generate Key, click on Enable.
Next click on the copy button to copy your API key. Your API key will may look something like this:eed9c637-cf6c-4cad-849b-c46282df4946.
Step 4: Go to https://cloud.boltiot.com/ and create a new product. While creating the product, choose product type as Input Device and interface type as GPIO. After creating the product, select the recently created product and then click on configure icon.NOTE1: Registration Process on bolt cloud
- 1: Open www.cloud.boltiot.com on your web browser (Google Chrome recommended)
- 2: Click on "SignUp” as shown below
- 3: Enter your details on the SignUp page shown below. Enter your name, email id (login ID for Bolt cloud), and password in the fields. Do confirm your password by typing it again in the Confirm Password field and then click on the Register button.
4: Verification of your account: If you have entered all the details correctly, you will be successfully registered on Bolt Cloud and you shall see the screen below,
You will be sent a Verification Mail to your mail Id as seen below (Please check your Spam folder if the mail is not found in your Inbox.
Note: If you did not get the Verification mail you can go to cloud.boltiot.com and SignIn and Click on the Resend Email option marked below.
Open the mail and click on the “Click here to verify your E-mail ID” button as shown below.
Once you click on the button, your email id will be verified and you will be directed to the following page thus completing the registration process on Bolt Cloud.
- 5: You will be redirected to your Bolt Cloud Dashboard, with the Welcome message greeting, where you can click on the Getting Started button to view the guide.
- 6: You will be given a basic tour of the Bolt Cloud features on the Dashboard. You can click on the Next & Back button to view the features. You can click the Skip button to skip the tour if you wish to. The tour can be taken anytime by clicking the “Take a Tour” button at the top right corner of your dashboard.
- 7: Once the tour is done you shall have the option to add a Bolt device to you dashboard. The process of linking your Bolt device to your Cloud Dashboard will be covered in the next lesson.
NOTE2: Now build your product like this:
Write the following code below to plot the temperature data and run the polynomial regression algorithm on the data, and save the product configurations.
setChartLibrary('google-chart');
setChartTitle('Polynomial Regression');
setChartType('predictionGraph');
setAxisName('time_stamp','temp');
mul(0.0977);
plotChart('time_stamp','temp');
Below is the screenshot of the final output.
Collect data for about 2-3 hrs to get the proper prediction of the temperature.
Step9: Data collection and prediction of future temperature valuesFor collecting the data I put the hardware modules in the fridge
Well, now the explanation to understand the graph is as below:
- Predictionpoints: This number tells the Visualizer how many future data points need to be predicted.
- No.Polynomialcoefficients: Number Polynomial Coefficients define the polynomial coefficients for the prediction.
- FrameSize: These are the number of previous data points the Visualizer will use to predict the trend of the data. For example, if you set this value to 5, the Visualizer will use the previous 5 points to predict the trend.
The graph prediction (which in color yellow) shows that for next 20 mins and more I will get a temperature range between 7.865-7.892 Degree Celsius which is not confortable to keep tablets in better condition hence I can take actions beforehand.
Temperature prediction is now done we will write the python code to fetch the temperature data on the server and done an Z core anomalie when somthing is happen with the fridge.
Step 11: Working principeA) Creation of an account and configuration for SMS on Twilio
B) Creation of an acount and configuration for Email on Mailgun
C) Login in your Oracle VM (VirtualBox) or in your digital ocean
D) Code writing in python
E) Runing code and view the output
F) Ending with receives the SMS and the Email
A) Creating an account on and done the configuration for an SMS on Twilio
Twilio is a cloud communications platform as a service (PaaS) company. Twilio allows software developers to programmatically make and receive phone calls and also send and receive text messages using its web service APIs.
Please note that SMS delivery via a trial Twilio account is not guaranteed to be instant by Twilio. Also, note that SMS will not be sent to numbers which have DND(Do Not Disturb) turned ON.
A-1) Open https://www.twilio.com/ in browser.
A-2) Click on Get a Free API Key button to sign up.
A-3) Fill all the necessary details in SIGN UP form. Below is an screenshot of it:
A-4) To verify they will ask for your phone number. Choose India as an option in the dropdown and then enter your phone number.
A-5) Click on "Products" as shown on the screen below
A-6) Now enable the SMS services by clicking on two checkboxes for Programmable SMS and Phone Numbers as shown below.
Once you have done this, scroll to the bottom of the screen and click on "Continue".
A-7) Now, you will need to give a name for your project. I have given the name as My Project. Click on "Continue" once you have entered the project name.
A-8) Click on "Skip this step" when it asks you to Invite a Teammate.
A-9) Your project should be created at this point. Click on "Project Info" to view the account credentials which is required for your projects.
A-10) You can view the Account SID and Auth token on this page. The Auth token is not visible by default, you can click on "view" button to make the Auth token visible as shown below. Copy both and save them somewhere securely.
A-11) From the drop-down menu, choose "Programmable SMS". Now click on Get Started button to generate phone number.
A-12) Click on Get a number button.
A-13) Then a popup will appear. Click on Choose this number button.
A-14) Then a popup will appear which will have the final number. Copy this number and save to notepad for future references.
That's it. You have successfully created the account on Twilio. In the next section, we will use Bolt Python library to create our own SMS Alert system.
B) Creating an account and done configuration for an Email on Mailgun
Mailgun is an Email automation service. It has a very powerful set of inbuilt functions for sending emails. Developers can process their email with the help of Mailgun API.
B-1) Open https://www.mailgun.com/ in browser.
B-2) Click on Sign Up button.
B-3) Fill all the necessary details in SIGN UP form. Make sure you are unchecking the payment option. Below is the screenshot of filled sign up form.
B-4) You will get a verification mail having a link. Click on that link to verify your mail.
B-5) To verify they will ask for phone number. Choose India as an option in the dropdown and then enter your phone number.
B-6) After verification, scroll down to Sandbox Domain section. Click on Add Recipient button.
B-7) Click on Invite New Recipient button.
B-8) Enter the Receipient Email ID. In this case enter your Email ID.
B-9) After adding Email ID a new sandbox will be generated. Click on the ID of the newly generated sandbox. Refer below image for the same.
B-10) The new screen will have all the necessary credentials that you want fosending an email. Copy all this credentials and save in the notepad.
OK, you have successfully created the account on Mailgun. In the next step, we will use also Bolt Python library to create our own Email Alert system.
C) Once you are done with the circuit connection in earlier step then, login toyour VirtualBox and create a folder to hold the files required..
Note: If you are using DigitalOcean Droplet or VMWare or a Linux system, log in to the system accordingly.
D) Coding in python
D-1) Create a folder and enter it using the following command.
mkdir Anomaly_Detection
cd Anomaly_Detection
D-2) Create the two configurations files, using the following command.
D-2.1) After successful login, create the first file named sms_conf.py which will store all the credentials related to Twilio. After write below code, save all the credentials in a single file.
sudo nano sms_conf.py
After the editor is open, type in the following configuration parameters
SSID = 'You can find SSID in your Twilio Dashboard'
AUTH_TOKEN = 'You can find  on your Twilio Dashboard'
FROM_NUMBER = 'This is the no. generated by Twilio. You can find this on your Twilio Dashboard'
TO_NUMBER = 'This is your number. Make sure you are adding +91 in beginning'
API_KEY = 'This is your Bolt Cloud account API key'
DEVICE_ID = 'This is the ID of your Bolt device'
NOTE_1:You can find the first four values in Twilio dashboard and the last two in Bolt Cloud dashboard
D-2.2) Now create the second file named email_conf.py which will store all the credentials related to Mailgun. Then also after write the below code, save all the credentials in the same file (email_conf.py).
sudo nano email_conf.py
After the editor is open, type in the following configuration parameter
MAILGUN_API_KEY = 'This is the private API key which you can find on your Mailgun Dashboard'
SANDBOX_URL= 'You can find this on your Mailgun Dashboard'
SENDER_EMAIL = 'This would be test@your SANDBOX_URL'RECIPIENT_EMAIL = 'Enter your Email ID Here'API_KEY = 'This is your Bolt Cloud accout API key'DEVICE_ID = 'This is the ID of your Bolt device'
FRAME_SIZE = 10
MUL_FACTOR  = 5
Note: You have to replace all the above value with your credentials. You can find the first four value in Mailgun dashboard and the last two in Bolt Cloud dashboard.
IMPORTANT: You have to replace all the above value in every file with your credentials. you can save the configurations files by pressing 'CTRL+x'.
D-3) Now create one more file named anomaly_detection.py, using the following command
sudo nano anomaly_detection.py
This file will contain the main code. The algorithm for the code can be broken down into the following steps:
a) Fetch the latest sensor value from the Bolt device.
b) Store the sensor value in a list, that will be used for computing z-score.
c) Compute the z-score and upper and lower threshold bounds for normal and anomalous readings.
d) Check if the sensor reading is within the range for normal readings, then send email.
e) If it is not in range, send the SMS.
f) Wait for 10 seconds.
g) Repeat from step a.
I/ Here we will start writing the code. Let us start with the imports.
- We have to import our ( sms_conf & email_conf ) files which have all the credentials, json and time.
- Also we import our Bolt python library which will let us fetch the data stored in Bolt Cloud and then based on value send Email and SMS.
import sms_conf, email_conf, json, time, math, statistics
from boltiot import Sms, Email, Bolt
- The math and statistics libraries will be required for calculating the Z-score and the threshold boundaries.
II/ The following lies code helps define a function which calculates the Z-score and the using the Z-score calculates the boundaries required for anomaly detection.
def compute_bounds(history_data,frame_size,factor):
The above line helps define a function, which takes 3 input variables: hisotry_data, frame_size and factor.
III/
if len(history_data)<frame_size :
          return None
 if len(history_data)>frame_size :
        del history_data[0:len(history_data)-frame_size]
- The above code checks whether enough data has been accumulated to calculate the Z-score, and if there is too much data, then the code deletes the older data.
IV/ Now the below code calculates the mean (Mn) value of the collected data points.
Mn=statistics.mean(history_data)
V/ Then now we calculate the Variance of the data points. You can read more about variance here
Variance=0
for data in history_data :
     Variance += math.pow((data-Mn),2)
VII/ Here we calculate the Z score (Zn) for the data and use it to calculate the upper and lower threshold bounds required to check if a new data point is normal or anomalous.
Zn = factor * math.sqrt(Variance / frame_size)
High_bound = history_data[frame_size-1]+Zn
Low_bound = history_data[frame_size-1]-Zn
return [High_bound,Low_Bound]
VIII/ The next code is used to initialize the Bolt and SMS variables, which we will use to collect data and send SMS alerts. Here we also initialize an empty list with the name 'history_data' which we will use to store older data, so that we can calculate the Z-score.
mybolt = Bolt(conf.API_KEY, conf.DEVICE_ID)
sms = Sms(conf.SSID, conf.AUTH_TOKEN, conf.TO_NUMBER, conf.FROM_NUMBER)
mailer = Email(email_conf.MAILGUN_API_KEY, email_conf.SANDBOXURL, email_conf.SENDER_EMAIL, email_conf.RECIPIENT_EMAIL)
history_data=[]
IX/ The following while loop contains the code required to run the algorithm of anomaly detection.
while True:
   response = mybolt.analogRead('A0')
   data = json.loads(response)
   if data['success'] != '1':
      print("There was an error while retriving the data.")
      print("This is the error:"+data['value'])
      time.sleep(10)
      continue
   print ("This is the value "+data['value'])
   sensor_value=0
   try:
      sensor_value = int(data['value'])
   except Exception as e:
      print("There was an error while parsing the response: ",e)
      continue
   bound = compute_bounds(history_data,conf.FRAME_SIZE,conf.MUL_FACTOR)
   if not bound:
      required_data_count=conf.FRAME_SIZE-len(history_data)
      print("Not enough data to compute Z-score. Need ",required_data_count," more data points")
      history_data.append(int(data['value']))
      time.sleep(10)
   try:
      temp = sensor_value/10.24
      if sensor_value > maximum_limit:
           print ("The Temperature value increased suddenly. Sending an sms.")
           print ("The Current temperature is: "+str(temp)+" °C")
           response = sms.send_sms("Alert ! Someone has opened the fridge door")
           print("This is the response ",response)
      elif sensor_value > critical_limit or sensor_value < maximum_limit:
                 print ("Urgent! Temperature condition destroy the tablets. Sending an email.")
                 print (" The Current temperature is:" +str(temp)+" °C")
                 response = mailer.send_email("Alert !","The level temperature can destroy the tablets")
                 print("This is the response ",response)
      history_data.append(sensor_value)
  except Exception as e:
          print ("Error",e)
  time.sleep(10)
Save the file by pressing Ctrl+x.
E) Project Output and How is works by runing it through the code below
Now that we have written the code for anomaly detection lets run the code.
Once that is done, run the anomaly detection code using the following command
python3 anomaly_detection.py
After about 10 seconds, the system will start printing the values, as per the following image; and alert you by Email if the thershold temperature exceed and alert you also by Sms if someone opens the fridge :
F) After runing the python code above, we receives in first time an email when the threshold temperature exceeds and secondly an Sms" when someone opens the fridge" like this:
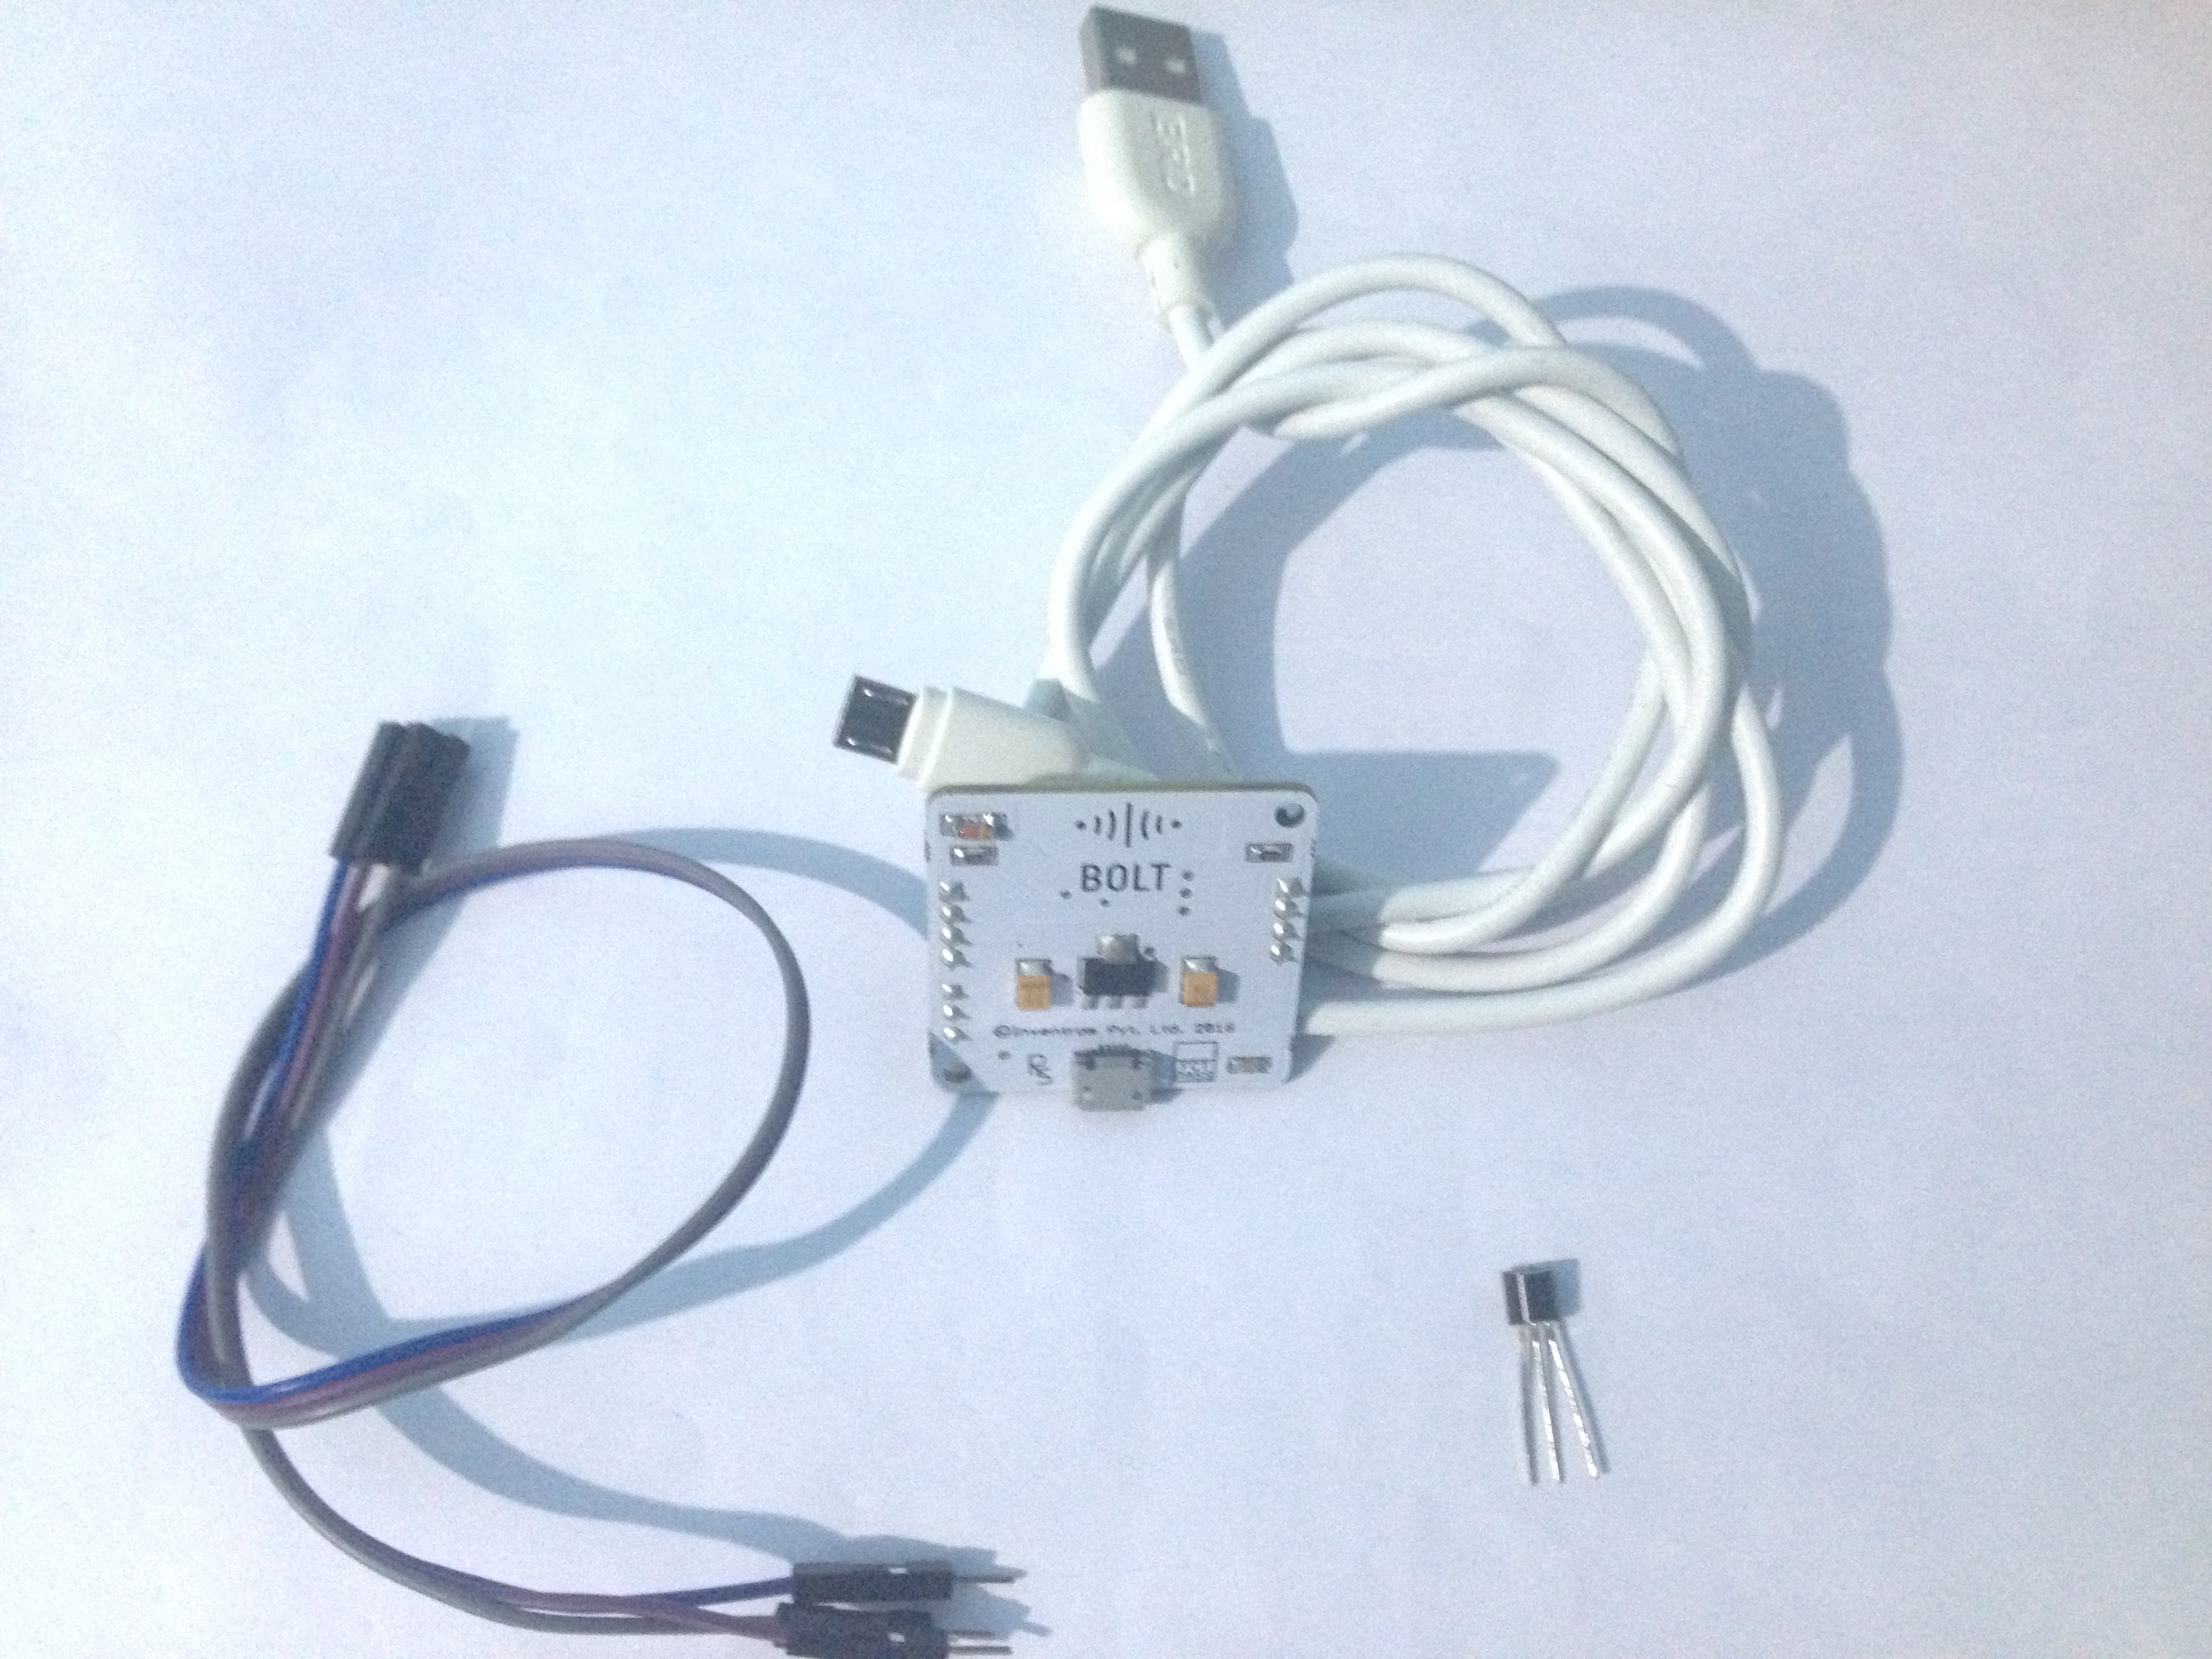
Hardwares used in the project
LM35 Temperature sensor
Connection Jumpers wire (male/female)
USB cable
Conection of devices
VCC indicates by blue wire
Output indicates by red bordaux wire
and Gnd indicates by ash wire
from your left to right.
connecting the LM35 to the bolt module
2. Output pin of the LM35 connects to A0 (Analog input pin) of the Bolt Wifi module.
3.Gnd pin of the LM35 connects to the Gnd.


Comments