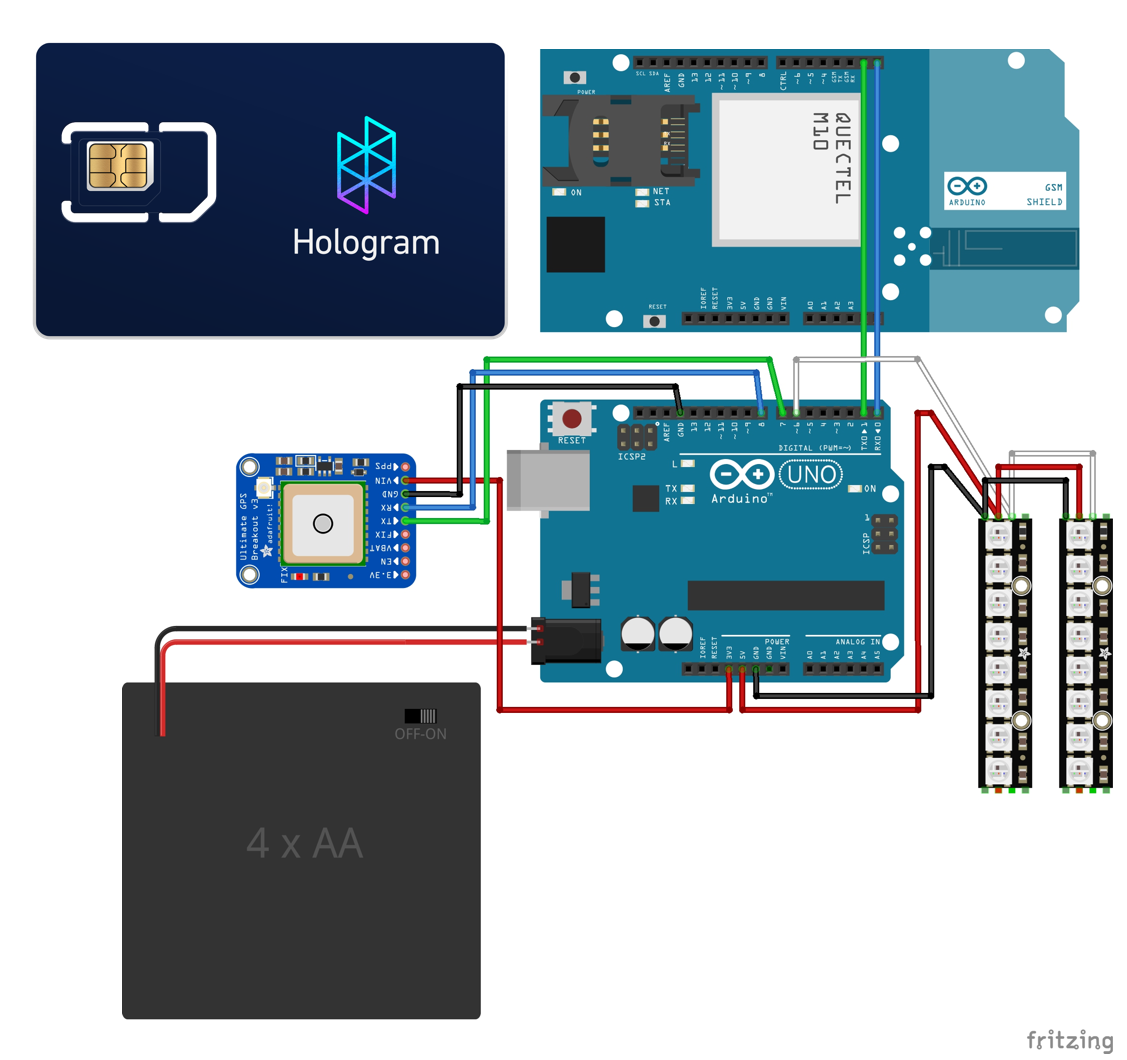
During Halloween my girls were unicorns (and my boys, ninjas). A few weeks before the holiday my oldest daughter jumped online to Google "rainbow unicorn horn". She found a killer tutorial from Adafruit outlining everything you needed to get a rainbow unicorn horn (check it out). I wanted to expand the project by adding GPS tracking sent to the cloud through Hologram's cellular network for IoT.
Why add GPS? As my kids get older, they want to try things without adult supervision. As a parent, that is one of the scariest thoughts. Being able to track my kids helps my wife and I transition into less-crazy parents.
What follows is the not-so-easy story on how we accomplished our Unicorn Finder.
This is the easy part since Adafruit did most of the heavy lifting. First we went to mHUB, a maker space here in Chicago, to 3D print the Adafruit unicorn horn on Thingiverse.
Next, we ordered the Adafruit Neopixel sticks and wired them up as per the tutorial. Once back in the 'burbs, we hit up Hobby Lobby for headband material, followed by mom sowing it all together.
The Neopixel wiring and unicorn horn were the only parts taken from the Adafruit tutorial. We decided to use an Arduino UNO as the base to build the rest of the project.
Arduino UNO + GSM ShieldA couple weeks before this project, the good folks at Arduino sent me a few GSM Shields to try on Hologram's cellular network. I decided to grab some UNOs along with those GSM Shields and go at it. The integration worked great and you can see the final code here. Below is a quick example using TCP.
You can to get your hands on an international Hologram SIM from their store.
Note: When using a Hologram SIM, you can send data directly to any cloud provider (no vendor lock) using any protocol that provider supports. In this example, I chose to send data to Hologram's data router because it is quick, secure and conserves data.
// Typical Arduino GSM globals
#include <GSM.h>
#define PINNUMBER ""
#define GPRS_APN "hologram"
#define GPRS_LOGIN ""
#define GPRS_PASSWORD ""
GSMClient client;
GPRS gprs;
GSM gsmAccess; // pass (true) for debugger
// Additional globals for Hologram TCP
char server[] = "23.253.146.203";
int port = 9999;
const char HOLOGRAMID[] = "xxx"; //replace w/your SIM id
const char HOLOGRAMKEY[] = "xxx"; //replace w/your SIM key
void setup() {
 Serial.println(F("Initializing Arduino GSM..."));
 boolean notConnected = true;
 while(notConnected){
   if(
    (gsmAccess.begin(PINNUMBER)==GSM_READY) &
    (gprs.attachGPRS(GPRS_APN, GPRS_LOGIN, GPRS_PASSWORD)==GPRS_READY)) {
     notConnected = false;
     Serial.println(F("Cellular Network Connected, sending message..."));
     modemCloudWrite("Sent from Arduino GSM to Hologram Data Router");
   } else {
     Serial.println(F("Not Connected to Cellular Network"));
     delay(1000);
   }
 }
}
void loop() { }
// Make a TCP write
bool modemCloudWrite(char * msg) {
 // if you get a connection send message then disconnect
 if (client.connect(server, port)) {
   client.beginWrite();
   client.print(F("A"));
   client.print((char*)HOLOGRAMID);
   client.print((char*)HOLOGRAMKEY);
   client.print(F(" "));
   client.print(F("S"));
   client.print(msg);
   client.println(F("\n\n"));
   client.endWrite();
   client.stop();
 }
}
Here is where things got hairy. I ran into a conflict between Arduino's GSM library and Adafruit's GPS library. The issue resulted from the GSM library's implementation of software serial. Eventually after an embarrassing amount of time, I found this forum post providing an alternative GPS library using the wonderful AltSoftSerial library. I included the alt GPS zip file in this project's code section.
Unfortunately, that was not the only issue I ran into. My Arduino UNO was running out of dynamic memory (RAM). You'll see in my sketch where I check and print available RAM. I kept those serial prints just in case you modify it. If things start acting weird, it is likely because you have no RAM left.
Eventually, after some code reorganization and wrapping all strings in F(), I was able to free up just enough memory (around 85% used). Sigh of relief.
We have rainbow lights; we have GPS location; we have cellular connectivity. Now we need a place to easily store, manipulate and display our IoT data. There are a number of great providers who offer these services. For this project I chose Losant.com - go ahead and create a free account.
Let's setup a connection from Hologram's data router to Losant's platform. We first will create a new Losant application. This application will consume data through a webhook, set the state of a virtual device then display our location on a dashboard map. Last, we create a new Hologram data route to send all new GPS coordinates to the Losant webhook.
1. Losant: Create an application and a webhook.
2. Losant: Create a standalone device with a GPS String attribute named gps.
3a. Losant: Create a new workflow then add/connect a webhook trigger to a device state output.
3b. Losant: The Webhook node will automatically map to the only available webhook you created in step 1. In the Device State node will need both the device and state values configured like the image below.
4. Losant: Create a Dashboard and add a GPS history block. You should have only one option in all the drop down inputs. You should now have an empty block waiting for it's first data.
5. Hologram: You should have a Hologram international SIM and a Hologram account. Create a new data route, select Advanced Webhook Builder and copy the setting from the image below (your Losant/Structure webhook ID will be different).
You should now see new coordinates update the Losant dashboard map. Since we are using the integrated GPS antenna, it may take up to 30 minutes for the satellites to connect. Enjoy!


_ztBMuBhMHo.jpg?auto=compress%2Cformat&w=48&h=48&fit=fill&bg=ffffff)


Comments
Please log in or sign up to comment.