The Internet of Things is all about employing physical sensors on internet connected devices to gather information abut the physical world, typically storing that information up into the cloud for archival or post-processing (i.e. aggregation or machine learning). Some of the more innovative projects in this space solve very interesting problems (Nest Learning Thermostat) and connect something typically disconnected from the internet (Rainmachine Wi-Fi Sprinkler System) that results in an overall improvement in efficiency, productivity, and / or utilization.
In this project, we will use a Particle Photon, powered by solar energy with a battery backup cell to push soil saturation data for six tree zones up into the Azure cloud for visualization in Power Bi. The purpose being that we will be able to monitor availability of water for these trees and eventually optimize the watering pattern to ensure optimal growth using the collected data.
The project will familiarize you with the following IoT related concepts:
- Powering a device using solar power and battery backup
- Best practices for designing testable hardware interfaces
- Code tricks for reducing power utilization to a minimum
- Limiting current draw from active circuitry
- Building a resilient weather-proof enclosure
- Storing sensor data into the cloud for archiving and processing
- Visualizing data in Power Bi
Building out systems like this has become simplified due to breakthroughs in small connected prototyping devices which build on tried and true specifications (Arduino). For example, take a look at some of the innovative devices offered through Particle.io. They specialize in creating Wi-Fi / GSM connected, Arduino-compatible microcontrollers that can be programmed through a cloud interface. Not only that, the product they produce is extremely resilient. In fact, I have 3 devices running in my home that have been operational without any need for maintenance over a 6 month time period.
These resilient web programmable devices can be augmented with cloud-connectivity. Using three lines of code and a custom library, we can connect our particle device up to the Azure cloud for storage in a mobile service. These mobile service may be deployed in a single click and offer an immediate scalable database infrastructure, REST API, Identity Management, and ability to provide push notifications to mobile devices. Essentially, a full production backend in a box, except you leave the management up to the provider, allowing the developer to focus on code. Finally, we bring in visualization through Power Bi tools which are created specifically for aggregating large datasets on-prem or in the cloud.
Ingredients:
- Azure Subscription (Trial works)
- PowerBi Subscription (Trial works)
- Particle Photon
- Pi Cobbler OR Arduino Header Pins, Ribbon Cable, and a Socket for the Ribbon Cable
- SparkFun Sunny Buddy
- Solar Cell (3W Minimum recommended, 1.4W worked for me)
- Polymer Lithium Ion Battery – 2000mAh
- Gasket Sealed Polycarbonate Enclosure
- Soil Moisture Monitors
Diagram:
Code:
1.) Powering Particle Photon using Solar Power and Battery Backup
Disclaimer: I have no idea how electricity actually works, I’m a software developer first =)
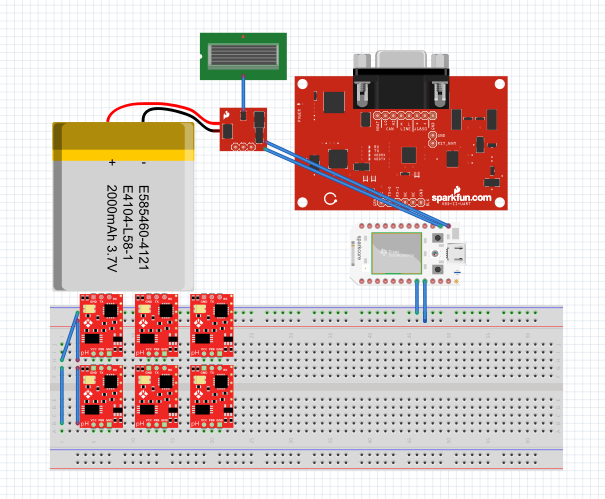
To power the Photon device using Solar Power, I opted for the solution employed in Dan Fein’s Particle Photon Weather Station Project on Hackster.io. It’s pretty straightforward, connect your SparkFun Sunny Buddy to an appropriate Solar Cell (Volts * Amps = Watts), and a battery source (larger capacity = better ability to run without sun).
2.) Best practices for designing testable hardware interfaces
When building circuity, especially when designed with permanent placement in mind, it is imperative to create a testable interface. What this means is that I can test the circuit outside of it’s place of intended operation. To do this, I used the Pi Cobbler to create a plug and play interface.
This allowed me to create a test environment for the completed project. Notice that I am connecting the interface to two probes, one in a cup of moist soil and another in a cup of dry soil and monitoring the readings as they are sent into an Azure Mobile Service.
3.) Code tricks for reducing power utilization to a minimum
When testing the device, it became clear that I could extend the life of the device when solar power is unavailable (night time, cloudy days, etc.) by employing certain programming tricks. The first was taking readings at a minimal interval and putting the device to sleep when not in use. Since we are dealing with soil readings I found a reading every 30 minutes was sufficient. In the meantime, I put the device to sleep using System.sleep(SLEEP_MODE_DEEP, ReportAndSleepIntervalInSeconds); to allow the device to operate at a mere 200uA while in the Sleep state. I also discovered that a good bit of power is used in making web requests. In my initial code, I was sending one reading per zone, but found that by consolidating all of the data into a single request, I could obtain much longer operation times from the battery.
4.) Limiting current draw from active circuitry
It makes sense to disable active circuity (Soil Moisture Monitors) while not in use. By supplying voltage to the Soil Moisture Monitors off of pin D7 on the Photon, I can turn this active circuitry on and off for reading through code without any additional hardware.
//Turn Saturation Sensors OndigitalWrite(D7, HIGH);ReadSaturationSensors();//Turn Saturation Sensors OffdigitalWrite(D7, LOW);
5.) Building a resilient weather-proof enclosure
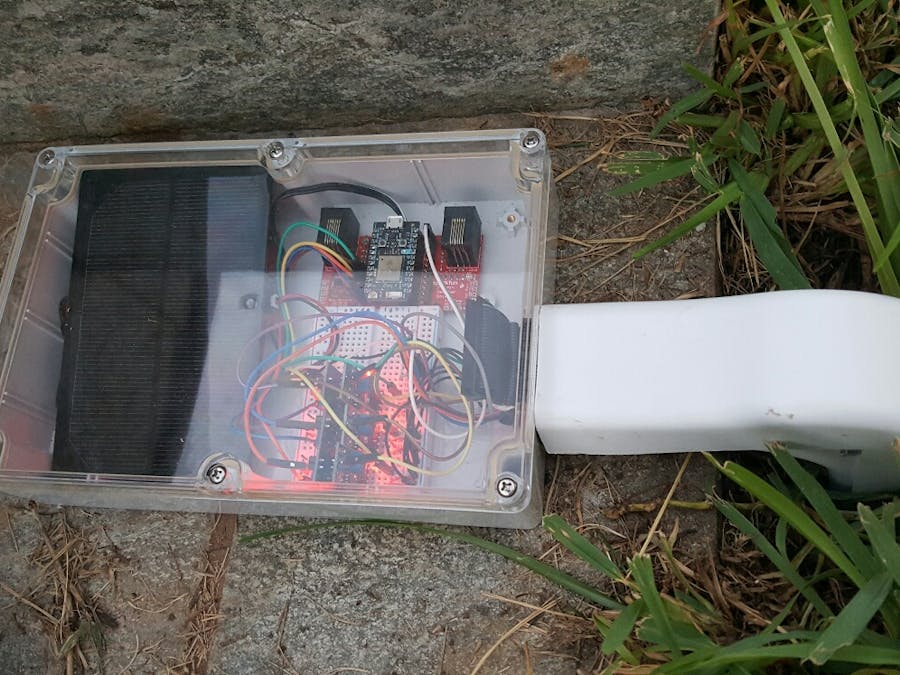
I found the local electronics store in town stocks Gasket Sealed Polycarbonate Enclosures, which are perfect for outdoor electronics projects. Make sure that your enclosure utilizes a gasket seal and that any wiring in / out of the device can be sufficiently closed off. In my design, I was able to run a ribbon cable out of the enclosure by sanding down a portion of the outer lip.
7.) Storing sensor data into the cloud for archiving and processing
For this I leverage the AzureMobileService Library for connecting publishing data from the Particle to an Azure Mobile Service. Simply create a new Mobile Service, under Data section in the Azure Portal for your service, click to add a new table named “Data” and leave all setting default. On the Photon side, import the “AzureMobileService” library, then add your MobileService name and Application Key to the MYSERVICE and MYKEY variables in your code.
8.) Visualizing data in Power Bi
Once we get the data into Microsoft Azure, it becomes very simple to create a visualization by leveraging PowerBi. to be honest, I found the tool to be very intuitive but you may wish to consult the documentation on Getting Started. After connecting to my Data Source, I simply dragged and dropped components until my data looked appropriate. The whole process took around 15 minutes with no prior training on the tool. The best part, not only is my data available for viewing in the PowerBi web dashboard, there are also Windows Store, IOS, and Android apps available for persuing the data as well!
Conclusion:
Creating this system was really interesting, mainly due to my curiosity around the above sub-problems. I found that using the code tricks mentioned above, I have been able to run the Soil Monitor system for over a month without charge! In addition, I now have a cross-platform way of viewing my data across devices that took less than 30 minutes to set up.
The data itself is interesting. We had two recent floods that I was able to view as spikes within my dashboard, this allowed me to know when to resume watering of my trees through my Rainmachine Sprinkler system. However, I have noticed that readings do change as temperature changes. This is due to temperature coefficient effects and could be explored more.
I want to stress that while the main data being gathered in this domain may not be your cup of tea, the techniques may prove valuable for other projects. I recently assisted three teams who placed at the recent TAMUHack Hackathon using techniques outlined in this post (storing data in AzureMobileService, visualization in PowerBi).
Hopefully this post has inspired a few hackers out there! Let me know what ideas you might have in the comments. Until next time, Happy Hacking!


Comments
Please log in or sign up to comment.