Description
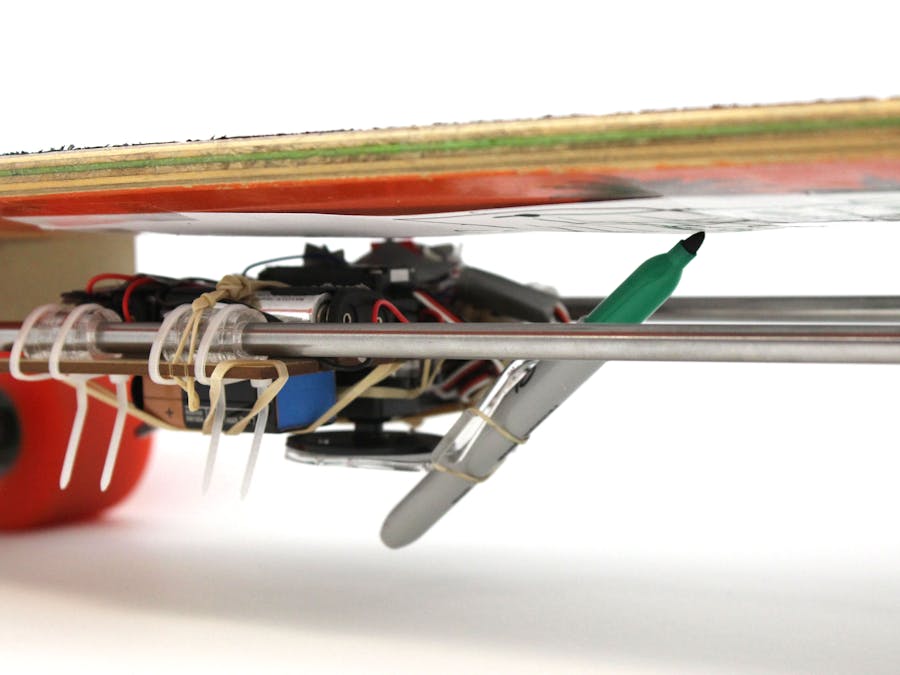
SketchBoard offers a fresh take on creating the artwork on the underside of your board. Your journey acts as the artist to your board's canvas through the use of an XY-plotter. The plotter moves a pen back and forth along the board, and rotates left and right when you turn in the respective directions. SketchBoard offers this question to riders: are we riding to create art, or is the board itself art?
Initial Brainstorm
modes of transportation:
- Snowshoes
- skiis
- snowboard
- chairlift
- slip’n’slide
- hot-air balloon
- pogo stick
- parachute
- kayak
- canoe
- flying squirrel suit
- surfboards
- boogieboards
- windsailing
- kitesailing
- cardboard on sand
- cardboard on stone/metal slide!!
- sled
- slide
- umbrella (Mary Poppins)
- broomstick
- skateboards
- segway
- scooter
- surrey (4-person bicycle car thing)
- paddleboats
- tandem bicycle
- zipline
- raft
- innertube
- hang-gliding
- rickshaw
- shopping cart
- trapeze
- bumper cars
- baby carriers
- dogsled
- waterslide
- unicycle
- stilts
- rolla-bolla
- heelys
- wakeboards
- human hamster balls
- mountain boarding
- handcart
- boxcar derby
- walker
- cane
- skimboarding
- rollerblades
- ice skates
- rock-climbing
- spiderman gloves/shoes
- waveboard
- imagination
- book
- skate/waveboard design changes as you ride it. designs and patterns based on how you ride it
- accelerometer? display of some kind
- swaggy walker, destigmatize it.
Combos:
- unicycle-wheelchair
- tandem skateboard/scooter
- tandem-bicycle: relationship test?
- rollerblade/skateboard combo
Refined Brainstorm
Main Question: are we riding to create art, or is the board itself art?
Feedback from other groups:
play around with weight (faster = lighter drawing, etc.)
lights on the edge of the board
visibility issue
affects externally
lights or wings turn on or sprout out when you go faster
matrix of LEDs on the bottom, maps out path of turning.
adjust fidelity of path based on how far you travel
translates motion into art
pacman grid (end of path = start of path on opposite sides)
lights on side are history of ride
lights change colors based on mileage
gamify it (x miles = new colors, patterns, etc.)
target professional skateboarders
films self doing tricks?
cameras
- look at people at skatepark at Clark Kerr or people at Stanley @ night
Arduino Code
SCHEMATIC DIAGRAM
FINAL PRODUCT
Progress Images
Future Questions and Considerations
Future Questions>Something we debated a lot in our team was the advantages and disadvantages of using sharpies or dry-erase markers. Although the sharpies offered more precision and permanence, the dry-erase markers offered ease of erasing and redrawing on the same sheet of paper. We also wondered how the use of e-ink could be applied to our board, removing the need for pen and paper entirely.
ConsiderationsWe considered adding a visual aspect to the sides and top of the board as well. Since the art is done on the underside, you could only see it when you stop and flip up the board. Adding side or top visuals would allow passerby's to enjoy the board as well. For the future, we also wanted to allow the board to wirelessly receive text messages and then write the messages onto the bottom of the board. Lastly, we thought of integrating the drawing device into the board itself, so that it didn't rely on the contraption we built on top of it. This would allow for a less clunky board, and then we wouldn't have to raise the axels.
Build Instructions
Step 1: Get a Longboard
Pretty self-explanatory. Find yourself a longboard you can use!
Step 2: Increase Height of Board
You'll have to increase the height of your board to make room for the XY-plotter underneath. To do this, we laser cut wood and added the wood underneath the axles, therefore extending the height of the axles.
Step 3: Cut Rod Risers
Laser cut two rod risers using our provided Illustrator file. Place them on the board on opposite sides, and move them into the board until there isn't any space underneath the risers.
Step 4: Stick Steel Rods Through Risers
After cutting your steel rods down to size, stick them into the risers
Step 5: Cut and Glue Bearings
Cut out 16 acrylic rings using our Illustrator file and glue them together in groups of 5. This will give you 4 acrylic bearings for the platform.
Step 6: Cut Servo Platform Using Illustrator File
This will be where the servors, Arduino, and batteries are all stored.
Step 7: Zip Tie Bearings to Platform
Secure the bearings into their appropriate holes using zip ties
Step 8: Place Servos, Arduino, and Batteries onto the Platform
The X-axis servo will fit into a hole, while the Y-axis servo is held down via rubber bands and acrylic circles. The pen holder is also glued onto the X-axis servo. Batteries and the Arduino are rubber banded and screwed respectively onto the underside of the platform.
Step 9: Create Splitter Wires for Arduino
Solder wires together to make splitters for the servo power and ground.
Step 10: Hook Accelerometer into Arduino
Place the accelerometer into the analog pins of the Arduino
Step 11: Load Code into Arduino
Load the code on our page into the Arduino
Step 12: Connect batteries to Arduino and Servos
Hook up servos before the Arduino!
Step 13: Begin Your Journey!
Ride out and make art!
ILLUSTRATOR LASERCUT FILE
Demo In Situ
We talked with Pro Longboarder JP-Z about his experience with the SketchBoard


_ztBMuBhMHo.jpg?auto=compress%2Cformat&w=48&h=48&fit=fill&bg=ffffff)

Comments
Please log in or sign up to comment.